Install the Azure Stack HCI, version 23H2 operating system
Applies to: Azure Stack HCI, version 23H2
This article describes the steps needed to install the Azure Stack HCI, version 23H2 operating system locally on each server in your cluster.
Prerequisites
Before you begin, make sure you do the following steps:
- Satisfy the prerequisites.
- Prepare your Active Directory environment.
- Make sure to keep a password handy to use to sign in to the operating system. This password must conform to the length and complexity requirements. Use a password that is at least 12 characters long and contains a lowercase character, an uppercase character, a numeral, and a special character.
Boot and install the operating system
To install the Azure Stack HCI, version 23H2 operating system, follow these steps:
Download the Azure Stack HCI operating system from the Azure portal.
Start the Install Azure Stack HCI wizard on the system drive of the server where you want to install the operating system.
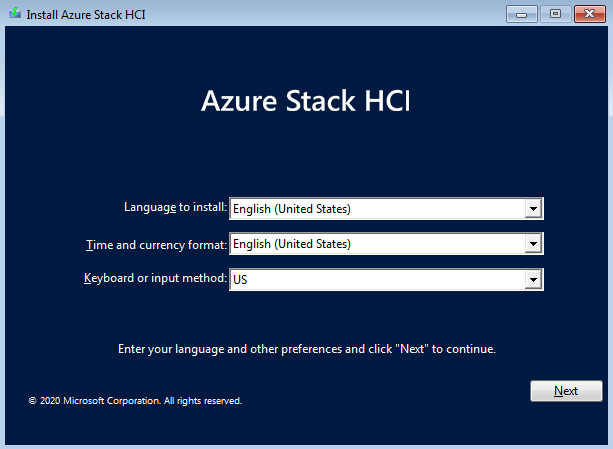
Choose the language to install or accept the default language settings, select Next, and then on next page of the wizard, select Install now.
On the Applicable notices and license terms page, review the license terms, select the I accept the license terms checkbox, and then select Next.
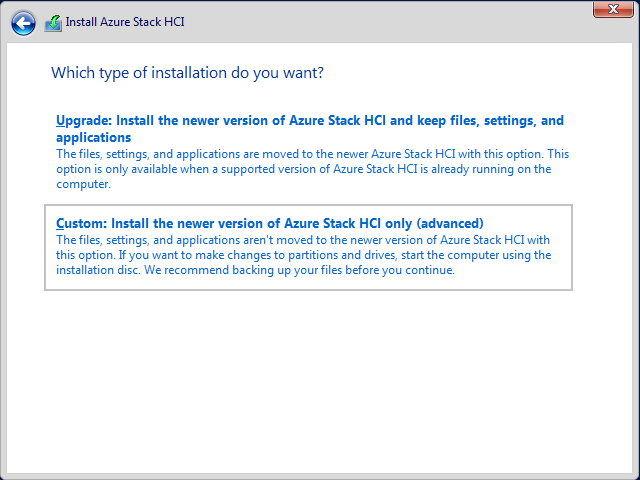
On the Which type of installation do you want? page, select Custom: Install the newer version of Azure Stack HCI only (advanced).
Note
Upgrade installations are not supported in this release of the operating system.
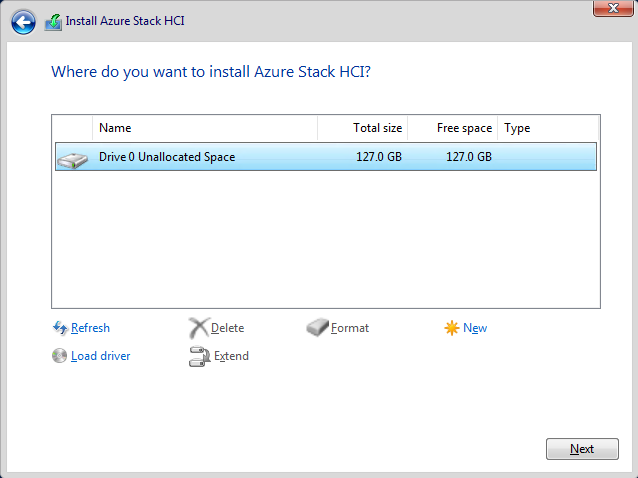
On the Where do you want to install Azure Stack HCI? page, confirm the drive on which the operating system is installed, and then select Next.
Note
If the hardware was used before, run
diskpartto clean the OS drive. For more information, see how to use diskpart. Also see the instructions in Clean drives.The Installing Azure Stack HCI page displays to show status on the process.

Note
The installation process restarts the operating system twice to complete the process, and displays notices on starting services before opening an Administrator command prompt.
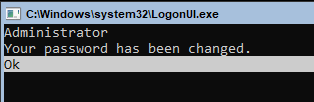
At the Administrator command prompt, select Ok to change the user's password before signing in to the operating system, then press Enter.

At the Enter new credential for Administrator prompt, enter a new password.
Important
Make sure that the local administrator password follows Azure password length and complexity requirements. Use a password that is at least 12 characters long and contains a lowercase character, an uppercase character, a numeral, and a special character.
Enter the password again to confirm it, then press Enter.
At the Your password has been changed confirmation prompt, press Enter.


Now you're ready to use the Server Configuration tool (SConfig) to perform important tasks.
Configure the operating system using SConfig
You can use SConfig to configure Azure Stack HCI version 23H2 after installation.
To use SConfig, sign in to the server running the Azure Stack HCI operating system. This could be locally via a keyboard and monitor, or using a remote management (headless or BMC) controller, or Remote Desktop. The SConfig tool opens automatically when you sign in to the server.

Important
Do not install Windows Updates using SConfig. Updates are installed during the deployment. Installing updates using SConfig causes a deployment failure.
Follow these steps to configure the operating system using SConfig:
Install the latest drivers and firmware as per the instructions provided by your hardware manufacturer. You can use SConfig to run driver installation apps. After the installation is complete, restart your servers.
Configure networking as per your environment. You can configure the following optional settings:
- Configure VLAN IDs for the management network. For more information, see Management VLAN ID and Management VLAN ID with a virtual switch.
- Configure DHCP for the management network. For more information, see DHCP IP assignment.
- Configure a proxy server. For more information, see Configure proxy settings for Azure Stack HCI, version 23H2.
Use the Network Settings option in SConfig to configure a default valid gateway and a DNS server. Set DNS to the DNS of the domain you're joining.
Configure a valid time server on each server. Validate that your server is not using the local CMOS clock as a time source, using the following command:
w32tm /query /statusTo configure a valid time source, run the following command:
w32tm /config /manualpeerlist:"ntpserver.contoso.com" /syncfromflags:manual /updateConfirm that the time is successfully synchronizing using the new time server:
w32tm /query /statusOnce the server is domain joined, it synchronizes its time from the PDC emulator.
(Optional) At this point, you can enable Remote Desktop Protocol (RDP) and then RDP to each server rather than use the virtual console. This action should simplify performing the remainder of the configuration.
Clean all the non-OS drives for each server that you intend to deploy. Remove any virtual media that have been used when installing the OS. Also validate that no other root drives exist.
Restart the servers.
Set the local administrator credentials to be identical across all servers.
Note
- Make sure that the local administrator password follows Azure password length and complexity requirements. Use a password that is at least 12 characters long and contains a lowercase character, an uppercase character, a numeral, and a special character.
- Do not join the servers with the Azure Stack HCI operating system installed, to the Active Directory domain prior to cloud deployment. Cluster nodes are automatically joined to a domain during the Deployment via Azure portal.
Install required Windows roles
Install the Hyper-V role. Run the following command on each server of the cluster:
Enable-WindowsOptionalFeature -Online -FeatureName Microsoft-Hyper-V -AllYour servers will restart; this takes a few minutes.
You are now ready to register the Azure Stack HCI server with Azure Arc and assign permissions for deployment.
Next steps
Feedback
Kommer snart: I hele 2024 udfaser vi GitHub-problemer som feedbackmekanisme for indhold og erstatter det med et nyt feedbacksystem. Du kan få flere oplysninger under: https://aka.ms/ContentUserFeedback.
Indsend og få vist feedback om