Configure cloud hybrid search - roadmap
APPLIES TO:  2013 2016 2019 Subscription Edition SharePoint in Microsoft 365
Learn how to configure cloud hybrid search for SharePoint Server by setting up a cloud Search service application in your SharePoint Server environment and connecting it to your search index in Office 365.
This article describes how you set up cloud hybrid search in an environment with SharePoint Server and SharePoint in Microsoft 365 for enterprises. With the cloud hybrid search solution, you add crawled metadata from all your content, including on-premises content, to your search index in Office 365. When users search in Microsoft 365, they get search results from both on-premises and from Microsoft 365 content.
Note
If you are a Microsoft 365 Dedicated customer, setting up cloud hybrid search requires engagement of SharePoint Service Engineering staff. For assistance, contact your Microsoft Service Delivery Manager. If you aren't sure what type of customer you are, you can safely disregard this note.
Before you start
To complete the configuration steps you'll need these items:
The hardware and software that's needed in a SharePoint Server hybrid environment.
An on-premises server or virtual machine for cloud hybrid search that has:
Minimum 100 GB storage, 16 GB RAM, and four 1.8 GHz CPUs.
SharePoint Server installed.
Is a member of a Windows Server Active Directory domain.
(SharePoint Server 2013 only) You must have at least Service Pack 1 and the January 2016 public update installed.
The accounts that are needed in a SharePoint Server hybrid environment, a search account for cloud hybrid search in SharePoint Server, and a managed account for default content access in SharePoint Server. Ensure that the account for default content access has at least read access to the content to crawl.
Your company's or organization's SharePoint portal URL, such as https://<yourtenantname>.sharepoint.com
The search architecture plan you made for cloud hybrid search.
If you'll use the Hybrid Configuration Wizard in the SharePoint admin center to help you configure, ensure that the application farm that hosts the SharePoint Server Central Administration website has .NET 4.6.2 or higher installed.
If you'll use the CreateCloudSSA.ps1 and Onboard-CloudHybridSearch.ps1 Microsoft PowerShell scripts to help you configure, find them in the Microsoft Download Center. You'll also need the Microsoft Online Services Sign-In Assistant for IT Professionals RTW and the Microsoft Graph Powershell module.
Follow these steps:
If you already completed step 1 when you configured a different hybrid solution, skip that step and go to the next.
| Step |
Description |
|---|---|
| 1. Configure Microsoft 365 for SharePoint hybrid |
Configure your Microsoft 365 organization for a hybrid environment, including registering your domain, configuring UPN suffixes, and synchronizing your on-premises user accounts with Microsoft 365. |
| 2. Create a cloud Search service application in SharePoint Server |
Run the Hybrid Configuration Wizard on the application farm that hosts the SharePoint Server Central Administration website. Alternatively, run the CreateCloudSSA.ps1 PowerShell script. |
| 3. Connect your cloud Search service application to your Microsoft 365 organization |
If you used the Hybrid Configuration Wizard to create a cloud Search service application, skip this step. The Hybrid Configuration Wizard automatically connected your environments. Otherwise, run the Onboard-CloudHybridSearch.ps1 PowerShell script to onboard your cloud SSA and Microsoft 365 organization to cloud hybrid search. The script sets up the cloud SSA to interact with the Microsoft 365 organization and also sets up server-to-server authentication. |
| 4. Set up search architecture in SharePoint Server for cloud hybrid search |
This step is optional. If you planned a search architecture that's different from the default one, set up the planned search architecture. |
| 5. Create a content source for cloud hybrid search to crawl |
We recommend adding a small file share first, you can add more on-premises content later. |
| 6. Set up a separate Search Center in Office 365 to validate hybrid search results |
Keep the existing search experience unchanged by setting up a separate Search Center in Office 365 so you can validate and tune the new search experience there. |
| 7. Start a full crawl of on-premises content for cloud hybrid search |
When the crawl completes, your on-premises content shows up in the search results in your validation Search Center in Office 365 and in Office Delve. |
| 8. Verify that cloud hybrid search works |
Go to your Search Center in SharePoint in Microsoft 365 and enter this query: "IsExternalContent:true". The results you get should show content from the on-premises content source that you've crawled. |
| 9. Tune cloud hybrid search |
Set up and tune the search experiences you've planned for your users. |
| 10. Remove the validation Search Center and expose all users to hybrid search results. |
Set your Search Center and any site search in Microsoft 365 to use the default result source and set up the default result source with the search experiences that you've tuned. Your on-premises content shows up in the search results in your Search Center in Office 365, site search in Microsoft 365, and in Office Delve. |
Create a cloud Search service application in SharePoint Server
The cloud SSA lets you crawl and add metadata from on-premises content to the search index in Office 365. Each search farm can have only one cloud SSA, but can have multiple SSAs in combination with the cloud SSA. You can't convert an existing SSA to a cloud SSA.
Note
If your organization restricts computers from connecting to the internet, you need to allow access to the endpoints (FQDNs) that cloud hybrid search uses. Include the endpoints in your outbound allow lists. The endpoints are listed in the SharePoint in Microsoft 365 section of the article Microsoft 365 URLs and IP address ranges and are marked for use with Hybrid Search.
Use the Hybrid Configuration Wizard to connect your SharePoint Server and Microsoft 365 environments and create the cloud Search service application.
On the application server that hosts the SharePoint Server Central Administration website:
Log on to the console as a farm administrator.
Connect to Office 365 as one of the following roles:
- Global Administrator
- Application Administrator
- Cloud Application Administrator
Navigate to https://go.microsoft.com/fwlink/?linkid=867176 to download, install, and start the Hybrid Configuration Wizard.
Follow the prompts in the Hybrid Configuration Wizard and select the hybrid search feature.
The Hybrid Configuration Wizard lets you choose between a cloud SSA with the default search architecture on the application server that hosts the SharePoint Server Central Administration website, or a cloud SSA with a search architecture on two application servers (supports high availability).
The Hybrid Configuration Wizard saves you time because it also connects the cloud SSA to your Microsoft 365 organization (step 3).
Alternative methods for creating a cloud Search service application
You can also create the cloud SSA as follows:
You can download the CreateCloudSSA.ps1 Powershell script from the Microsoft Download Center and run it. The script lets you choose between a cloud SSA with the default search architecture on the application server that hosts the SharePoint Server Central Administration website, or a cloud SSA with a search architecture on two application servers (supports high availability).
You can use the SharePoint Central Administration website, just like you would for an SSA. With this method you get a cloud SSA and the default search architecture installed on the application server that hosts the SharePoint Server Central Administration website.
To create a cloud SSA by running the CreateCloudSSA.ps1 PowerShell script, follow these instructions.
Note
When you installed SharePoint Server, the user account from which you ran the installation was granted the appropriate permissions to run Windows PowerShell cmdlets.
On the application server that hosts the SharePoint Server Central Administration website, follow these steps:
Make sure you're using the same user account as when you installed SharePoint Server. This account is granted the appropriate permissions to run Window Powershell cmdlets.
Start the Windows PowerShell console with administrator privileges: Select Start, enter PowerShell, and then right-click Windows PowerShell, and select Run as administrator.
Run the CreateCloudSSA.ps1 PowerShell script.
When prompted, enter:
The host name of the search server in SharePoint Server.
If you've planned highly available search, the host name of the second search server.
The Search service account in this format: domain\username.
A name of your choice for the cloud SSA.
The name of the database server in SharePoint Server.
Verify that you see the message that the cloud SSA was successfully created.
Can I make my own Windows PowerShell script for creating a cloud SSA?
If you want to make your own PowerShell script for creating a cloud SSA, first study the CreateCloudSSA.ps1 PowerShell script we've provided. Notice that the difference between creating a cloud SSA and an SSA is the value of the property CloudIndex. You set CloudIndex: true when you create a cloud SSA (you can't change this value later). When CloudIndex is true, crawled metadata is not added to the on-premises search index. However, this doesn't mean that the metadata is added to the Microsoft 365 search index, you have to onboard the cloud SSA to cloud hybrid search for that to happen (see Connect your cloud Search service application to your Microsoft 365 organization). Ensure that your PowerShell script:
Tests that the Search service account is a managed account, and makes it a managed account if it isn't.
Includes -CloudIndex $true as an argument when it uses the New-SPEnterpriseSearchServiceApplication PowerShell cmdlet.
Connect your cloud Search service application to your Microsoft 365 organization
Note
If you used the Hybrid Configuration Wizard to create a cloud Search service application, then you can skip this step.
This section guides you how to onboard your cloud SSA and Microsoft 365 organization to cloud hybrid search and covers:
Connecting your cloud SSA and your Microsoft 365 organization - When your cloud SSA and your Microsoft 365 organization are correctly connected, the cloud hybrid search solution is ready to add crawled metadata from on-premises content to the search index in Office 365. When you've onboarded your cloud SSA, check to see that your cloud SSA has the value 1 for the property IsHybrid. You check by running this PowerShell command: $ssa.GetProperty("CloudIndex").
Configuring server-to-server authentication - Server-to-server authentication allows servers to access and request resources from one another on behalf of users.
On the application server that hosts the SharePoint Server Central Administration website, follow these steps:
Ensure that the date and time of the server is synchronized with the other servers in the SharePoint Server farm.
Download and install the Microsoft Online Services Sign-In Assistant for IT Professionals RTW from the Microsoft Download Center.
Download and install the latest version of the Microsoft Graph PowerShell module from the PowerShell Gallery.
Download the OnBoard-CloudHybridSearch.ps1 PowerShell script from the Microsoft Download Center.
If your environment is Microsoft 365 Apps for business, Office 365 Enterprise, Office 365 Education, Office 365 operated by 21Vianet, or Office 365 US Government Defense, open an elevated PowerShell prompt, and run the OnBoard-CloudHybridSearch.ps1 PowerShell script as follows:
#For service principals
Import-Module Microsoft.Graph.Applications

#For fetching organization details
Import-Module Microsoft.Graph.Identity.DirectoryManagement
.\OnBoard-CloudHybridSearch.ps1 -PortalUrl <SPOTenantPortalUrl> -CloudSsaId <CloudSSANameCreatd>SPOTenantPortalUrl is the URL of your company's or organization's SharePoint portal, and CloudSsaID is the name of the cloud SSA that you created earlier.
If your environment is Office 365 US Government Communication, open an elevated PowerShell prompt, and run the OnBoard-CloudHybridSearch.ps1 PowerShell script as follows:
Import-Module Microsoft.Graph.Applications
Import-Module Microsoft.Graph.Identity.DirectoryManagement
.\OnBoard-CloudHybridSearch.ps1 -PortalUrl <SPOTenantPortalUrl> -CloudSsaId <CloudSSANameCreatd> -IsPortalForUSGovernment $trueSPOTenantPortalUrl is the URL of your company's or organization's SharePoint portal, and CloudSsaID is the name of the cloud SSA that you created earlier.
When prompted, use one of the following admin roles to sign in your Office 365 tenant:
- Global Admin
- Application Admin
- Cloud Application Admin
Set up search architecture in SharePoint Server for cloud hybrid search
If you planned to use the default search architecture that you get when creating a cloud SSA, you can skip this step.
Otherwise, ensure that you have prepared the servers you need for your planned search architecture for cloud hybrid search, and follow the guidance for setting up your planned search architecture. This guidance is applicable also for cloud hybrid search.
Create a content source for cloud hybrid search to crawl
We recommend that you start with a small on-premises content source, for example a small file share, to test. You can add more on-premises content sources later.
Verify that the user account that is performing this procedure is an administrator for the cloud SSA.
On the home page of Central Administration, in the Application Management section, select Manage service applications.
On the Manage Service Applications page, select the cloud SSA.
On the Search Administration page, in the Crawling section, select Content Sources.
On the Manage Content Sources page, select New Content Source.
On the Add Content Source page, in the Name section, in the Name box, enter a name for the new content source.
In the Content Source Type section, select the type of content that you want to crawl.
In the Start Addresses section, in the Type start addresses below (one per line) box, type the URLs from which the crawler should begin crawling.
In the Crawl Settings section, select the crawling behavior that you want.
In the Crawl Schedules section, to specify a schedule for full crawls, select a defined schedule from the Full Crawl list. A full crawl crawls all content that is specified by the content source, regardless of whether the content has changed. To define a full crawl schedule, select Create schedule.
To specify a schedule for incremental crawls, select a defined schedule from the Incremental Crawl list. An incremental crawl crawls content that is specified by the content source that has changed since the last crawl. To define a schedule, select Create schedule. You can change a defined schedule by clicking Edit schedule.
To set the priority of this content source, in the Content Source Priority section, on the Priority list, select Normal or High.
Select OK.
Set up a separate Search Center in Office 365 to validate hybrid search results
After you've set up cloud hybrid search and completed a full crawl of your on-premises content, your existing Search Center in Office 365 as well as Office Delve will automatically show both on-premises and online search results. Before you start the full crawl, we recommend that you create a new, separate Search Center. Set it up to show the mixed on-premises and online search results. This way you can validate and tune the new search experience in the separate Search Center, while you keep the existing Search Center unchanged.
Follow these steps to set up a separate Search Center in Office 365:
Create a result source that retrieves search results from the search index of this tenant, but limits search results to Microsoft 365 content by using a Query Transform. Change the default query transform to "{?{searchTerms} NOT IsExternalContent:true}". This works because content that has the managed property IsExternalContent set to true (see About the IsExternalContent managed property) in the SharePoint in Microsoft 365 search schema, is on-premises content.
Modify the Search Results Web Part in your Microsoft 365 Search Center to use the result source that you just created. Your users get the original search experience in this Search Center.
Create a second Microsoft 365 Search Center that uses the default result source. This Search Center has hybrid search results when you've run a full crawl. Validate and tune your new search experience in this Search Center.
Set up access so only testers and administrators have access to the second Microsoft 365 Search Center.
Here's an example of a validation environment:
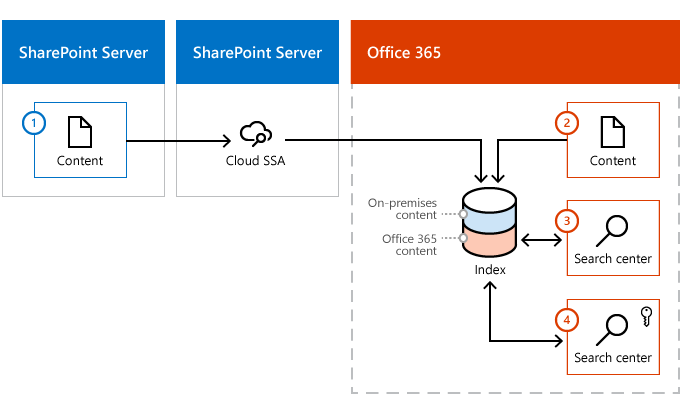
On-premises content. During crawl, content is added to the Microsoft 365 index.
Microsoft 365 content. During crawl, content is added to the Microsoft 365 index.
Default (or existing) Microsoft 365 Search Center. This Search Center uses the custom result source that limits search results to only Microsoft 365 content.
Second Microsoft 365 Search Center, where you validate and tune how hybrid search results are shown. This Search Center uses the default result source and shows search results from both on-premises and Microsoft 365 content.
About the IsExternalContent managed property
An important part in this environment is the custom result source you use in the default or existing Microsoft 365 Search Center. This result source keeps the search experience unchanged while you validate and tune how hybrid search results are displayed. An important piece in this custom result source is the IsExternalContent managed property in the SharePoint in Microsoft 365 search schema. Before you set up cloud hybrid search, this managed property is empty. But, after you've set up cloud hybrid search and crawled your on-premises content, this property is set to true for all on-premises content. You can therefore limit search results to show only Microsoft 365 content with NOT IsExternalContent:true .
Start a full crawl of on-premises content for cloud hybrid search
Start a full crawl of the content source. See Start, pause, resume, or stop a crawl in SharePoint Server 2013 or follow these steps:
Verify that the user account that is performing this procedure is an administrator for the Cloud Search service application.
On the home page of the SharePoint Central Administration website, in the Application Management section, select Manage service applications.
On the Manage Service Applications page, select the cloud Search service application.
On the Search Administration page, in the Crawling section, select Content Sources.
On the Manage Content Sources page, in the list of content sources, point to the name of the content source that you want to crawl, select the arrow and then select Start Full Crawl. The value in the Status column changes to Crawling Full for the selected content source.
Verify that cloud hybrid search works
After the full crawl completes, verify that your on-premises content shows up in the search results in your validation Search Center in Office 365.
Log in to Microsoft 365 with your work or school account. Make sure that:
You have access to the validation Search Center.
You have access to the content in the content source that you have crawled. If you performed step 1 of this roadmap, you should have access.
Your organization hasn't assigned user access rights to the on-premises content by using one of the default security groups in Windows Server Active Directory (AD), for example the Domain Users security group, see Plan cloud hybrid search for SharePoint.
Search for IsExternalContent:1 in the validation Search Center. The results you get should show content from the on-premises content source that you've crawled.
Verify that your on-premises content shows up in the search results.
Tune cloud hybrid search
After you've set up cloud hybrid search and verified that you get search results from on-premises content in your validation Search Center in Office 365, set up the search experiences that you planned.
You might find this guidance useful:
With cloud hybrid search you manage the search schema in SharePoint in Microsoft 365, just as you would in a Microsoft 365 environment. Learn how in Manage the Search Center in SharePoint in Microsoft 365.
You manage how search results are displayed from the search schema in SharePoint in Microsoft 365, see Manage the Search Center in SharePoint in Microsoft 365. If you've set up site search in SharePoint Server to get search results the Microsoft 365, you also manage how these results are displayed from the search schema in SharePoint in Microsoft 365.
Enable previews of on-premises search results in cloud hybrid search .
Show results from Microsoft 365 in on-premises SharePoint with cloud hybrid search.
To publish your SharePoint Server site and make it accessible for your users, follow the best practices in Plan for Internet, intranet, and extranet publishing sites in SharePoint Server.
To open a link from a search result that comes from on-premises content, users have to either be connected to the on-premises intranet via a Virtual Private Network (VPN) connection or be logged on to where the content is stored. Alternatively, you enable users to open such links by installing a reverse proxy device for SharePoint Server.
After setting up and validating the planned search experiences, you might want to clear your search index in Office 365 for metadata from the on-premises content you've used during this work. This works differently from what you might be familiar with from SharePoint Server.
In the SharePoint Central Administration website you can use the option "Index reset" for an SSA to remove all content from the search index. This option does not work for cloud hybrid search because there is no direct communication between the cloud SSA in SharePoint Server and the search index in Office 365. If you only want to remove some on-premises metadata, remove that on-premises content source, or create a crawl rule that doesn't crawl the URL of a file. If you need to remove all metadata from on-premises content from the search index in Office 365, open a ticket with Microsoft Support.
Proxy Considerations
If the SharePoint farm is behind a forward proxy (that is, traffic destined for the Internet must be sent through a proxy server), it may be necessary to configure additional proxy settings. Follow the steps outlined in Configure proxy server settings for Search in SharePoint Server.
In addition, it may be necessary to configure the machine.config to support the proxy. This file resides at C:\Windows\Microsoft.NET\Framework64\v4.0.30319\Config\machine.config. More information on configuring the appropriate element can be found at Network Settings Schema.
Related Topics
Learn about cloud hybrid search for SharePoint in Microsoft 365