Getting Started by Creating Android App and Codesigning
Important
Visual Studio App Center is scheduled for retirement on March 31, 2025. While you can continue to use Visual Studio App Center until it is fully retired, there are several recommended alternatives that you may consider migrating to.
In this tutorial, you'll learn to set up a sample Android app with App Center.
Prerequisite Steps
Sign in to GitHub and fork the repository
- Sign in to your GitHub account.
- Access the sample app's GitHub repository.
- Click Fork at the top-right hand corner of the page.
Sign in to App Center
- Open the App Center portal.
- Click Connect with GitHub and sign in, or use another provider.
Create a new app in App Center
- Click Add new app.
- Name the app Sample Android App.
- Choose Android and Java respectively.
- Click Add new app.
Replace the App Secret
In order for the sample app to send information to App Center, the app secret must be changed to match the one provided for your specific App Center project.
- Navigate to your app page in App Center by clicking it in the Apps list.
- Go to the settings of your app by clicking Settings in the left sidebar.
- Click the three dots in the upper right corner to open the context menu and then within it, click Copy app secret.
- Go into the sampleapp_android repository and navigate into MainActivity.java
- In the project's MainActivity.java, locate the following. Note: You can also find the code snippet with your specific app secret on the Getting Started page in the App Center portal.
@Override
protected void onCreate(Bundle savedInstanceState) {
        AppCenter.start(getApplication(), "<APP SECRET HERE>",
                Analytics.class, Crashes.class);
- Replace
<APP SECRET HERE>with your unique app secret. - Add, commit, and push changes to your forked repository. This action can be done from the terminal, or a tool of your choice.
Sign the Android Package Kit (APK)
Code signing is optional, but recommended. To run tests and distribute the app to users, the APK must be digitally signed with a certificate. After creating an App ID for the sample app, follow the steps below to manually sign the APK. To learn what a digital certificate is, or for signing options other than the one outlined below, refer to the Android Developer Documentation.
Open Android Studio and click Open an existing Android Studio project.
Navigate to the forked sample app repository location on your machine and upload it to Android Studio.
Go to Build Variants in the leftmost panel and click it.
Make sure that the build variant is set to release.
Go to Build > Generate Signed APK from the menu bar.
Leave Module: app and click Next.
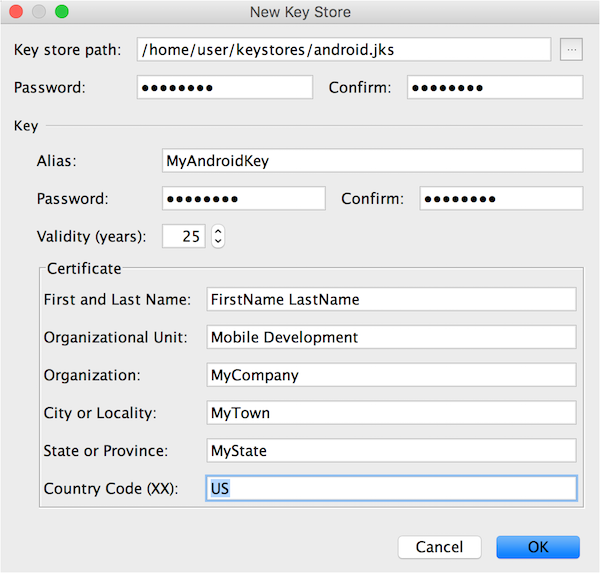
In Key store path, click Create new... and create the keystore as per the following image from the Android Developer Documentation:
Click OK. The Key store password, Key alias and Key password should automatically fill in with the information from your new keystore. Click Next.
Select a destination for the signed APK, make sure Build Type is set to release, and select both signature versions V1 and V2. Click Finish.
Gradle should automatically begin to build. After everything syncs up, you should find your signed APK in the specified destination folder.
Add, commit, and push changes to your forked repository.
Optional: Run app in Android Studio and read descriptions
The crashes and analytics services must be linked to the app in order for the associated buttons to send trackable data to App Center. Go to the crash quickstart and analytics quickstart for further details.
Feedback
Coming soon: Throughout 2024 we will be phasing out GitHub Issues as the feedback mechanism for content and replacing it with a new feedback system. For more information see: https://aka.ms/ContentUserFeedback.
Submit and view feedback for