Sign in users in a sample Node.js CLI application.
This guide uses a sample Node Command Line Interface (CLI) application to sign in users in an external tenant. The sample application uses the Microsoft Authentication Library for Node (MSAL Node) to handle authentication.
In this article, you complete the following tasks:
Register and configure a client Node.js CLI application in the Microsoft Entra admin center.
Create a sign-up and sign-in user flow in the Microsoft Entra admin center, and then associate the CLI application with it.
Update the sample CLI application to use your external tenant details.
Run and test the sample CLI application.
Prerequisites
- Visual Studio Code or another code editor.
- Node.js.
- An external tenant. If you don't already have one, sign up for a free trial.
Register the Node.js CLI app
To enable your application to sign in users with Microsoft Entra, Microsoft Entra External ID must be made aware of the application you create. The app registration establishes a trust relationship between the app and Microsoft Entra. When you register an application, External ID generates a unique identifier known as an Application (client) ID, a value used to identify your app when creating authentication requests.
The following steps show you how to register your app in the Microsoft Entra admin center:
Sign in to the Microsoft Entra admin center as at least an Application Developer.
If you have access to multiple tenants, use the Settings icon
 in the top menu to switch to your external tenant from the Directories + subscriptions menu.
Browse to Identity >Applications > App registrations.
Select + New registration.
In the Register an application page that appears;
- Enter a meaningful application Name that is displayed to users of the app, for example ciam-client-app.
- Under Supported account types, select Accounts in this organizational directory only.
Select Register.
The application's Overview pane displays upon successful registration. Record the Application (client) ID to be used in your application source code.
Add platform configurations
To specify your app type to your app registration, follow these steps:
- Under Manage, select Authentication.
- On the Platform configurations page, select Add a platform, and then select Mobile and desktop applications.
- For the Custom redirect URIs, enter
http://localhost. - Select Configure to save your changes.
To identify your app as a public client, follow these steps:
Under Manage, select Authentication.
Under Advanced settings, for Allow public client flows, select Yes.
Select Save to save your changes.
Grant API permissions
Since this app signs in users, add delegated permissions. These permissions allow the app to act on behalf of a signed-in user and access resources that the user has permissions to access.
From the App registrations page, select the application that you created (such as ciam-client-app) to open its Overview page.
Under Manage, select API permissions.
Under Configured permissions, select Add a permission.
Select Microsoft APIs tab.
Under Commonly used Microsoft APIs section, select Microsoft Graph.
Select Delegated permissions option.
Under Select permissions section, search for and select both openid and offline_access permissions.
Select the Add permissions button.
At this point, you've assigned the permissions correctly. However, since the tenant is a customer's tenant, the consumer users themselves can't consent to these permissions. You as the admin must consent to these permissions on behalf of all the users in the tenant:
- Select Grant admin consent for <your tenant name>, then select Yes.
- Select Refresh, then verify that Granted for <your tenant name> appears under Status for both scopes.
Create a user flow
Follow these steps to create a user flow a customer can use to sign in or sign up for an application.
Sign in to the Microsoft Entra admin center as at least an External ID User Flow Administrator.
If you have access to multiple tenants, use the Settings icon
in the top menu to switch to your external tenant from the Directories + subscriptions menu.Browse to Identity > External Identities > User flows.
Select + New user flow.
On the Create page:
Enter a Name for the user flow, such as SignInSignUpSample.
In the Identity providers list, select Email Accounts. This identity provider allows users to sign-in or sign-up using their email address.
Under Email accounts, you can select one of the two options. For this tutorial, select Email with password.
- Email with password: Allows new users to sign up and sign in using an email address as the sign-in name and a password as their first factor credential.
- Email one-time-passcode: Allows new users to sign up and sign in using an email address as the sign-in name and email one-time passcode as their first factor credential. Email one-time passcode must be enabled at the tenant level (All Identity Providers > Email One-time-passcode) for this option to be available at the user flow level.
Under User attributes, choose the attributes you want to collect from the user upon sign-up. By selecting Show more, you can choose attributes and claims for Country/Region, Display Name, and Postal Code. Select OK. (Users are only prompted for attributes when they sign up for the first time.)
Select Create. The new user flow appears in the User flows list. If necessary, refresh the page.
To enable self-service password reset, use the steps in Enable self-service password reset article.
Associate the Node.js CLI application with the user flow
Although many applications can be associated with your user flow, a single application can only be associated with one user flow. A user flow allows configuration of the user experience for specific applications. For example, you can configure a user flow that requires users to sign in or sign up with email address.
On the sidebar menu, select Identity.
Select External Identities, then User flows.
In the User flows page, select the User flow name you created earlier, for example, SignInSignUpSample.
Under Use, select Applications.
Select Add application.
Select the application from the list such as ciam-client-app or use the search box to find the application, and then select it.
Choose Select.
Clone or download the sample Node.js CLI application
To obtain the sample application, you can either clone it from GitHub or download it as a .zip file.
To clone the sample, open a command prompt and navigate to where you wish to create the project, and enter the following command:
git clone https://github.com/Azure-Samples/ms-identity-ciam-javascript-tutorial.gitDownload the .zip file. Extract it to a file path where the length of the name is fewer than 260 characters.
Configure the sample Node.js CLI application
To configure the client application (Node.js CLI app) to use your Microsoft Entra app registration details, open the project in your IDE and follow these steps:
Open the App\authConfig.js file.
Find the placeholder:
Enter_the_Application_Id_Hereand replace the existing value with the application ID (clientId) ofnode-cli-appapplication copied from the Microsoft Entra admin center.Enter_the_Tenant_Subdomain_Hereand replace it with the Directory (tenant) subdomain. For example, if your tenant primary domain iscontoso.onmicrosoft.com, usecontoso. If you don't have your tenant name, learn how to read your tenant details
Run and test the sample Node.js CLI application
You can now test the sample Node.js CLI application.
In your terminal, run the following command:
cd 1-Authentication\6-sign-in-node-cli-app\App
npm start
The browser opens up automatically and you should see a page similar to the following:
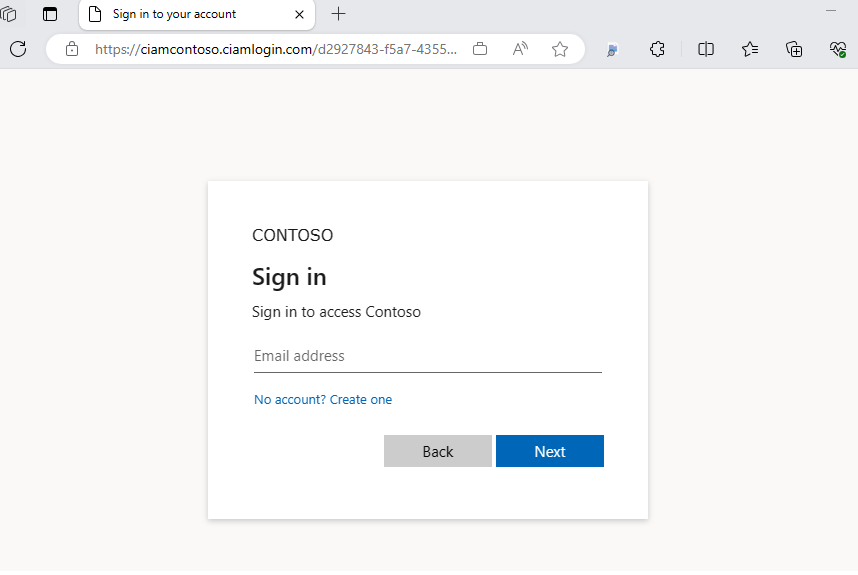
On the sign-in page, type your Email address. If you don't have an account, select No account? Create one, which starts the sign-up flow.
If you choose the sign-up option, after filling in your email, one-time passcode, new password, and more account details, you complete the whole sign-up flow. After completing the sign up flow and signing in, you see a page similar to the following screenshot:
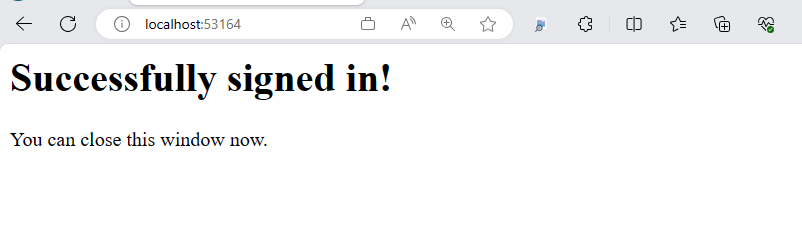
Move back to the terminal and see your authentication information including the ID token claims.
Related content
Feedback
Coming soon: Throughout 2024 we will be phasing out GitHub Issues as the feedback mechanism for content and replacing it with a new feedback system. For more information see: https://aka.ms/ContentUserFeedback.
Submit and view feedback for