Deploy a flow for real-time inference
Note
Azure AI Studio is currently in public preview. This preview is provided without a service-level agreement, and we don't recommend it for production workloads. Certain features might not be supported or might have constrained capabilities. For more information, see Supplemental Terms of Use for Microsoft Azure Previews.
After you build a prompt flow and test it properly, you might want to deploy it as an online endpoint. Deployments are hosted within an endpoint, and can receive data from clients and send responses back in real-time.
You can invoke the endpoint for real-time inference for chat, copilot, or another generative AI application. Prompt flow supports endpoint deployment from a flow, or from a bulk test run.
In this article, you learn how to deploy a flow as a managed online endpoint for real-time inference. The steps you take are:
- Test your flow and get it ready for deployment.
- Create an online deployment.
- Grant permissions to the endpoint.
- Test the endpoint.
- Consume the endpoint.
Prerequisites
To deploy a prompt flow as an online endpoint, you need:
- An Azure subscription. If you don't have one, create a free account before you begin.
- An Azure AI Studio project.
Create an online deployment
Now that you have built a flow and tested it properly, it's time to create your online endpoint for real-time inference.
Follow the steps below to deploy a prompt flow as an online endpoint in Azure AI Studio.
Have a prompt flow ready for deployment. If you don't have one, see how to build a prompt flow.
Optional: Select Chat to test if the flow is working correctly. Testing your flow before deployment is recommended best practice.
Select Deploy on the flow editor.

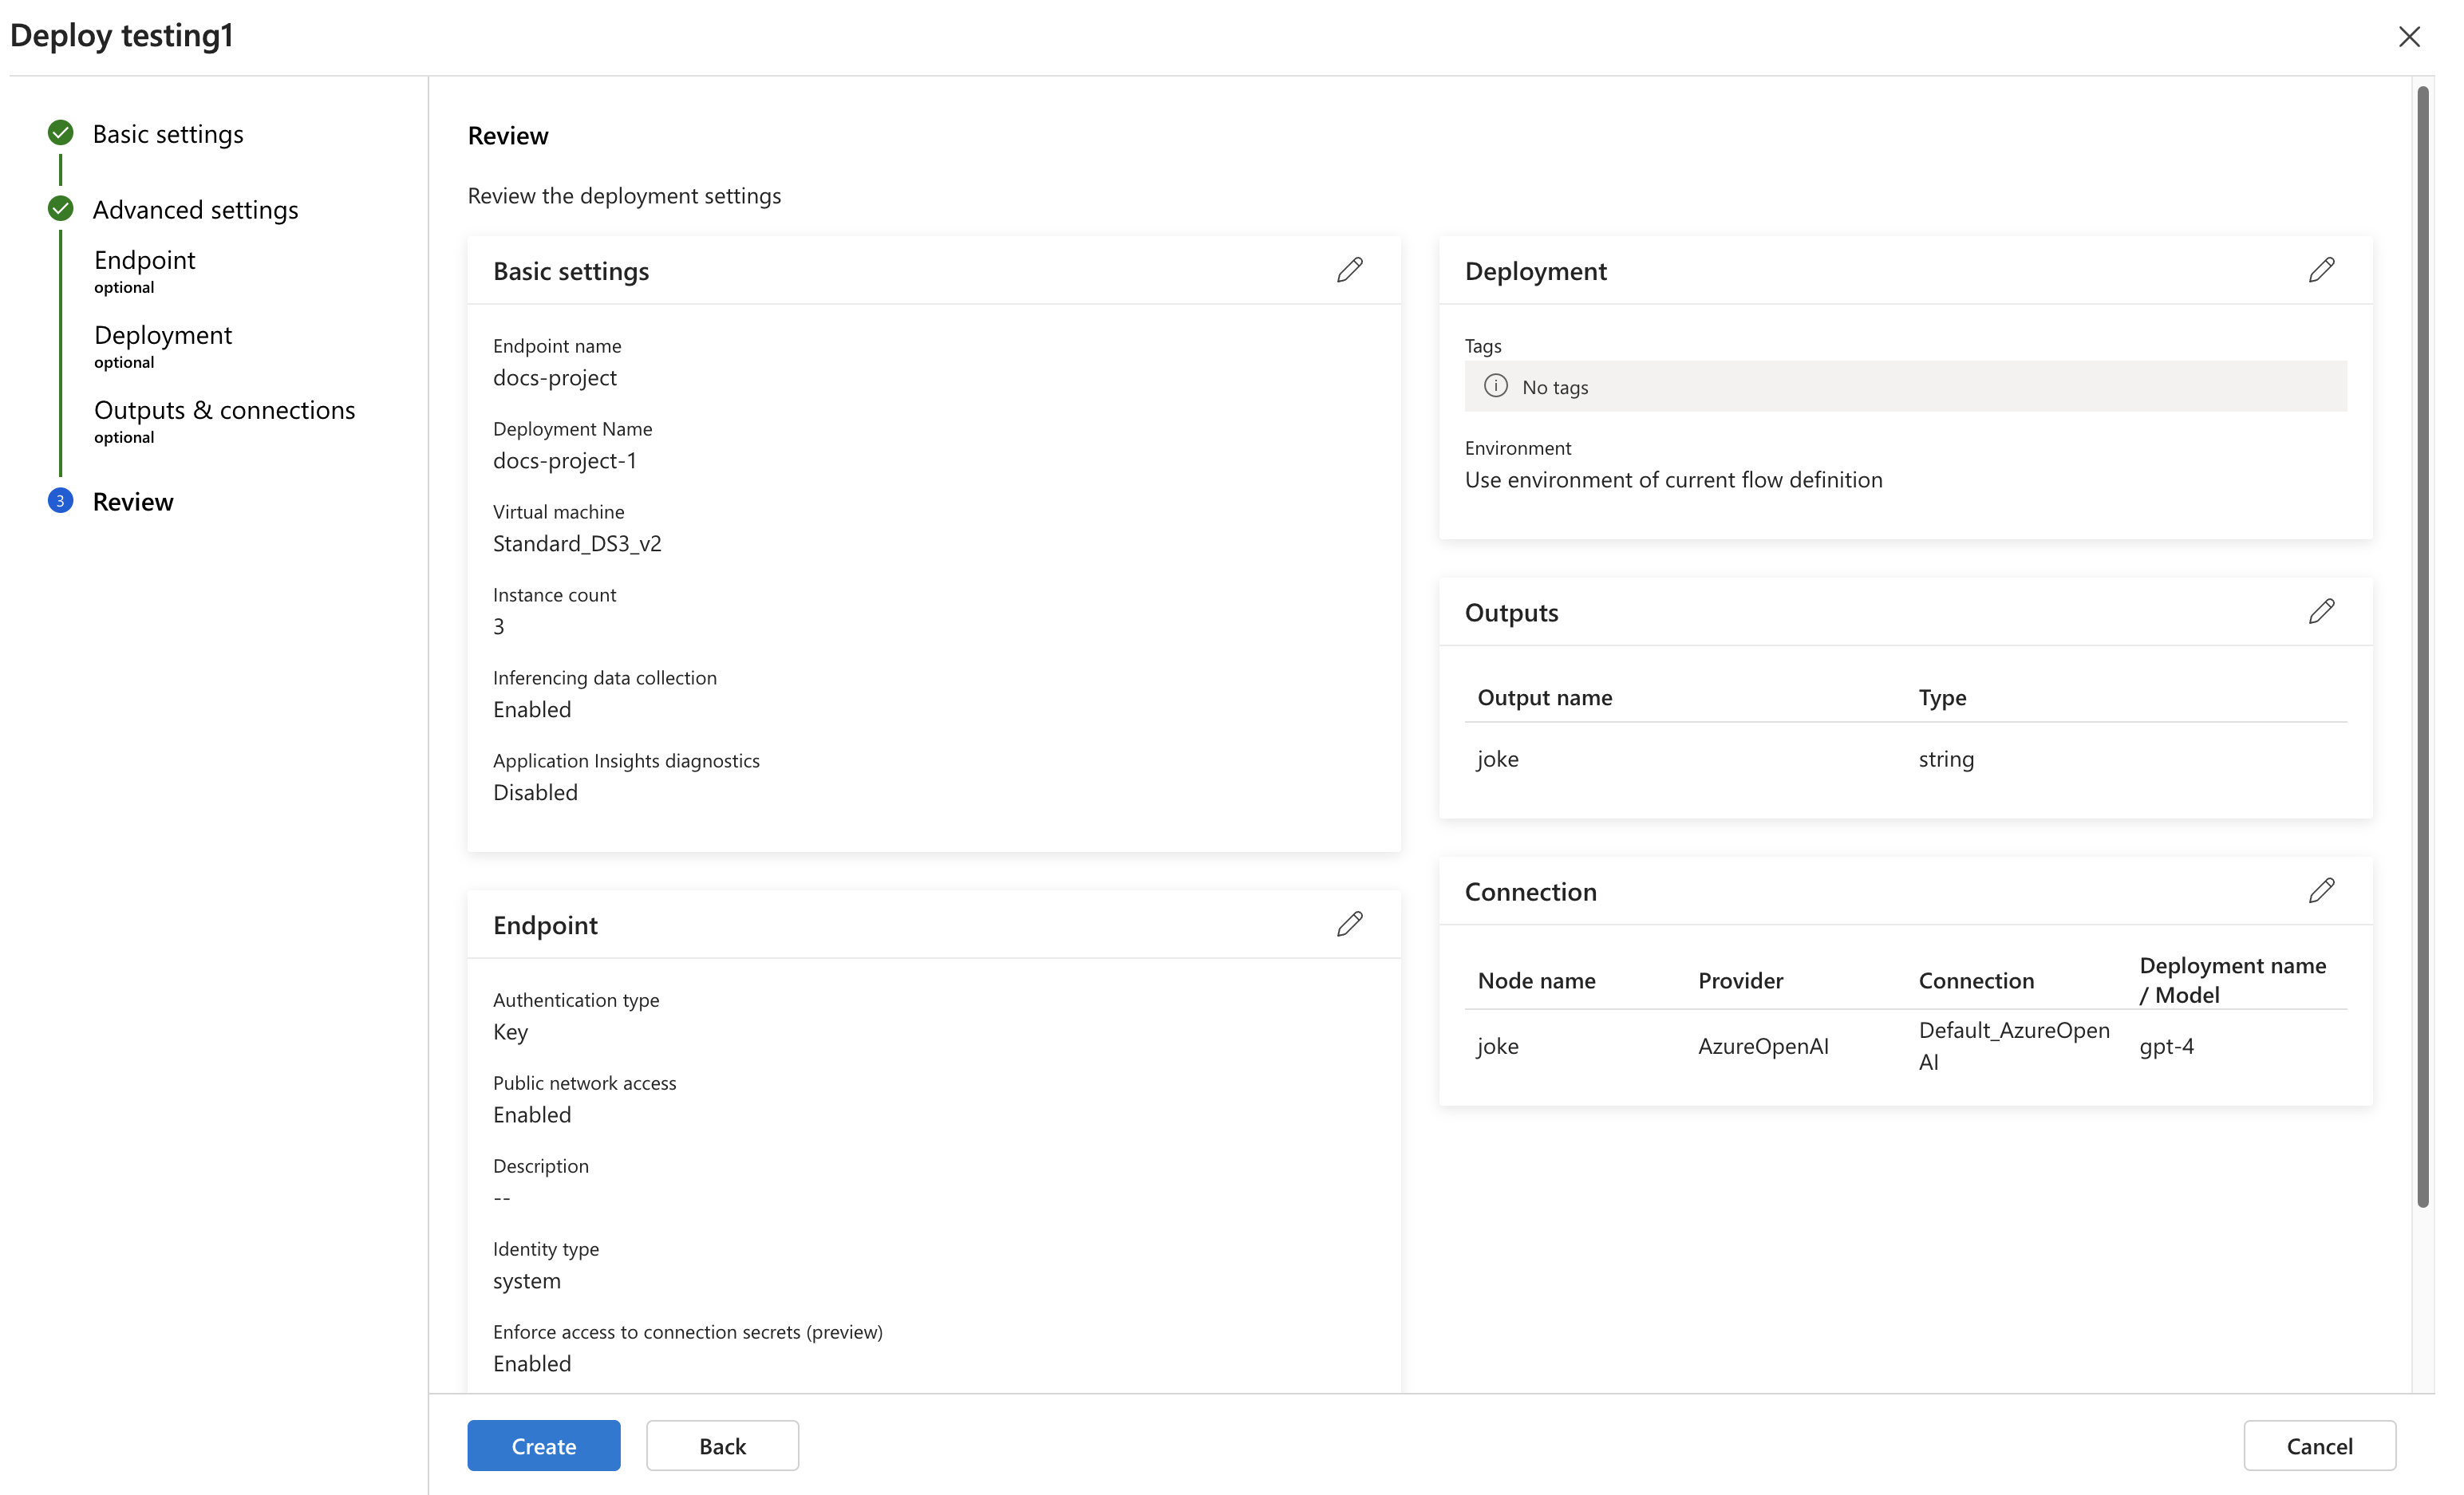
Provide the requested information on the Basic Settings page in the deployment wizard.

Select Review + Create to review the settings and create the deployment. Otherwise you can select Next to proceed to the advanced settings pages.
Select Create to deploy the prompt flow.
To view the status of your deployment, select Deployments from the left navigation. Once the deployment is created successfully, you can select the deployment to view the details.

Select the Consume tab to see code samples that can be used to consume the deployed model in your application.
Note
On this page you can also see the endpoint URL that you can use to consume the endpoint.

You can use the REST endpoint directly or get started with one of the samples shown here.


For more information, see the sections below.
Tip
For a guide about how to deploy a base model, see Deploying models with Azure AI Studio.
Settings and configurations
Requirements text file
Optionally you can specify extra packages you needed in requirements.txt. You can find requirements.txt in the root folder of your flow folder. When you deploy prompt flow to managed online endpoint in UI, by default the deployment uses the environment created based on the base image specified in the flow.dag.yaml and dependencies specified in the requirements.txt of the flow.
Note
The base image specified in the flow.dag.yaml must be created based on prompt flow base image mcr.microsoft.com/azureml/promptflow/promptflow-runtime-stable:<newest_version> and you can find the latest version here. If you don't specify the base image in the flow.dag.yaml, the deployment will use the default base image mcr.microsoft.com/azureml/promptflow/promptflow-runtime-stable:latest.


Basic settings
This step allows you to configure the basic settings of the deployment.
| Property | Description |
|---|---|
| Endpoint | You can select whether you want to deploy a new endpoint or update an existing endpoint. If you select New, you need to specify the endpoint name. |
| Deployment name | - Within the same endpoint, deployment name should be unique. - If you select an existing endpoint, and input an existing deployment name, then that deployment will be overwritten with the new configurations. |
| Virtual machine | The VM size to use for the deployment. |
| Instance count | The number of instances to use for the deployment. Specify the value on the workload you expect. For high availability, we recommend that you set the value to at least 3. We reserve an extra 20% for performing upgrades. |
| Inference data collection | If you enable this, the flow inputs and outputs are auto collected in an Azure Machine Learning data asset, and can be used for later monitoring. |
| Application Insights diagnostics | If you enable this, system metrics during inference time (such as token count, flow latency, flow request, and etc.) will be collected into Azure AI hub resource default Application Insights. |
After you finish the basic settings, you can directly Review + Create to finish the creation, or you can select Next to configure advanced settings.
Advanced settings - Endpoint
You can specify the following settings for the endpoint.

In the advanced settings workflow, you can also specify deployment tags and select a custom environment.

Authentication type
The authentication method for the endpoint. Key-based authentication provides a primary and secondary key that doesn't expire. Azure Machine Learning token-based authentication provides a token that periodically refreshes automatically.
Identity type
The endpoint needs to access Azure resources such as the Azure Container Registry or your Azure AI hub resource connections for inferencing. You can allow the endpoint permission to access Azure resources via giving permission to its managed identity.
System-assigned identity will be autocreated after your endpoint is created, while user-assigned identity is created by user. Learn more about managed identities.
System-assigned
You notice there's an option whether Enforce access to connection secrets (preview). If your flow uses connections, the endpoint needs to access connections to perform inference. The option is by default enabled, the endpoint is granted Azure Machine Learning Workspace Connection Secrets Reader role to access connections automatically if you have connection secrets reader permission. If you disable this option, you need to grant this role to the system-assigned identity manually by yourself or ask help from your admin. Learn more about how to grant permission to the endpoint identity.
User-assigned
When you create the deployment, Azure tries to pull the user container image from the Azure AI hub resource Azure Container Registry (ACR) and mounts the user model and code artifacts into the user container from the Azure AI hub resource storage account.
If you created the associated endpoint with User Assigned Identity, the user-assigned identity must be granted the following roles before the deployment creation; otherwise, the deployment creation fails.
| Scope | Role | Why it's needed |
|---|---|---|
| Azure AI project | Azure Machine Learning Workspace Connection Secrets Reader role OR a customized role with Microsoft.MachineLearningServices/workspaces/connections/listsecrets/action |
Get Azure AI project connections |
| Azure AI project container registry | ACR pull | Pull container image |
| Azure AI project default storage | Storage Blob Data Reader | Load model from storage |
| Azure AI project | Workspace metrics writer | After you deploy then endpoint, if you want to monitor the endpoint related metrics like CPU/GPU/Disk/Memory utilization, you need to give this permission to the identity. Optional |
See detailed guidance about how to grant permissions to the endpoint identity in Grant permissions to the endpoint.
Advanced settings - Outputs & Connections
In this step, you can view all flow outputs, and specify which outputs to include in the response of the endpoint you deploy. By default all flow outputs are selected.
You can also specify the connections used by the endpoint when it performs inference. By default they're inherited from the flow.
Once you configured and reviewed all the steps above, you can select Review + Create to finish the creation.

Note
Expect the endpoint creation to take approximately more than 15 minutes, as it contains several stages including creating endpoint, registering model, creating deployment, etc.
You can understand the deployment creation progress via the notification starts by Prompt flow deployment.
Grant permissions to the endpoint
Important
Granting permissions (adding role assignment) is only enabled to the Owner of the specific Azure resources. You might need to ask your IT admin for help.
It's recommended to grant roles to the user-assigned identity before the deployment creation. It might take more than 15 minutes for the granted permission to take effect.
You can grant all permissions in Azure portal UI by following steps.
Go to the Azure AI project overview page in Azure portal.
Select Access control, and select Add role assignment.
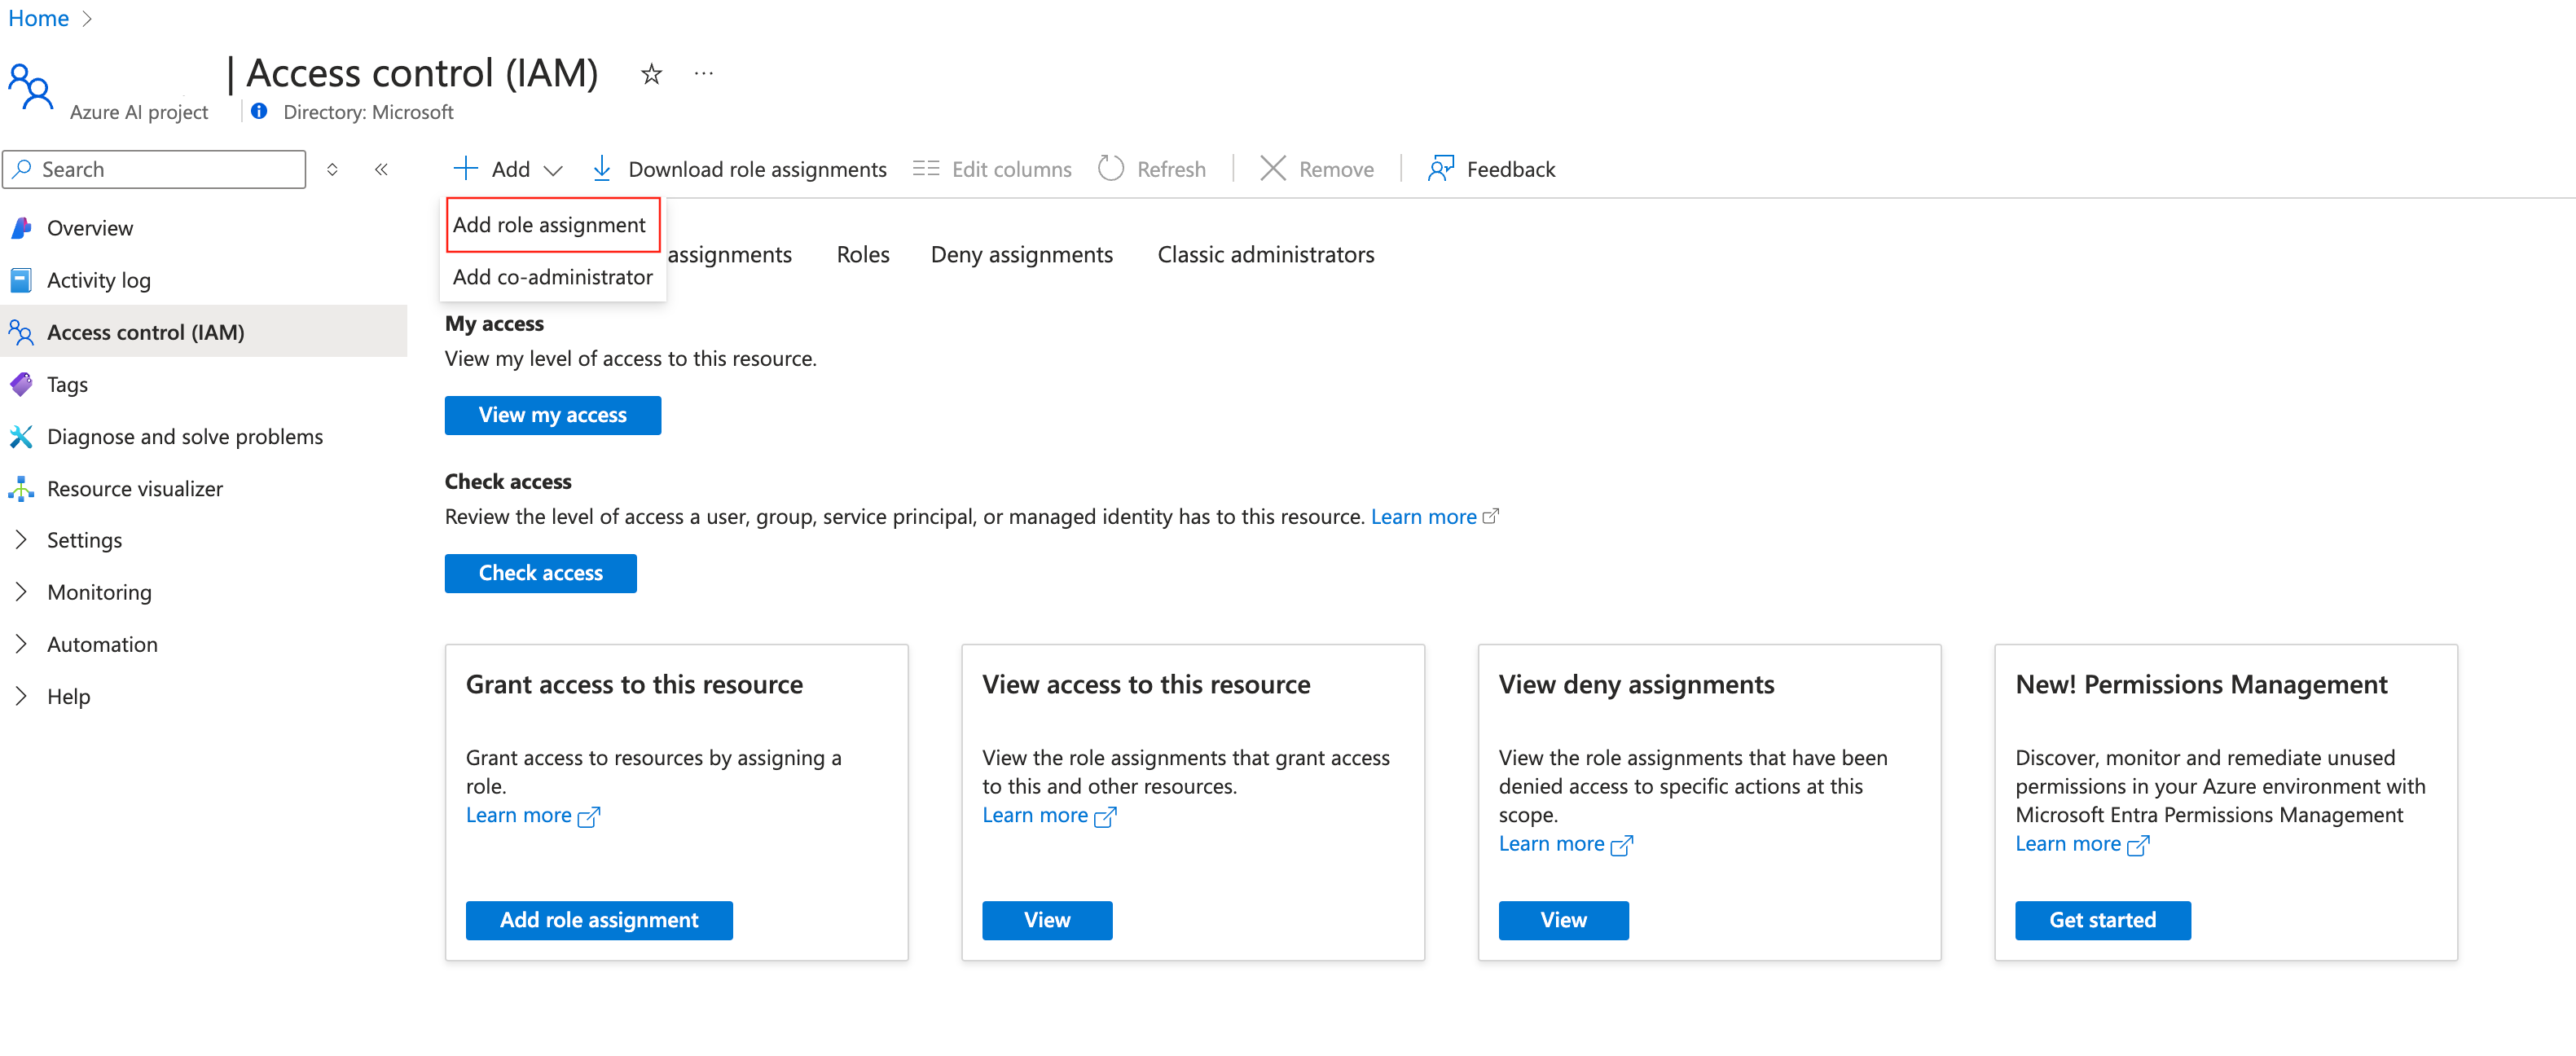
Select Azure Machine Learning Workspace Connection Secrets Reader, go to Next.
Note
The Azure Machine Learning Workspace Connection Secrets Reader role is a built-in role which has permission to get Azure AI hub resource connections.
If you want to use a customized role, make sure the customized role has the permission of
Microsoft.MachineLearningServices/workspaces/connections/listsecrets/action. Learn more about how to create custom roles.Select Managed identity and select members.
For system-assigned identity, select Machine learning online endpoint under System-assigned managed identity, and search by endpoint name.
For user-assigned identity, select User-assigned managed identity, and search by identity name.
For user-assigned identity, you need to grant permissions to the Azure AI hub resource container registry and storage account as well. You can find the container registry and storage account in the Azure AI hub resource overview page in Azure portal.

Go to the Azure AI hub resource container registry overview page, select Access control, and select Add role assignment, and assign ACR pull |Pull container image to the endpoint identity.
Go to the Azure AI hub resource default storage overview page, select Access control, and select Add role assignment, and assign Storage Blob Data Reader to the endpoint identity.
(optional) For user-assigned identity, if you want to monitor the endpoint related metrics like CPU/GPU/Disk/Memory utilization, you need to grant Workspace metrics writer role of Azure AI hub resource to the identity as well.


Check the status of the endpoint
There will be notifications after you finish the deploy wizard. After the endpoint and deployment are created successfully, you can select View details in the notification to deployment detail page.
You can also directly go to the Deployments page from the left navigation, select the deployment, and check the status.
Test the endpoint
In the deployment detail page, switch to the Test tab.
For endpoints deployed from standard flow, you can input values in form editor or JSON editor to test the endpoint.
Test the endpoint deployed from a chat flow
For endpoints deployed from chat flow, you can test it in an immersive chat window.
The chat_input was set during development of the chat flow. You can input the chat_input message in the input box. If your flow has multiple inputs, the Inputs panel on the right side is for you to specify the values for other inputs besides the chat_input.
Consume the endpoint
In the deployment detail page, switch to the Consume tab. You can find the REST endpoint and key/token to consume your endpoint. There's also sample code for you to consume the endpoint in different languages.

You need to input values for RequestBody or data and api_key. For example, if your flow has 2 inputs location and url, then you need to specify data as following.
 {
"location": "LA",
"url": "<the_url_to_be_classified>"
}
Clean up resources
If you aren't going use the endpoint after completing this tutorial, you should delete the endpoint.
Note
The complete deletion might take approximately 20 minutes.
Next Steps
- Learn more about what you can do in Azure AI Studio
- Get answers to frequently asked questions in the Azure AI FAQ article
Feedback
Coming soon: Throughout 2024 we will be phasing out GitHub Issues as the feedback mechanism for content and replacing it with a new feedback system. For more information see: https://aka.ms/ContentUserFeedback.
Submit and view feedback for