Develop a prompt flow
Note
Azure AI Studio is currently in public preview. This preview is provided without a service-level agreement, and we don't recommend it for production workloads. Certain features might not be supported or might have constrained capabilities. For more information, see Supplemental Terms of Use for Microsoft Azure Previews.
Prompt flow is a development tool designed to streamline the entire development cycle of AI applications powered by Large Language Models (LLMs). Prompt flow provides a comprehensive solution that simplifies the process of prototyping, experimenting, iterating, and deploying your AI applications.
With prompt flow, you're able to:
- Orchestrate executable flows with LLMs, prompts, and Python tools through a visualized graph.
- Test, debug, and iterate your flows with ease.
- Create prompt variants and compare their performance.
In this article, you learn how to create and develop your first prompt flow in Azure AI Studio.
Prerequisites
- If you don't have an Azure AI project already, first create a project.
- Prompt flow requires a runtime. If you don't have a runtime, you can create one in Azure AI Studio.
- You need a deployed model.
Create and develop your Prompt flow
You can create a flow by either cloning the samples available in the gallery or creating a flow from scratch. If you already have flow files in local or file share, you can also import the files to create a flow.
To create a prompt flow from the gallery in Azure AI Studio:
Sign in to Azure AI Studio and select your project from the Build page.
From the collapsible left menu, select Prompt flow.
Select + Create.
In the Standard flow tile, select Create.
On the Create a new flow page, enter a folder name and then select Create.

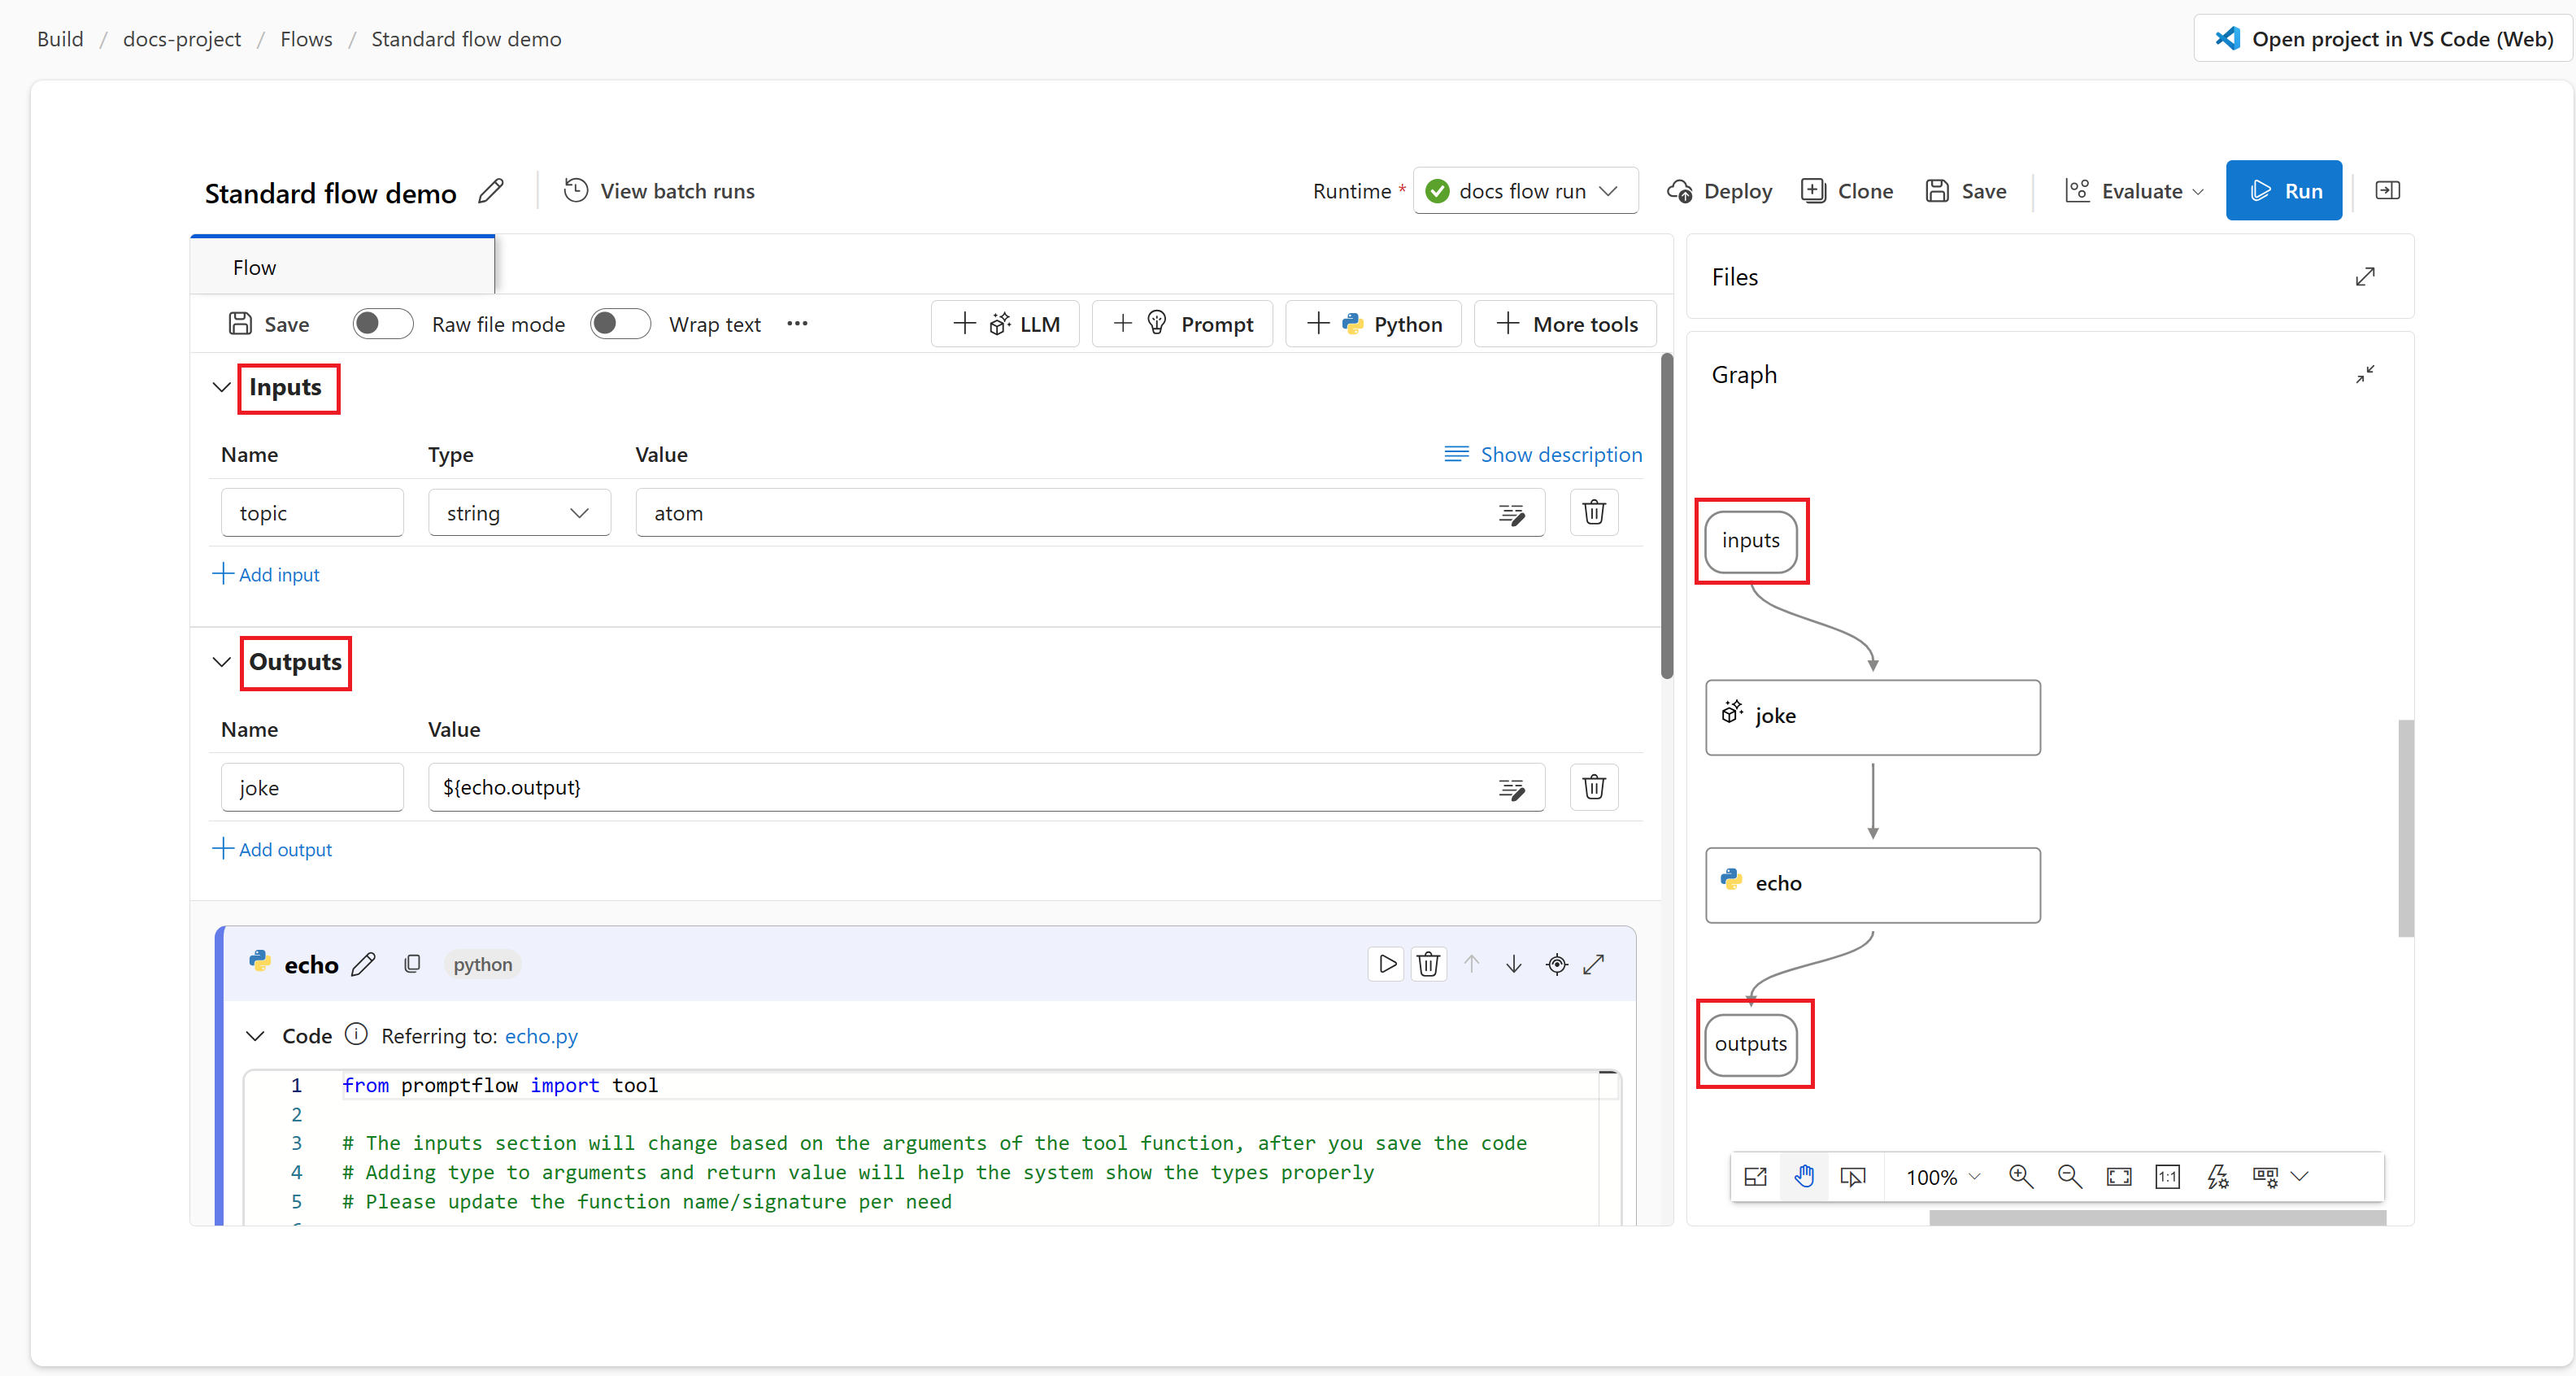
The prompt flow authoring page opens. You can start authoring your flow now. By default you see a sample flow. This example flow has nodes for the LLM and Python tools.
Note
The graph view for visualization only. It shows the flow structure you're developing. You cannot edit the graph view directly, but you can zoom in, zoom out, and scroll. You can select a node in the graph view to highlight and navigate to the node in the tool edit view.
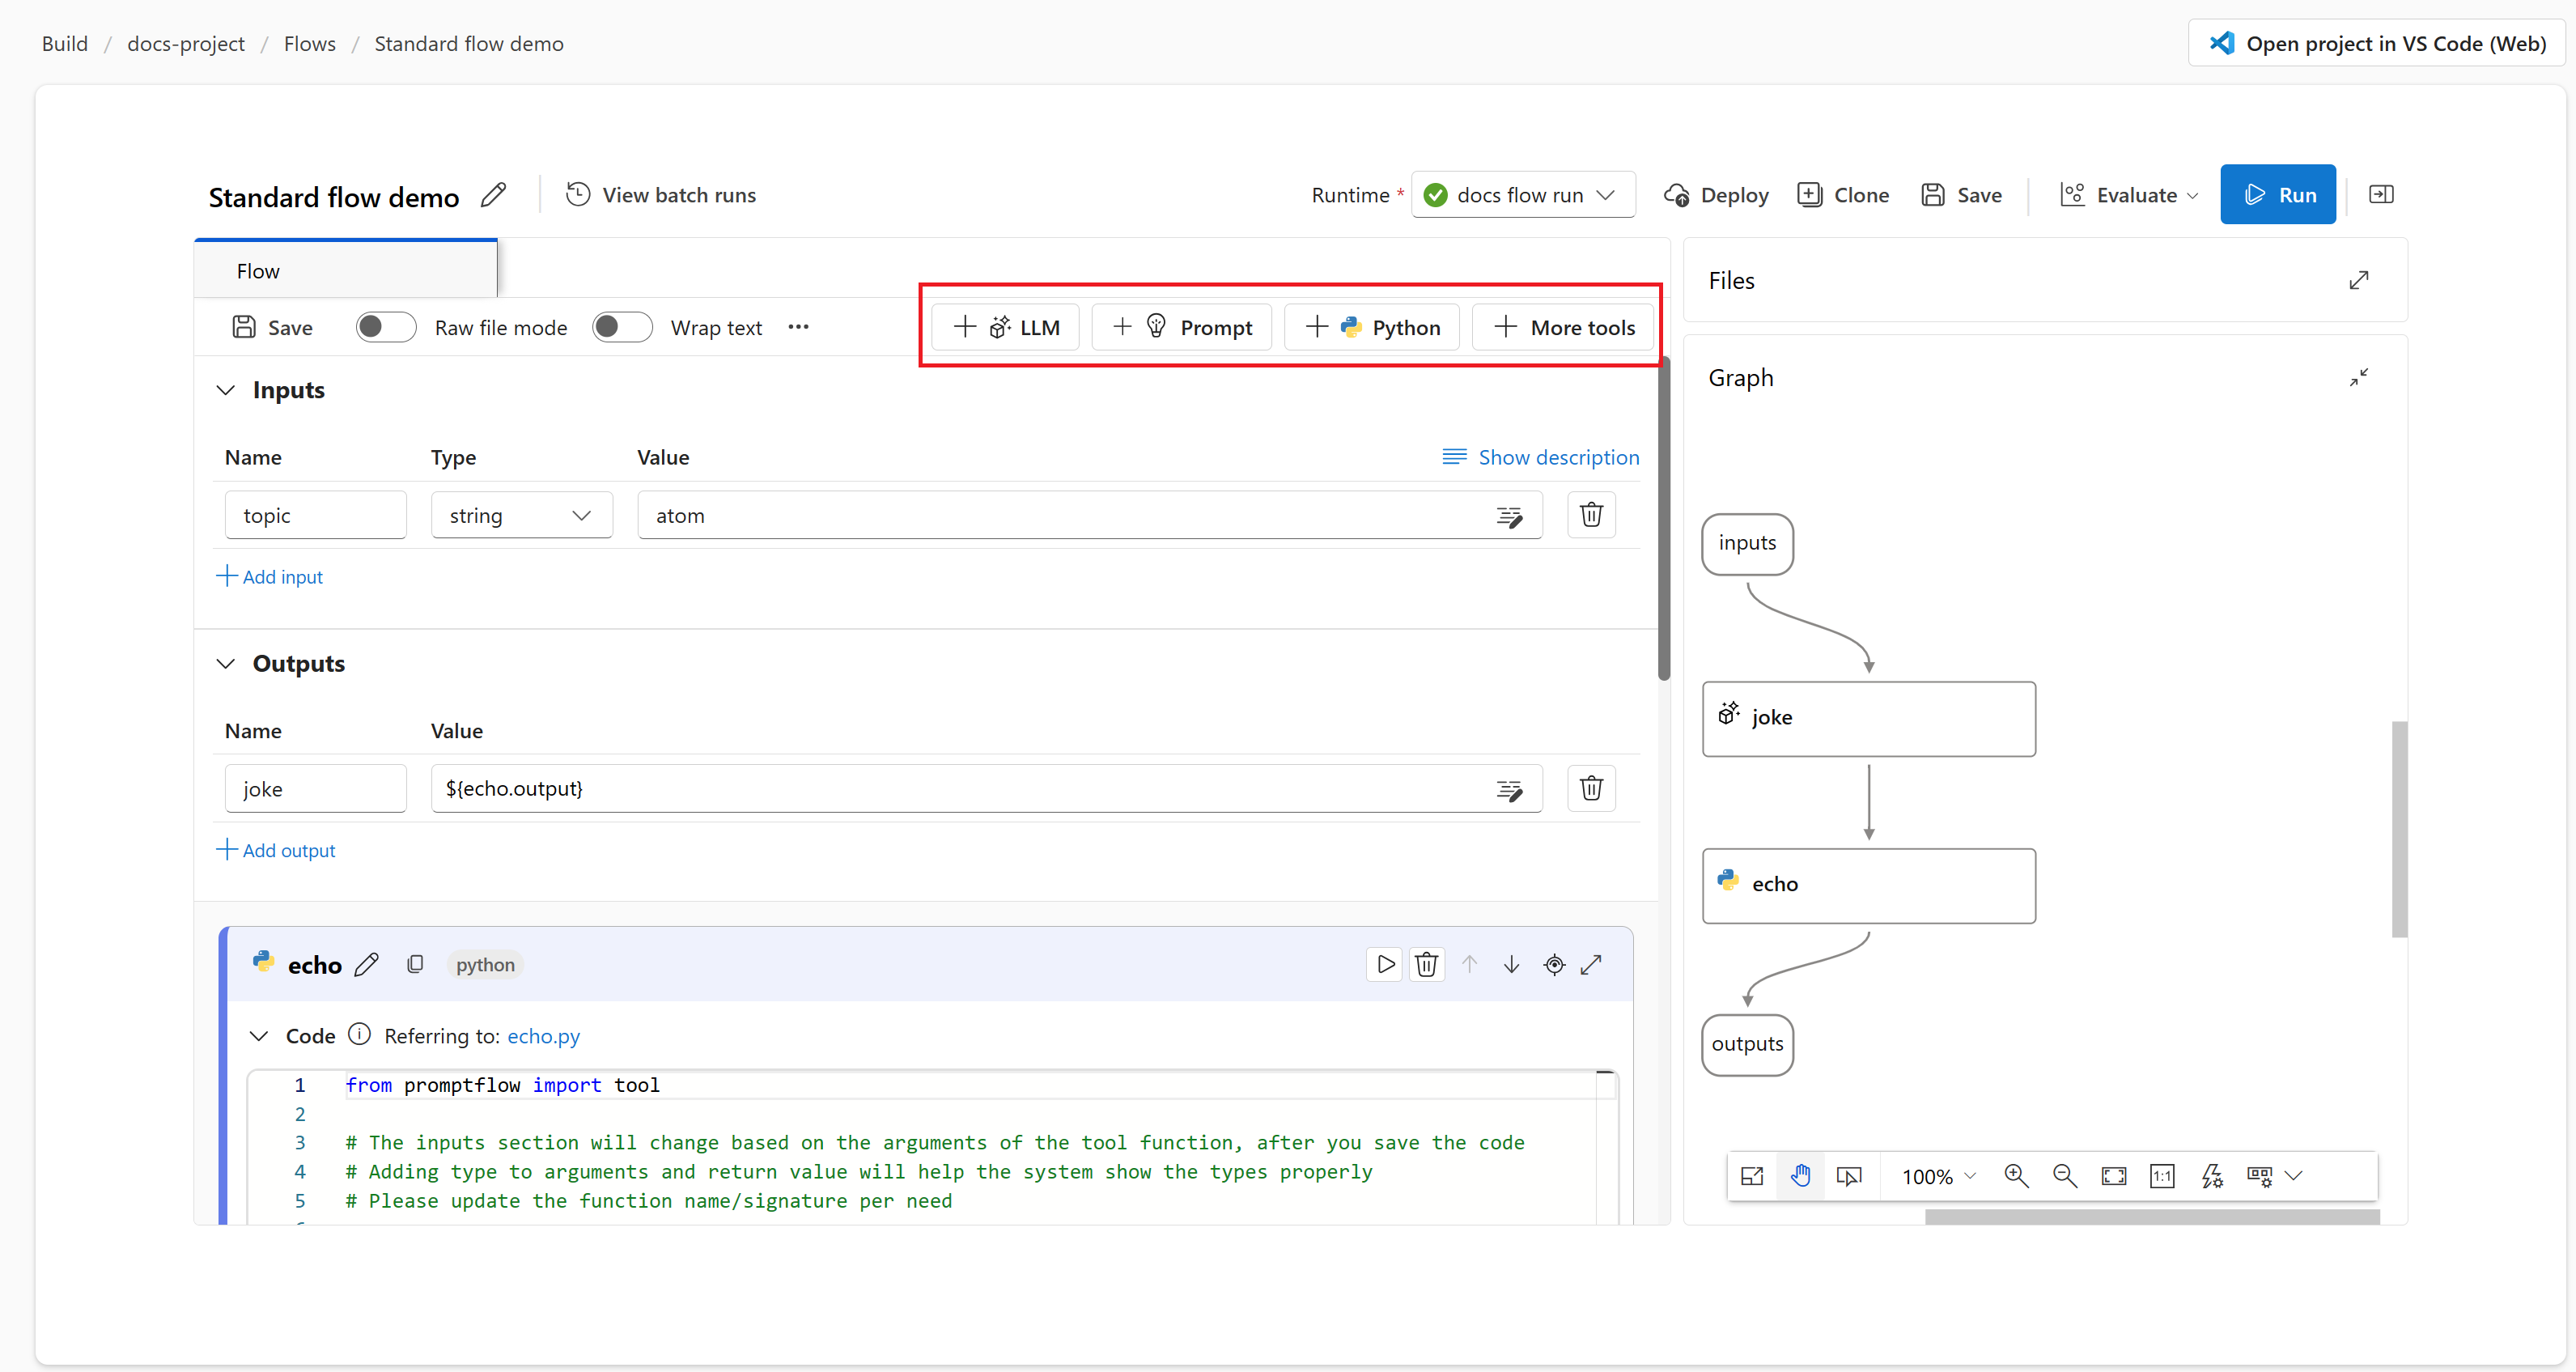
Optionally, you can add more tools to the flow. The visible tool options are LLM, Prompt, and Python. To view more tools, select + More tools.
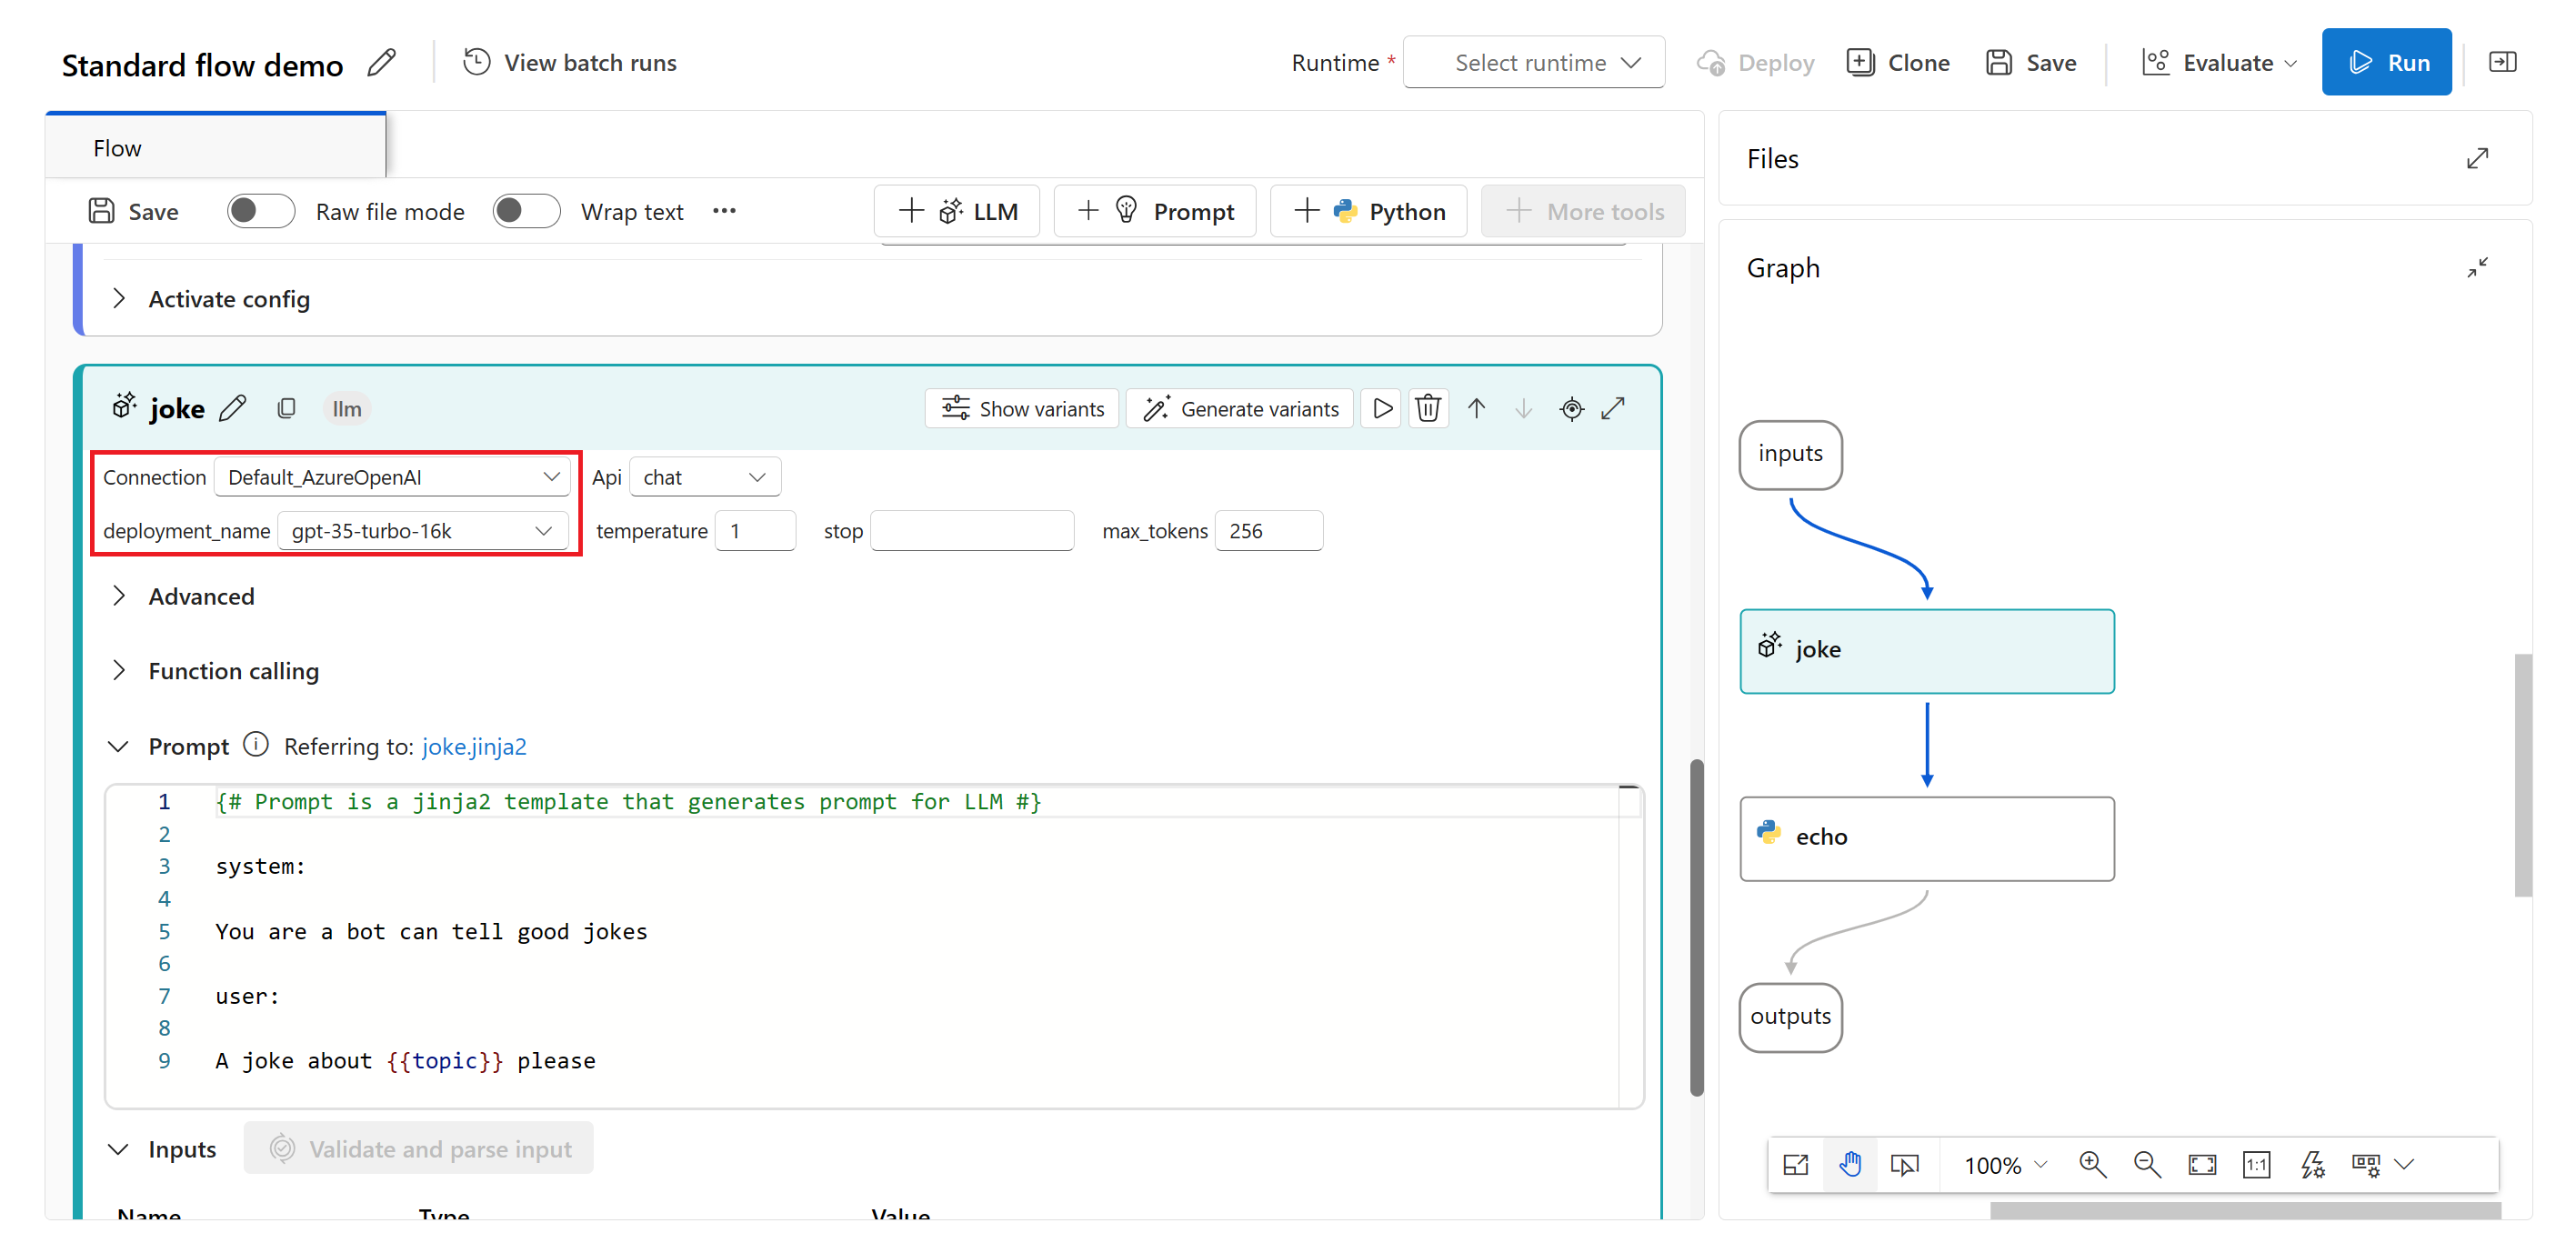
Select a connection and deployment in the LLM tool editor.
Select Run to run the flow.

The flow run status is shown as Running.

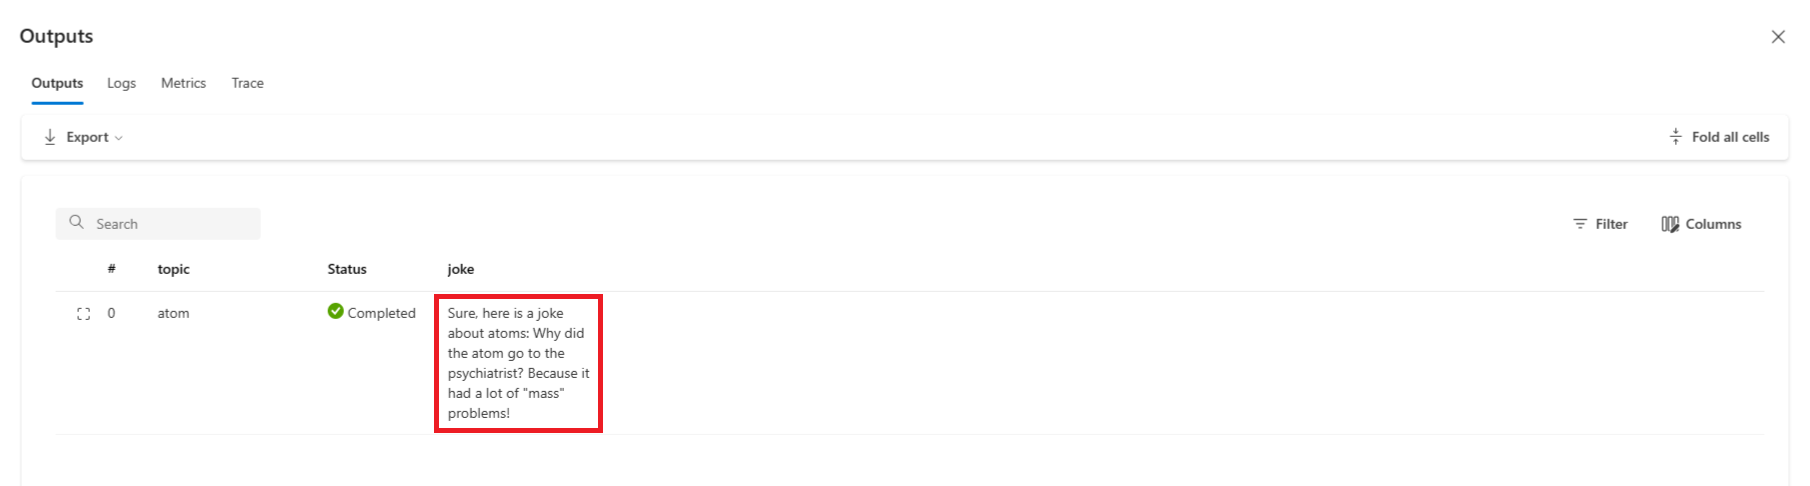
Once the flow run is completed, select View outputs to view the flow results.

You can view the flow run status and output in the Outputs section.


Authoring the flow
Each flow is represented by a folder that contains a `flow.dag.yaml`` file, source code files, and system folders. You can add new files, edit existing files, and delete files. You can also export the files to local, or import files from local.
In addition to inline editing the node in flatten view, you can also turn on the Raw file mode toggle and select the file name to edit the file in the opening file tab.
Flow input and output
Flow input is the data passed into the flow as a whole. Define the input schema by specifying the name and type. Set the input value of each input to test the flow. You can reference the flow input later in the flow nodes using ${input.[input name]} syntax.
Flow output is the data produced by the flow as a whole, which summarizes the results of the flow execution. You can view and export the output table after the flow run or batch run is completed. Define flow output value by referencing the flow single node output using syntax ${[node name].output} or ${[node name].output.[field name]}.
Link nodes together
By referencing the node output, you can link nodes together. For example, you can reference the LLM node output in the Python node input, so the Python node can consume the LLM node output, and in the graph view you can see that the two nodes are linked together.
Enable conditional control to the flow
Prompt Flow offers not just a streamlined way to execute the flow, but it also brings in a powerful feature for developers - conditional control, which allows users to set conditions for the execution of any node in a flow.
At its core, conditional control provides the capability to associate each node in a flow with an activate config. This configuration is essentially a "when" statement that determines when a node should be executed. The power of this feature is realized when you have complex flows where the execution of certain tasks depends on the outcome of previous tasks. By using the conditional control, you can configure your specific nodes to execute only when the specified conditions are met.
Specifically, you can set the activate config for a node by selecting the Activate config button in the node card. You can add "when" statement and set the condition.
You can set the conditions by referencing the flow input, or node output. For example, you can set the condition ${input.[input name]} as specific value or ${[node name].output} as specific value.
If the condition isn't met, the node is skipped. The node status is shown as "Bypassed".
Test the flow
You can test the flow in two ways: run single node or run the whole flow.
To run a single node, select the Run icon on node in flatten view. Once running is completed, check output in node output section.
To run the whole flow, select the Run button at the right top. Then you can check the run status and output of each node, and the results of flow outputs defined in the flow. You can always change the flow input value and run the flow again.
Develop a chat flow
Chat flow is designed for conversational application development, building upon the capabilities of standard flow and providing enhanced support for chat inputs/outputs and chat history management. With chat flow, you can easily create a chatbot that handles chat input and output.
In chat flow authoring page, the chat flow is tagged with a "chat" label to distinguish it from standard flow and evaluation flow. To test the chat flow, select "Chat" button to trigger a chat box for conversation.
Chat input/output and chat history
The most important elements that differentiate a chat flow from a standard flow are Chat input, Chat history, and Chat output.
- Chat input: Chat input refers to the messages or queries submitted by users to the chatbot. Effectively handling chat input is crucial for a successful conversation, as it involves understanding user intentions, extracting relevant information, and triggering appropriate responses.
- Chat history: Chat history is the record of all interactions between the user and the chatbot, including both user inputs and AI-generated outputs. Maintaining chat history is essential for keeping track of the conversation context and ensuring the AI can generate contextually relevant responses.
- Chat output: Chat output refers to the AI-generated messages that are sent to the user in response to their inputs. Generating contextually appropriate and engaging chat output is vital for a positive user experience.
A chat flow can have multiple inputs, chat history and chat input are required in chat flow.
In the chat flow inputs section, a flow input can be marked as chat input. Then you can fill the chat input value by typing in the chat box.
Prompt flow can help user to manage chat history. The
chat_historyin the Inputs section is reserved for representing Chat history. All interactions in the chat box, including user chat inputs, generated chat outputs, and other flow inputs and outputs, are automatically stored in chat history. User can't manually set the value ofchat_historyin the Inputs section. It's structured as a list of inputs and outputs:[ { "inputs": { "<flow input 1>": "xxxxxxxxxxxxxxx", "<flow input 2>": "xxxxxxxxxxxxxxx", "<flow input N>""xxxxxxxxxxxxxxx" }, "outputs": { "<flow output 1>": "xxxxxxxxxxxx", "<flow output 2>": "xxxxxxxxxxxxx", "<flow output M>": "xxxxxxxxxxxxx" } }, { "inputs": { "<flow input 1>": "xxxxxxxxxxxxxxx", "<flow input 2>": "xxxxxxxxxxxxxxx", "<flow input N>""xxxxxxxxxxxxxxx" }, "outputs": { "<flow output 1>": "xxxxxxxxxxxx", "<flow output 2>": "xxxxxxxxxxxxx", "<flow output M>": "xxxxxxxxxxxxx" } } ]
Note
The capability to automatically save or manage chat history is an feature on the authoring page when conducting tests in the chat box. For batch runs, it's necessary for users to include the chat history within the batch run dataset. If there's no chat history available for testing, simply set the chat_history to an empty list [] within the batch run dataset.
Author prompt with chat history
Incorporating Chat history into your prompts is essential for creating context-aware and engaging chatbot responses. In your prompts, you can reference chat_history to retrieve past interactions. This allows you to reference previous inputs and outputs to create contextually relevant responses.
Use for-loop grammar of Jinja language to display a list of inputs and outputs from chat_history.
{% for item in chat_history %}
user:
{{item.inputs.question}}
assistant:
{{item.outputs.answer}}
{% endfor %}
Test with the chat box
The chat box provides an interactive way to test your chat flow by simulating a conversation with your chatbot. To test your chat flow using the chat box, follow these steps:
- Select the "Chat" button to open the chat box.
- Type your test inputs into the chat box and press Enter to send them to the chatbot.
- Review the chatbot's responses to ensure they're contextually appropriate and accurate.
Next steps
Feedback
Coming soon: Throughout 2024 we will be phasing out GitHub Issues as the feedback mechanism for content and replacing it with a new feedback system. For more information see: https://aka.ms/ContentUserFeedback.
Submit and view feedback for