Configure development environment for deployment scripts in Bicep files
Learn how to create a development environment for developing and testing deployment scripts with a deployment script image. You can either create an Azure container instance or use Docker. Both options are covered in this article.
Prerequisites
Azure PowerShell container
If you don't have an Azure PowerShell deployment script, you can create a hello.ps1 file by using the following content:
param([string] $name)
$output = 'Hello {0}' -f $name
Write-Output $output
$DeploymentScriptOutputs = @{}
$DeploymentScriptOutputs['text'] = $output
param([string] $name, [string] $subscription)
$output = 'Hello {0}' -f $name
#Write-Output $output

Connect-AzAccount -UseDeviceAuthentication
Set-AzContext -subscription $subscription

$kv = Get-AzKeyVault
#Write-Output $kv

$DeploymentScriptOutputs = @{}
$DeploymentScriptOutputs['greeting'] = $output
$DeploymentScriptOutputs['kv'] = $kv.resourceId
Write-Output $DeploymentScriptOutputs
In an Azure PowerShell deployment script, the variable $DeploymentScriptOutputs is used to store the output values. For more information about working with Azure PowerShell outputs, see Work with outputs.
Azure CLI container
For an Azure CLI container image, you can create a hello.sh file by using the following content:
FIRSTNAME=$1
LASTNAME=$2
OUTPUT="{\"name\":{\"displayName\":\"$FIRSTNAME $LASTNAME\",\"firstName\":\"$FIRSTNAME\",\"lastName\":\"$LASTNAME\"}}"
echo -n "Hello "
echo $OUTPUT | jq -r '.name.displayName'
In an Azure CLI deployment script, an environment variable called AZ_SCRIPTS_OUTPUT_PATH stores the location of the script output file. The environment variable isn't available in the development environment container. For more information about working with Azure CLI outputs, see Work with outputs from CLI scripts.
Use Azure PowerShell container instance
To author Azure PowerShell scripts on your computer, you need to create a storage account and mount the storage account to the container instance. So that you can upload your script to the storage account and run the script on the container instance. The storage account that you create to test your script is not the same storage account that the deployment script service uses to execute the script. Deployment script service creates a unique name as a file share on every execution.
Create an Azure PowerShell container instance
The following Bicep file creates a container instance and a file share, and then mounts the file share to the container image.
@description('Specify a project name that is used for generating resource names.')
param projectName string

@description('Specify the resource location.')
param location string = resourceGroup().location

@description('Specify the container image.')
param containerImage string = 'mcr.microsoft.com/azuredeploymentscripts-powershell:az9.7'

@description('Specify the mount path.')
param mountPath string = '/mnt/azscripts/azscriptinput'

var storageAccountName = toLower('${projectName}store')
var fileShareName = '${projectName}share'
var containerGroupName = '${projectName}cg'
var containerName = '${projectName}container'

resource storageAccount 'Microsoft.Storage/storageAccounts@2023-01-01' = {
  name: storageAccountName
  location: location
  sku: {
    name: 'Standard_LRS'
  }
  kind: 'StorageV2'
  properties: {
    accessTier: 'Hot'
  }
}

resource fileShare 'Microsoft.Storage/storageAccounts/fileServices/shares@2023-01-01' = {
  name: '${storageAccountName}/default/${fileShareName}'
  dependsOn: [
    storageAccount
  ]
}

resource containerGroup 'Microsoft.ContainerInstance/containerGroups@2023-05-01' = {
  name: containerGroupName
  location: location
  properties: {
    containers: [
      {
        name: containerName
        properties: {
          image: containerImage
          resources: {
            requests: {
              cpu: 1
              memoryInGB: json('1.5')
            }
          }
          ports: [
            {
              protocol: 'TCP'
              port: 80
            }
          ]
          volumeMounts: [
            {
              name: 'filesharevolume'
              mountPath: mountPath
            }
          ]
          command: [
            '/bin/sh'
            '-c'
            'pwsh -c \'Start-Sleep -Seconds 1800\''
          ]
        }
      }
    ]
    osType: 'Linux'
    volumes: [
      {
        name: 'filesharevolume'
        azureFile: {
          readOnly: false
          shareName: fileShareName
          storageAccountName: storageAccountName
          storageAccountKey: storageAccount.listKeys().keys[0].value
        }
      }
    ]
  }
}
The default value for the mount path is /mnt/azscripts/azscriptinput. This is the path in the container instance where it's mounted to the file share.
The default container image specified in the Bicep file is mcr.microsoft.com/azuredeploymentscripts-powershell:az9.7. See a list of all supported Azure PowerShell versions.
The Bicep file suspends the container instance after 1,800 seconds. You have 30 minutes before the container instance goes into a terminated state and the session ends.
Use the following script to deploy the Bicep file:
$projectName = Read-Host -Prompt "Enter a project name that is used to generate resource names"
$location = Read-Host -Prompt "Enter the location (i.e. centralus)"
$templateFile = Read-Host -Prompt "Enter the Bicep file path and file name"
$resourceGroupName = "${projectName}rg"

New-AzResourceGroup -Location $location -name $resourceGroupName
New-AzResourceGroupDeployment -resourceGroupName $resourceGroupName -TemplateFile $templatefile -projectName $projectName
Upload the deployment script
Upload your deployment script to the storage account. Here's an example of a PowerShell script:
$projectName = Read-Host -Prompt "Enter the same project name that you used earlier"
$fileName = Read-Host -Prompt "Enter the deployment script file name with the path"

$resourceGroupName = "${projectName}rg"
$storageAccountName = "${projectName}store"
$fileShareName = "${projectName}share"

$context = (Get-AzStorageAccount -ResourceGroupName $resourceGroupName -Name $storageAccountName).Context
Set-AzStorageFileContent -Context $context -ShareName $fileShareName -Source $fileName -Force
You can also upload the file by using the Azure portal or the Azure CLI.
Test the deployment script
In the Azure portal, open the resource group where you deployed the container instance and the storage account.
Open the container group. The default container group name is the project name appended with cg. The container instance is in the Running state.
In the resource menu, select Containers. The container instance name is the project name appended with container.
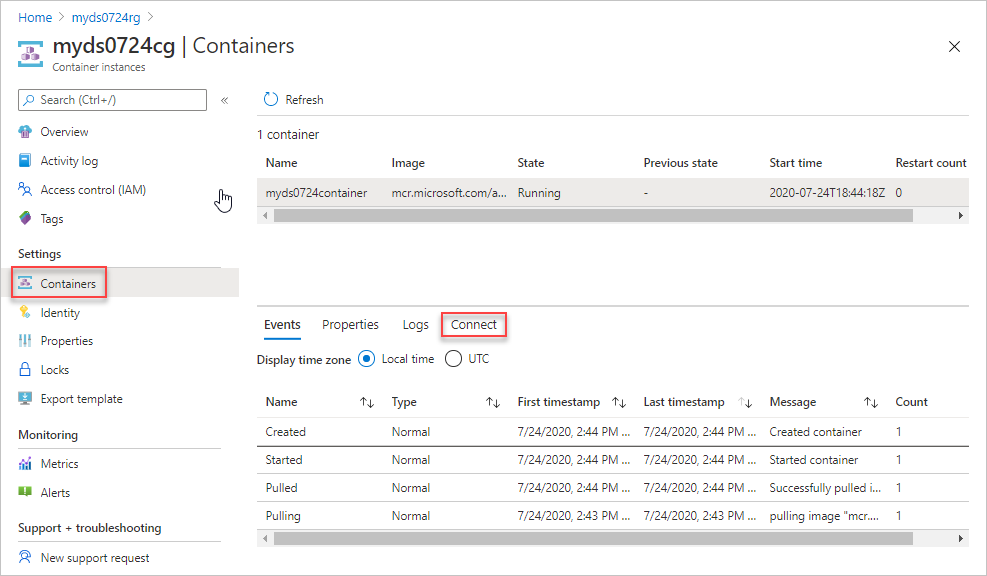
Select Connect, and then select Connect. If you can't connect to the container instance, restart the container group and try again.
In the console pane, run the following commands:
cd /mnt/azscripts/azscriptinput
ls
pwsh ./hello.ps1 "John Dole"
The output is Hello John Dole.

Use an Azure CLI container instance
To author Azure CLI scripts on your computer, create a storage account and mount the storage account to the container instance. Then, you can upload your script to the storage account and run the script on the container instance. The storage account that you create to test your script isn't the same storage account that the deployment script service uses to execute the script. The deployment script service creates a unique name as a file share on every execution.
Create an Azure CLI container instance
The following Bicep file creates a container instance and a file share, and then mounts the file share to the container image:
@description('Specify a project name that is used for generating resource names.')
param projectName string

@description('Specify the resource location.')
param location string = resourceGroup().location

@description('Specify the container image.')
param containerImage string = 'mcr.microsoft.com/azure-cli:2.9.1'

@description('Specify the mount path.')
param mountPath string = '/mnt/azscripts/azscriptinput'

var storageAccountName = toLower('${projectName}store')
var fileShareName = '${projectName}share'
var containerGroupName = '${projectName}cg'
var containerName = '${projectName}container'

resource storageAccount 'Microsoft.Storage/storageAccounts@2023-01-01' = {
  name: storageAccountName
  location: location
  sku: {
    name: 'Standard_LRS'
  }
  kind: 'StorageV2'
  properties: {
    accessTier: 'Hot'
  }
}

resource fileshare 'Microsoft.Storage/storageAccounts/fileServices/shares@2023-01-01' = {
  name: '${storageAccountName}/default/${fileShareName}'
  dependsOn: [
    storageAccount
  ]
}

resource containerGroup 'Microsoft.ContainerInstance/containerGroups@2023-05-01' = {
  name: containerGroupName
  location: location
  properties: {
    containers: [
      {
        name: containerName
        properties: {
          image: containerImage
          resources: {
            requests: {
              cpu: 1
              memoryInGB: json('1.5')
            }
          }
          ports: [
            {
              protocol: 'TCP'
              port: 80
            }
          ]
          volumeMounts: [
            {
              name: 'filesharevolume'
              mountPath: mountPath
            }
          ]
          command: [
            '/bin/bash'
            '-c'
            'echo hello; sleep 1800'
          ]
        }
      }
    ]
    osType: 'Linux'
    volumes: [
      {
        name: 'filesharevolume'
        azureFile: {
          readOnly: false
          shareName: fileShareName
          storageAccountName: storageAccountName
          storageAccountKey: storageAccount.listKeys().keys[0].value
        }
      }
    ]
  }
}
The default value for the mount path is /mnt/azscripts/azscriptinput. This is the path in the container instance where it's mounted to the file share.
The default container image specified in the Bicep file is mcr.microsoft.com/azure-cli:2.9.1. See a list of supported Azure CLI versions. The deployment script uses the available CLI images from Microsoft Container Registry (MCR). It takes about one month to certify a CLI image for a deployment script. Don't use the CLI versions that were released within 30 days. To find the release dates for the images, see Azure CLI release notes. If you use an unsupported version, the error message lists the supported versions.
The Bicep file suspends the container instance after 1,800 seconds. You have 30 minutes before the container instance goes into a terminal state and the session ends.
To deploy the Bicep file:
$projectName = Read-Host -Prompt "Enter a project name that is used to generate resource names"
$location = Read-Host -Prompt "Enter the location (i.e. centralus)"
$templateFile = Read-Host -Prompt "Enter the Bicep file path and file name"
$resourceGroupName = "${projectName}rg"

New-AzResourceGroup -Location $location -name $resourceGroupName
New-AzResourceGroupDeployment -resourceGroupName $resourceGroupName -TemplateFile $templatefile -projectName $projectName
Upload the deployment script
Upload your deployment script to the storage account. The following is a PowerShell example:
$projectName = Read-Host -Prompt "Enter the same project name that you used earlier"
$fileName = Read-Host -Prompt "Enter the deployment script file name with the path"

$resourceGroupName = "${projectName}rg"
$storageAccountName = "${projectName}store"
$fileShareName = "${projectName}share"

$context = (Get-AzStorageAccount -ResourceGroupName $resourceGroupName -Name $storageAccountName).Context
Set-AzStorageFileContent -Context $context -ShareName $fileShareName -Source $fileName -Force
You also can upload the file by using the Azure portal or the Azure CLI.
Test the deployment script
In the Azure portal, open the resource group where you deployed the container instance and the storage account.
Open the container group. The default container group name is the project name appended with cg. The container instance is shown in the Running state.
In the resource menu, select Containers. The container instance name is the project name appended with container.
Select Connect, and then select Connect. If you can't connect to the container instance, restart the container group and try again.
In the console pane, run the following commands:
cd /mnt/azscripts/azscriptinput
ls
./hello.sh John Dole
The output is Hello John Dole.

Use Docker
You can use a preconfigured Docker container image as your deployment script development environment. To install Docker, see Get Docker. You also need to configure file sharing to mount the directory, which contains the deployment scripts into Docker container.
Pull the deployment script container image to the local computer:
docker pull mcr.microsoft.com/azuredeploymentscripts-powershell:az10.0The example uses version PowerShell 4.3.0.
To pull a CLI image from an MCR:
docker pull mcr.microsoft.com/azure-cli:2.52.0This example uses version CLI 2.52.0. Deployment script uses the default CLI containers images.
Run the Docker image locally.
docker run -v <host drive letter>:/<host directory name>:/data -it mcr.microsoft.com/azuredeploymentscripts-powershell:az10.0Replace <host driver letter> and <host directory name> with an existing folder on the shared drive. It maps the folder to the /data folder in the container. For example, to map D:\docker:
docker run -v d:/docker:/data -it mcr.microsoft.com/azuredeploymentscripts-powershell:az10.0-it means keeping the container image alive.
A CLI example:
docker run -v d:/docker:/data -it mcr.microsoft.com/azure-cli:2.52.0The following screenshot shows how to run a PowerShell script, given that you have a helloworld.ps1 file in the shared drive.

After the script is tested successfully, you can use it as a deployment script in your Bicep files.
Next steps
In this article, you learned how to create script development environments. To learn more:
Feedback
Coming soon: Throughout 2024 we will be phasing out GitHub Issues as the feedback mechanism for content and replacing it with a new feedback system. For more information see: https://aka.ms/ContentUserFeedback.
Submit and view feedback for