Authorize requests to Azure SignalR Service resources with Microsoft Entra applications
Azure SignalR Service supports Microsoft Entra ID for authorizing requests from Microsoft Entra applications.
This article shows how to configure your Azure SignalR Service resource and codes to authorize requests to the resource from a Microsoft Entra application.
Register an application
The first step is to register a Microsoft Entra application:
In the Azure portal, search for and select Microsoft Entra ID.
Under Manage, select App registrations.
Select New registration. The Register an application pane opens.
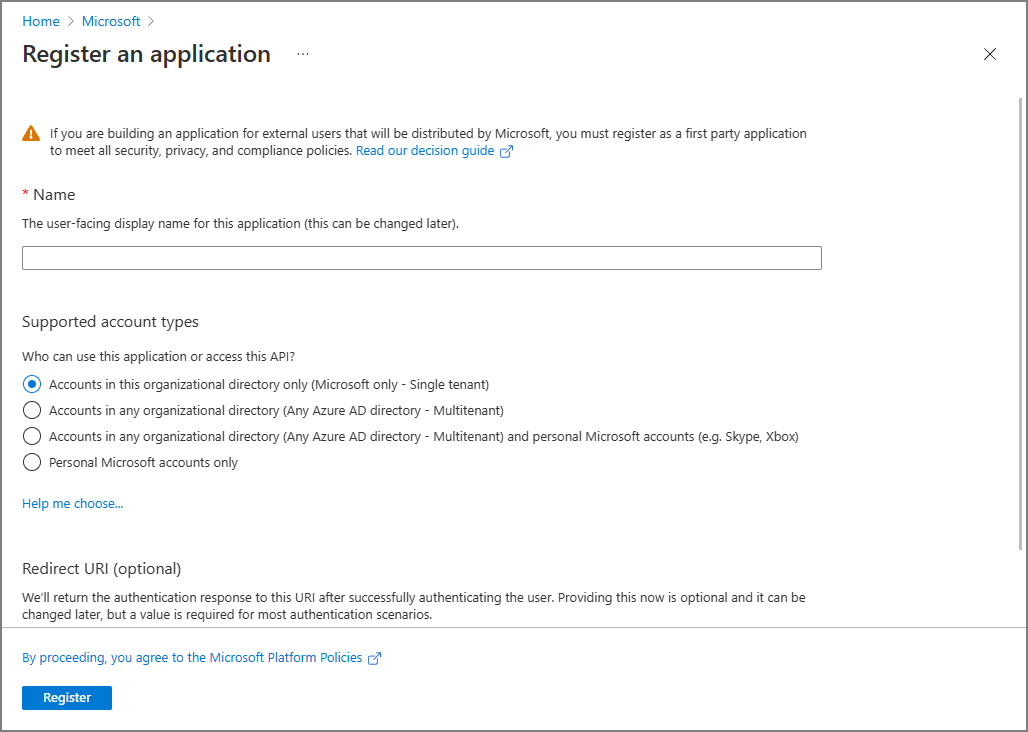
For Name, enter a display name for your application.
Select Register to confirm the registration.
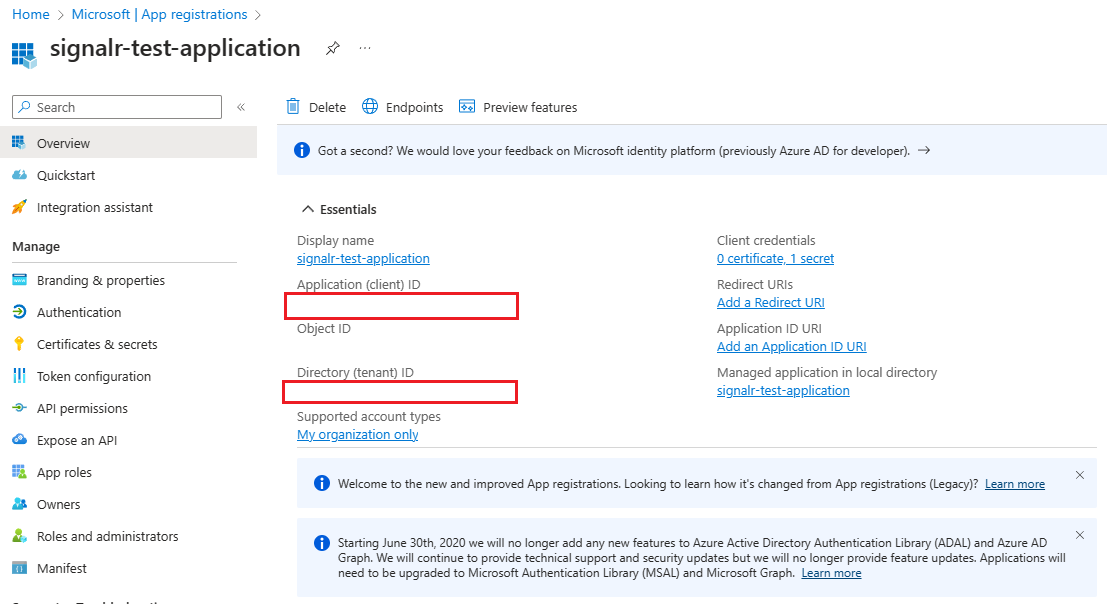
After you register your application, you can find the Application (client) ID and Directory (tenant) ID values on the application's overview page. These GUIDs can be useful in the following steps.
To learn more about registering an application, see Quickstart: Register an application with the Microsoft identity platform.
Add credentials
You can add both certificates and client secrets (a string) as credentials to your confidential client app registration.
Client secret
The application requires a client secret to prove its identity when it's requesting a token. To create a client secret, follow these steps:
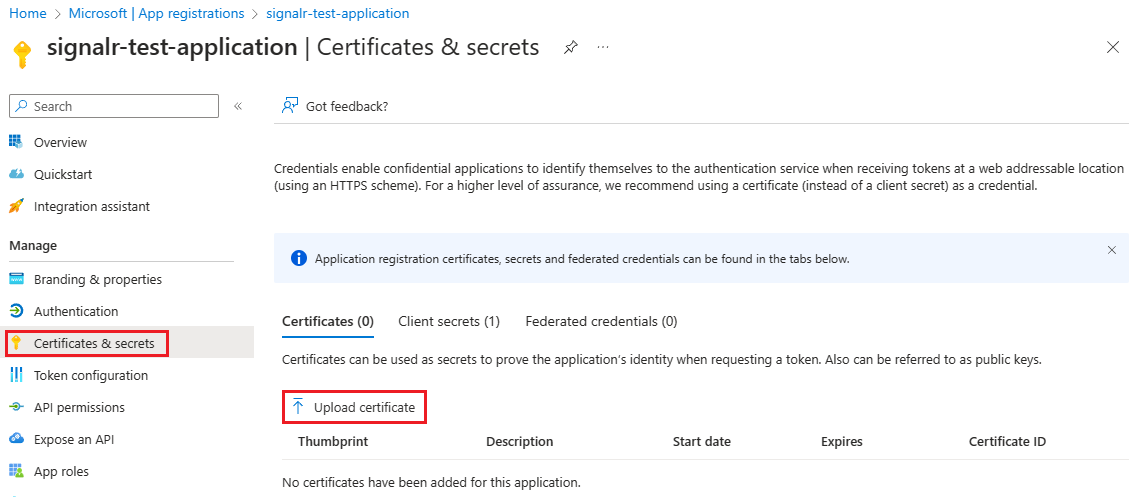
Under Manage, select Certificates & secrets.
On the Client secrets tab, select New client secret.

Enter a description for the client secret, and choose an expiration time.
Copy the value of the client secret and then paste it in a secure location.
Note
The secret appears only once.
Certificate
You can upload a certificate instead of creating a client secret.
To learn more about adding credentials, see Add credentials.
Add role assignments in the Azure portal
The following steps describe how to assign a SignalR App Server role to a service principal (application) over an Azure SignalR Service resource. For detailed steps, see Assign Azure roles using the Azure portal.
Note
A role can be assigned to any scope, including management group, subscription, resource group, or single resource. To learn more about scope, see Understand scope for Azure RBAC.
In the Azure portal, go to your Azure SignalR Service resource.
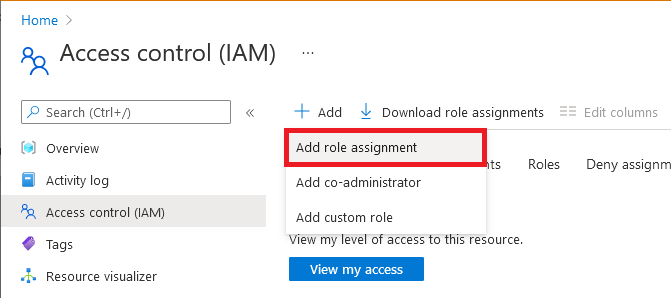
Select Access control (IAM).
Select Add > Add role assignment.
On the Role tab, select SignalR App Server.
On the Members tab, select User, group, or service principal, and then choose Select members.
Search for and select the application to which you want to assign the role.
On the Review + assign tab, select Review + assign to assign the role.
Important
Azure role assignments might take up to 30 minutes to propagate.
To learn more about how to assign and manage Azure roles, see these articles:
- Assign Azure roles using the Azure portal
- Assign Azure roles using the REST API
- Assign Azure roles using Azure PowerShell
- Assign Azure roles using the Azure CLI
- Assign Azure roles using Azure Resource Manager templates
Configure your app
App server
The best practice is to configure identity and credentials in your environment variables:
| Variable | Description |
|---|---|
AZURE_TENANT_ID |
The Microsoft Entra tenant ID. |
AZURE_CLIENT_ID |
The client (application) ID of an app registration in the tenant. |
AZURE_CLIENT_SECRET |
A client secret that was generated for the app registration. |
AZURE_CLIENT_CERTIFICATE_PATH |
A path to a certificate and private key pair in PEM or PFX format, which can authenticate the app registration. |
AZURE_USERNAME |
The username, also known as User Principal Name (UPN), of a Microsoft Entra user account. |
AZURE_PASSWORD |
The password of the Microsoft Entra user account. A password isn't supported for accounts with multifactor authentication enabled. |
You can use either DefaultAzureCredential or EnvironmentCredential to configure your Azure SignalR Service endpoints. Here's the code for DefaultAzureCredential:
services.AddSignalR().AddAzureSignalR(option =>
{
    option.Endpoints = new ServiceEndpoint[]
    {
        new ServiceEndpoint(new Uri("https://<resource-name>.service.signalr.net"), new DefaultAzureCredential())
    };
});
Here's the code for EnvironmentCredential:
services.AddSignalR().AddAzureSignalR(option =>
{
    option.Endpoints = new ServiceEndpoint[]
    {
        new ServiceEndpoint(new Uri("https://<resource-name>.service.signalr.net"), new EnvironmentCredential())
    };
});
To learn how DefaultAzureCredential works, see DefaultAzureCredential class.
Use endpoint-specific credentials
In your organization, you might want to use different credentials for different endpoints.
In this scenario, you can use ClientSecretCredential or ClientCertificateCredential:
services.AddSignalR().AddAzureSignalR(option =>
{
    var credential1 = new ClientSecretCredential("tenantId", "clientId", "clientSecret");
    var credential2 = new ClientCertificateCredential("tenantId", "clientId", "pathToCert");

    option.Endpoints = new ServiceEndpoint[]
    {
        new ServiceEndpoint(new Uri("https://<resource1>.service.signalr.net"), credential1),
        new ServiceEndpoint(new Uri("https://<resource2>.service.signalr.net"), credential2),
    };
});
Azure SignalR Service bindings in Azure Functions
Azure SignalR Service bindings in Azure Functions use application settings in the portal or local.settings.json locally to configure Microsoft Entra application identities to access your Azure SignalR Service resources.
First, you need to specify the service URI of Azure SignalR Service. The key of the service URI is serviceUri. It starts with a connection name prefix (which defaults to AzureSignalRConnectionString) and a separator. The separator is an underscore (__) in the Azure portal and a colon (:) in the local.settings.json file. You can customize the connection name by using the binding property ConnectionStringSetting. Continue reading to find the sample.
Then, you choose whether to configure your Microsoft Entra application identity in predefined environment variables or in SignalR-specified variables.
Configure an identity in predefined environment variables
See Environment variables for the list of predefined environment variables. When you have multiple services, we recommend that you use the same application identity, so that you don't need to configure the identity for each service. Other services might also use these environment variables, based on the settings of those services.
For example, to use client secret credentials, configure the identity as follows in the local.settings.json file:
{
  "Values": {
    "<CONNECTION_NAME_PREFIX>:serviceUri": "https://<SIGNALR_RESOURCE_NAME>.service.signalr.net",
    "AZURE_CLIENT_ID": "...",
    "AZURE_CLIENT_SECRET": "...",
    "AZURE_TENANT_ID": "..."
  }
}
In the Azure portal, add settings as follows:
 <CONNECTION_NAME_PREFIX>__serviceUri=https://<SIGNALR_RESOURCE_NAME>.service.signalr.net
AZURE_CLIENT_ID = ...
AZURE_TENANT_ID = ...
AZURE_CLIENT_SECRET = ...
Configure an identity in SignalR-specified variables
SignalR-specified variables share the same key prefix with the serviceUri key. Here's the list of variables that you might use:
clientIdclientSecrettenantId
Here are the samples to use client secret credentials in the local.settings.json file:
{
  "Values": {
    "<CONNECTION_NAME_PREFIX>:serviceUri": "https://<SIGNALR_RESOURCE_NAME>.service.signalr.net",
    "<CONNECTION_NAME_PREFIX>:clientId": "...",
    "<CONNECTION_NAME_PREFIX>:clientSecret": "...",
    "<CONNECTION_NAME_PREFIX>:tenantId": "..."
  }
}
In the Azure portal, add settings as follows:
<CONNECTION_NAME_PREFIX>__serviceUri = https://<SIGNALR_RESOURCE_NAME>.service.signalr.net
<CONNECTION_NAME_PREFIX>__clientId = ...
<CONNECTION_NAME_PREFIX>__clientSecret = ...
<CONNECTION_NAME_PREFIX>__tenantId = ...
Next steps
See the following related articles:
Feedback
Coming soon: Throughout 2024 we will be phasing out GitHub Issues as the feedback mechanism for content and replacing it with a new feedback system. For more information see: https://aka.ms/ContentUserFeedback.
Submit and view feedback for