Tutorial: Azure SignalR Service authentication with Azure Functions
In this step-by-step tutorial, you build a chat room with authentication and private messaging by using these technologies:
- Azure Functions: Back-end API for authenticating users and sending chat messages.
- Azure SignalR Service: Service for broadcasting new messages to connected chat clients.
- Azure Storage: Storage service that Azure Functions requires.
- Azure App Service: Service that provides user authentication.
Prerequisites
- An Azure account with an active subscription. If you don't have one, you can create one for free.
- Node.js (version 20.x).
- Azure Functions Core Tools (version 4).
Create essential resources on Azure
Create an Azure SignalR Service resource
Your application will access an Azure SignalR Service instance. Use the following steps to create an Azure SignalR Service instance by using the Azure portal:
In the Azure portal, select the Create a resource (+) button.
Search for SignalR Service and select it.
Select Create.
Enter the following information.
Name Value Resource group Create a new resource group with a unique name. Resource name Enter a unique name for the Azure SignalR Service instance. Region Select a region close to you. Pricing Tier Select Free. Service mode Select Serverless. Select Review + Create.
Select Create.
Create an Azure function app and an Azure storage account
From the home page in the Azure portal, select Create a resource (+).
Search for Function App and select it.
Select Create.
Enter the following information.
Name Value Resource group Use the same resource group with your Azure SignalR Service instance. Function App name Enter a unique name for the function app. Runtime stack Select Node.js. Region Select a region close to you. By default, a new Azure storage account is created in the same resource group together with your function app. If you want to use another storage account in the function app, switch to the Hosting tab to choose an account.
Select Review + Create, and then select Create.
Create an Azure Functions project locally
Initialize a function app
From a command line, create a root folder for your project and change to the folder.
Run the following command in your terminal to create a new JavaScript Functions project:
By default, the generated project includes a host.json file that contains the extension bundles that include the SignalR extension. For more information about extension bundles, see Register Azure Functions binding extensions.
Configure application settings
When you run and debug the Azure Functions runtime locally, the function app reads application settings from local.settings.json. Update this file with the connection strings of the Azure SignalR Service instance and the storage account that you created earlier.
Replace the content of local.settings.json with the following code:
{
  "IsEncrypted": false,
  "Values": {
    "FUNCTIONS_WORKER_RUNTIME": "node",
    "AzureWebJobsStorage": "<your-storage-account-connection-string>",
    "AzureSignalRConnectionString": "<your-Azure-SignalR-connection-string>"
  }
}
In the preceding code:
Enter the Azure SignalR Service connection string into the
AzureSignalRConnectionStringsetting.To get the string, go to your Azure SignalR Service instance in the Azure portal. In the Settings section, locate the Keys setting. Select the Copy button to the right of the connection string to copy it to your clipboard. You can use either the primary or secondary connection string.
Enter the storage account connection string into the
AzureWebJobsStoragesetting.To get the string, go to your storage account in the Azure portal. In the Security + networking section, locate the Access keys setting. Select the Copy button to the right of the connection string to copy it to your clipboard. You can use either the primary or secondary connection string.
Create a function to authenticate users to Azure SignalR Service
When the chat app first opens in the browser, it requires valid connection credentials to connect to Azure SignalR Service. Create an HTTP trigger function named negotiate in your function app to return this connection information.
Note
This function must be named negotiate because the SignalR client requires an endpoint that ends in /negotiate.
From the root project folder, create the
negotiatefunction from a built-in template by using the following command:func new --template "HTTP trigger" --name negotiateOpen src/functions/negotiate.js, update the content as follows:
const { app, input } = require('@azure/functions');

const inputSignalR = input.generic({
    type: 'signalRConnectionInfo',
    name: 'connectionInfo',
    hubName: 'default',
    connectionStringSetting: 'AzureSignalRConnectionString',
});

app.post('negotiate', {
    authLevel: 'anonymous',
    handler: (request, context) => {
        return { body: JSON.stringify(context.extraInputs.get(inputSignalR)) }
    },
    route: 'negotiate',
    extraInputs: [inputSignalR],
});
The function contains an HTTP trigger binding to receive requests from SignalR clients. The function also contains a SignalR input binding to generate valid credentials for a client to connect to an Azure SignalR Service hub named
default.This function takes the SignalR connection information from the input binding and returns it to the client in the HTTP response body..
There's no
userIdproperty in thesignalRConnectionInfobinding for local development. You'll add it later to set the username of a SignalR connection when you deploy the function app to Azure.
Create a function to send chat messages
The web app also requires an HTTP API to send chat messages. Create an HTTP trigger function that sends messages to all connected clients that use Azure SignalR Service:
From the root project folder, create an HTTP trigger function named
sendMessagefrom the template by using the following command:func new --name sendMessage --template "Http trigger"Open the src/functions/sendMessage.js file, update the content as follows:
const { app, output } = require('@azure/functions');

const signalR = output.generic({
    type: 'signalR',
    name: 'signalR',
    hubName: 'default',
    connectionStringSetting: 'AzureSignalRConnectionString',
});

app.http('messages', {
    methods: ['POST'],
    authLevel: 'anonymous',
    extraOutputs: [signalR],
    handler: async (request, context) => {
        const message = await request.json();
        message.sender = request.headers && request.headers.get('x-ms-client-principal-name') || '';

        let recipientUserId = '';
        if (message.recipient) {
            recipientUserId = message.recipient;
            message.isPrivate = true;
        }
        context.extraOutputs.set(signalR,
            {
                'userId': recipientUserId,
                'target': 'newMessage',
                'arguments': [message]
            });
    }
});
The function contains an HTTP trigger and a SignalR output binding. It takes the body from the HTTP request and sends it to clients connected to Azure SignalR Service. It invokes a function named
newMessageon each client.The function can read the sender's identity and can accept a
recipientvalue in the message body to allow you to send a message privately to a single user. You'll use these functionalities later in the tutorial.Save the file.
Host the chat client's web user interface
The chat application's UI is a simple single-page application (SPA) created with the Vue JavaScript framework by using the ASP.NET Core SignalR JavaScript client. For simplicity, the function app hosts the webpage. In a production environment, you can use Static Web Apps to host the webpage.
Create a file named index.html in the root directory of your function project.
Copy and paste the content of index.html to your file. Save the file.
From the root project folder, create an HTTP trigger function named
indexfrom the template by using this command:func new --name index --template "Http trigger"Modify the content of src/functions/index.js to the following code:
const { app } = require('@azure/functions');
const { readFile } = require('fs/promises');

app.http('index', {
    methods: ['GET'],
    authLevel: 'anonymous',
    handler: async (context) => {
        const content = await readFile('index.html', 'utf8', (err, data) => {
            if (err) {
                context.err(err)
                return
            }
        });

        return {
            status: 200,
            headers: {
                'Content-Type': 'text/html'
            },
            body: content,
        };
    }
});
The function reads the static webpage and returns it to the user.
Test your app locally. Start the function app by using this command:
func startOpen
http://localhost:7071/api/indexin your web browser. A chat webpage should appear.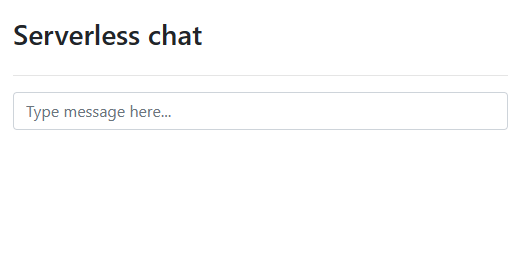
Enter a message in the chat box.
After you select the Enter key, the message appears on the webpage. Because the username of the SignalR client isn't set, you're sending all messages anonymously.
Deploy to Azure and enable authentication
You've been running the function app and chat app locally. Now, deploy them to Azure and enable authentication and private messaging.
Configure the function app for authentication
So far, the chat app works anonymously. In Azure, you'll use App Service authentication to authenticate the user. The user ID or username of the authenticated user is passed to the SignalRConnectionInfo binding to generate connection information authenticated as the user.
Open src/functions/negotiate.js file.
Insert a
userIdproperty into theinputSignalRbinding with the value{headers.x-ms-client-principal-name}. This value is a binding expression that sets the username of the SignalR client to the name of the authenticated user. The binding should now look like this example:const inputSignalR = input.generic({ type: 'signalRConnectionInfo', name: 'connectionInfo', hubName: 'default', connectionStringSetting: 'AzureSignalRConnectionString', userId: '{headers.x-ms-client-principal-name}' });Save the file.
Deploy the function app to Azure
Deploy the function app to Azure by using the following command:
func azure functionapp publish <your-function-app-name> --publish-local-settings
The --publish-local-settings option publishes your local settings from the local.settings.json file to Azure, so you don't need to configure them in Azure again.
Enable App Service authentication
Azure Functions supports authentication with Microsoft Entra ID, Facebook, Twitter, Microsoft account, and Google. You'll use Microsoft as the identity provider for this tutorial.
In the Azure portal, go to the resource page of your function app.
Select Settings > Authentication.
Select Add identity provider.

In the Identity provider list, select Microsoft. Then select Add.
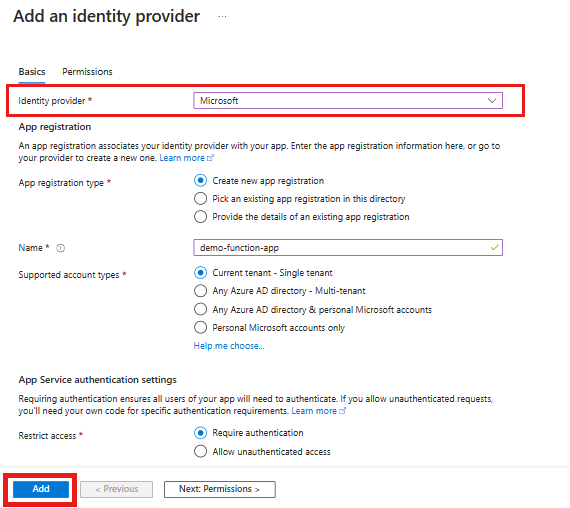
The completed settings create an app registration that associates your identity provider with your function app.
For more information about the supported identity providers, see the following articles:
Try the application
- Open
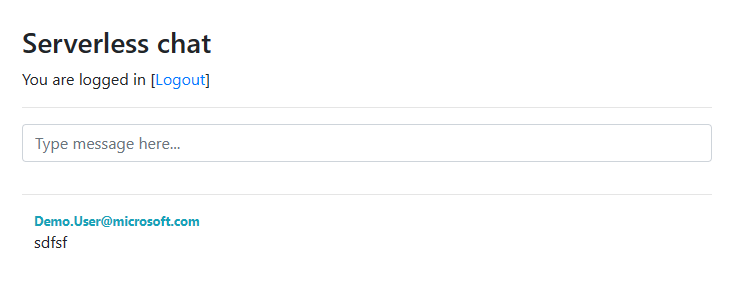
https://<YOUR-FUNCTION-APP-NAME>.azurewebsites.net/api/index. - Select Login to authenticate with your chosen authentication provider.
- Send public messages by entering them in the main chat box.
- Send private messages by selecting a username in the chat history. Only the selected recipient receives these messages.
Congratulations! You deployed a real-time, serverless chat app.
Clean up resources
To clean up the resources that you created in this tutorial, delete the resource group by using the Azure portal.
Caution
Deleting the resource group deletes all the resources that it contains. If the resource group contains resources outside the scope of this tutorial, they're also deleted.
Next steps
In this tutorial, you learned how to use Azure Functions with Azure SignalR Service. Read more about building real-time serverless applications with Azure SignalR Service bindings for Azure Functions:
Feedback
Coming soon: Throughout 2024 we will be phasing out GitHub Issues as the feedback mechanism for content and replacing it with a new feedback system. For more information see: https://aka.ms/ContentUserFeedback.
Submit and view feedback for