Quickstart: Receive and Reply to SMS
Azure Communication Services SMS capabilities provide developers options to consume SMS received events. The events are posted to Azure Event Grid which provides out of the box integrations to process those using webhooks, Azure Functions, Power Automate / Logic App connectors, and more.
Once received, SMS messages can be processed to respond to them or to simply log them to a database for future access.
In this QuickStart, we will focus on showcasing the processing of SMS received events through Azure Functions using Event Grid triggers and no-code connectors for Power Automate / Logic Apps.
The SMSReceived event generated when an SMS is sent to an Azure Communication Services phone number is formatted in the following way:
[{
  "id": "Incoming_20200918002745d29ebbea-3341-4466-9690-0a03af35228e",
  "topic": "/subscriptions/50ad1522-5c2c-4d9a-a6c8-67c11ecb75b8/resourcegroups/acse2e/providers/microsoft.communication/communicationservices/{communication-services-resource-name}",
  "subject": "/phonenumber/15555555555",
  "data": {
    "MessageId": "Incoming_20200918002745d29ebbea-3341-4466-9690-0a03af35228e",
    "From": "15555555555",
    "To": "15555555555",
    "Message": "Great to connect with Azure Communication Services events",
    "ReceivedTimestamp": "2020-09-18T00:27:45.32Z"
  },
  "eventType": "Microsoft.Communication.SMSReceived",
  "dataVersion": "1.0",
  "metadataVersion": "1",
  "eventTime": "2020-09-18T00:27:47Z"
}]
To start generating the events, we must configure Azure Event Grid for our Azure Communication Services resource.
Note
Using Azure Event Grid incurs additional costs. For more information, see Azure Event Grid pricing.
Pre-requisites
- An Azure account with an active subscription. Create an account for free.
- An active Communication Services resource and connection string. Create a Communication Services resource.
- An SMS-enabled telephone number. Get a phone number.
- Enable Event Grid resource provide on your subscription. See instructions.
Event Grid provides out of the box support for Azure Functions, making it easy to set up an event listener without the need to deal with the complexity of parsing headers or debugging webhooks. Using the out of the box trigger, we can set up an Azure Function that runs each time an event is detected that matches the trigger. In this document, we focus on SMS received triggers.
Setting up our local environment
Using Visual Studio Code, install the Azure Functions Extension.
With the extension, create an Azure Function following these instructions.
Configure the function with the following instructions:
- Language: TypeScript
- Template: Azure Event Grid Trigger
- Function Name: User defined
Once created, you see a function created in your directory like this:
import { AzureFunction, Context } from "@azure/functions"

const eventGridTrigger: AzureFunction = async function (context: Context, eventGridEvent: any): Promise<void> {
    context.log(eventGridEvent);

};

export default eventGridTrigger;
Configure Azure Function to receive SMS event
Configure Azure Function to parse values from the event like who sent it, to what number and what the message was.
import { AzureFunction, Context } from "@azure/functions"

const eventGridTrigger: AzureFunction = async function (context: Context, eventGridEvent: any): Promise<void> {
   context.log(eventGridEvent);
   const to = eventGridEvent['data']['to'];
   const from = eventGridEvent['data']['from'];
   const message = eventGridEvent['data']['message'];

};

export default eventGridTrigger;
At this point, you have successfully handled receiving an SMS through events. Now the possibilities of what to do with that event range from just logging it to responding to it. In the next section, we focus on responding to that SMS we received. If you don't want to do respond to the SMS, skip to the next section on running the function locally.
Responding to the SMS
- To respond to the incoming SMS, we use the Azure Communication Service SMS capabilities for sending SMS. We start by invoking the
SmsClientand initializing it with theconnection stringfor our resource. You can either paste the connection string directly in the code or place it inside your local.settings.json file in your Azure Function directory under values.
{
  "IsEncrypted": false,
  "Values": {
    "FUNCTIONS_WORKER_RUNTIME": "node",
    "ACS_CONNECTION_STRING": "<<CONNECTION STRING>>"
  }
}
Then we compose an SMS to send based on the
toandfromvalues from the event we got.import { AzureFunction, Context } from "@azure/functions" import { SmsClient } from "@azure/communication-sms"; const connectionString = process.env.ACS_CONNECTION_STRING; //Replace with your connection string const eventGridTrigger: AzureFunction = async function (context: Context, eventGridEvent: any): Promise<void> { context.log(eventGridEvent); const to = eventGridEvent['data']['to']; const from = eventGridEvent['data']['from']; const message = eventGridEvent['data']['message']; const smsClient = new SmsClient(connectionString); const sendResults = await smsClient.send({ from: to, to: [from], message: "Message received successfully. Will respond shortly." }); }; export default eventGridTrigger;
From here, the possibilities are endless. From responding to a message with a pre-canned answer, to adding a bot or simply storing responses, you can adapt the code in the last step to do that.
Running locally
To run the function locally, press F5 in Visual Studio Code. We use ngrok to hook our locally running Azure Function with Azure Event Grid.
Once the function is running, we configure ngrok. (You need to download ngrok for your environment.)
ngrok http 7071Copy the ngrok link provided where your function is running.
Configure SMS events through Event Grid within your Azure Communication Services resource. We do this using the Azure CLI. You need the resource ID for your Azure Communication Services resource found in the Azure portal. (The resource ID will look something like: /subscriptions/
<<AZURE SUBSCRIPTION ID>>/resourceGroups/<<RESOURCE GROUP NAME>>/providers/Microsoft.Communication/CommunicationServices/<<RESOURCE NAME>>)az eventgrid event-subscription create --name "<<EVENT_SUBSCRIPTION_NAME>>" --endpoint-type webhook --endpoint "<<NGROK URL>> " --source-resource-id "<<RESOURCE_ID>>" --included-event-types Microsoft.Communication.SMSReceivedNow that everything is hooked up, test the flow by sending an SMS to the phone number you've on your Azure Communication Services resource. You should see the console logs on your terminal where the function is running. If you added the code to respond to the SMS, you should see that text message delivered back to you.
Deploy to Azure
To deploy the Azure Function to Azure, you need to follow these instructions. Once deployed, we configure Event Grid for the Azure Communication Services resource. With the URL for the Azure Function that was deployed (URL found in the Azure portal under the function), we run the following command:
az eventgrid event-subscription update --name "<<EVENT_SUBSCRIPTION_NAME>>" --endpoint-type azurefunction --endpoint "<<AZ FUNCTION URL>> " --source-resource-id "<<RESOURCE_ID>>"
Since we are updating the event subscription we created for local testing, make sure to use the same event subscription name you used above.
You can test by sending an SMS to the phone number you have procured through Azure Communication Services resource.
Logic Apps and Power Automate provide out of the box connectors to help handle events generated by Azure Communication Services through Event Grid. Both Logic Apps and Power Automate provide the same set of connectors. It's up to you to decide what you prefer, read about the differences between the services to inform your decision.
Handling events with the Event Grid connector
Start by creating a new flow in your preferred environment. Pick the
When a resource event occurstrigger to get started.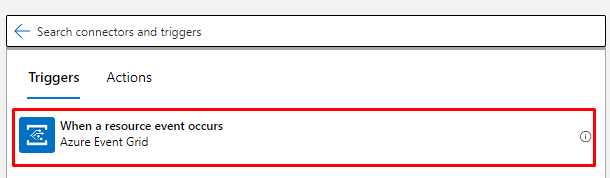
Now, lets configure it. The connector requires you to provide a subscription you want to use. (Should be the same subscription where your Azure Communication Services resource is). Specify the type of resource. In this case, choose
Microsoft.Communication.CommunicationServices. Then you need to provide a resource name for the Azure Communication Services resource you want it to connect to. Finally, we need to pick the event types we want to receive, in this case:Microsoft.Communication.SMSReceived.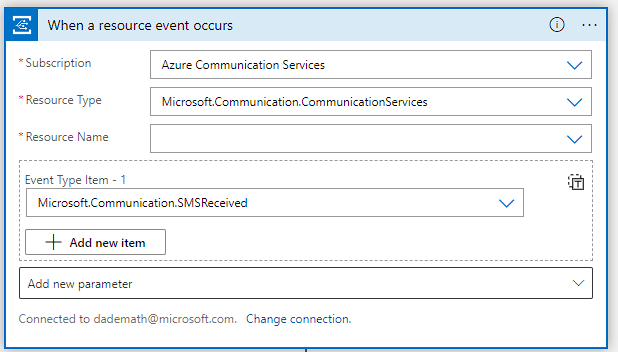
The connector automatically sets up the event subscription on your behalf and configures the events it wants to receive.
To make our lives easier later on, add a
Parse JSON connectorto process response coming from the Event Grid connector. Configure the connector to take theBodyobject from the Event Grid connector and match it to our expected schema for the event:Sample schema (open to see)
    {
        "properties": {
            "data": {
                "properties": {
                    "From": {
                        "type": "string"
                    },
                    "Message": {
                        "type": "string"
                    },
                    "MessageId": {
                        "type": "string"
                    },
                    "ReceivedTimestamp": {
                        "type": "string"
                    },
                    "To": {
                        "type": "string"
                    }
                },
                "type": "object"
            },
            "dataVersion": {
                "type": "string"
            },
            "eventTime": {
                "type": "string"
            },
            "eventType": {
                "type": "string"
            },
            "id": {
                "type": "string"
            },
            "metadataVersion": {
                "type": "string"
            },
            "subject": {
                "type": "string"
            },
            "topic": {
                "type": "string"
            }
        },
        "type": "object"
    }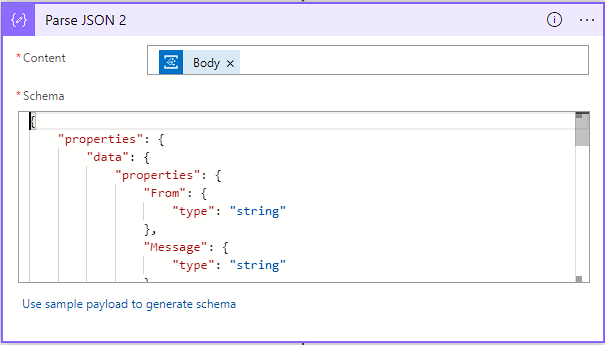
At this point, you've successfully handled the SMS event. You then have multiple options of what to do with it ranging from logging the event to responding to the SMS. In the context of this document, we will show how to respond to it. Continue reading to learn the steps to respond to the SMS.
Responding to the SMS
Start by adding the SMS connector into our flow and configuring it with the information for our Azure Communication Services resource. It allows the connector to access the resource and send the SMS on our behalf. You need the
connection stringfor your resource.
Next, we configure the connector with the information for the sender and recipient. We use the information from the event we received to populate them. Fip the
toandfromnumbers to send an SMS back to the original sender. Finally, add a message.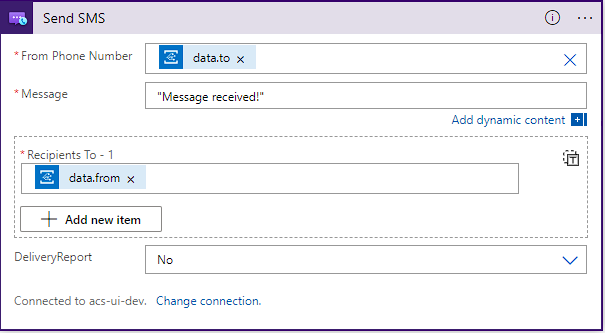
Now, you can save the flow and test it by sending an SMS to the phone number associated with your Azure Communication Services resource. You should receive back a text message.
From here, the possibilities are endless. From responding to a message with a pre-canned answer, to adding a bot or simply storing responses, you can add more logic to the flow.
Clean up resources
If you want to clean up and remove a Communication Services subscription, you can delete the resource or resource group. Deleting the resource group also deletes any other resources associated with it. Learn more about cleaning up resources.
Toll-free verification
If you have a new toll-free number and want to send high volume of SMS messages or send SMS messages to Canadian phone numbers, please visit here to learn how to verify your toll-free number.
Next steps
In this quickstart, you learned how to send SMS messages by using Communication Services.
Feedback
Coming soon: Throughout 2024 we will be phasing out GitHub Issues as the feedback mechanism for content and replacing it with a new feedback system. For more information see: https://aka.ms/ContentUserFeedback.
Submit and view feedback for