Quickstart: Create and manage Communication Services resources
Article
Get started with Azure Communication Services by provisioning your first Communication Services resource. Communication Services resources can be provisioned through the Azure portal or using the .NET management SDK. The management SDK and the Azure portal enable you to create, configure, update, and delete your resources and interface using the new deployment and management service: Azure Resource Manager. All functions available in the SDKs are available in the Azure portal.
Warning
Note that you can't create a resource group at the same time as a resource for Azure Communication Services. Before creating a resource, you need to first create a resource group.
If you're planning to use phone numbers, you can't use the free trial account. Check that your subscription meets all the requirements if you plan to purchase phone numbers before creating your resource.
Create Azure Communication Services resource
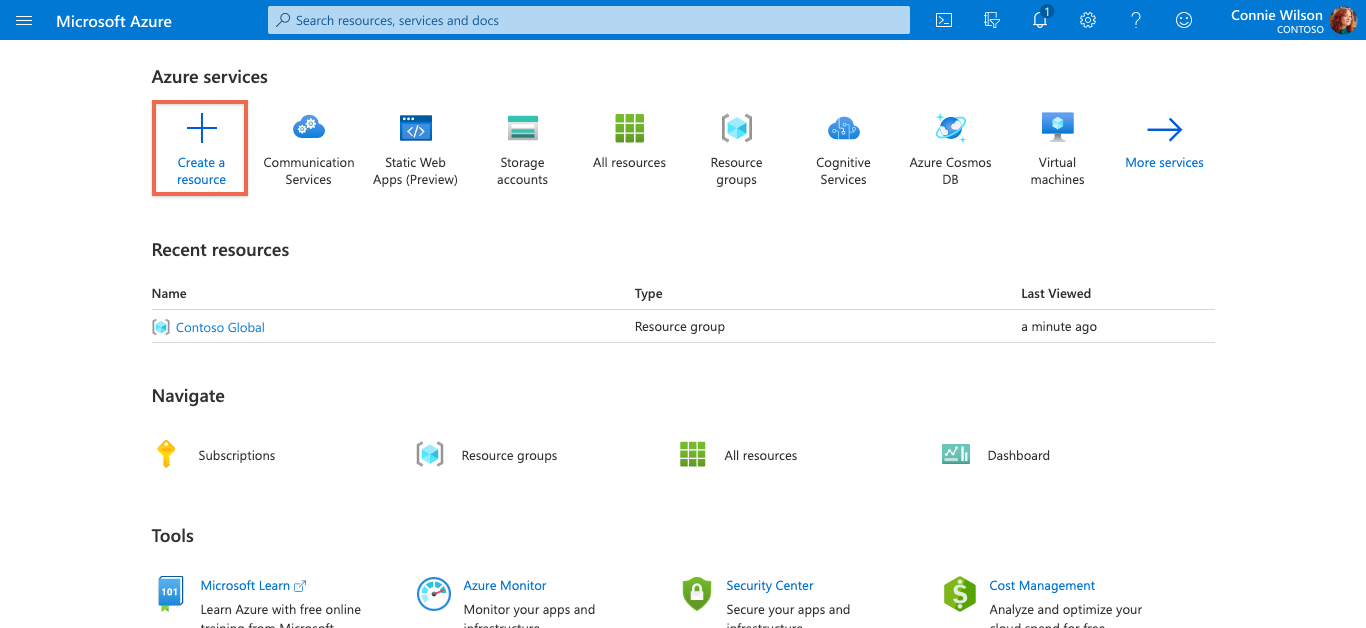
To create an Azure Communication Services resource, first sign in to the Azure portal. In the upper-left corner of the page, select + Create a resource.
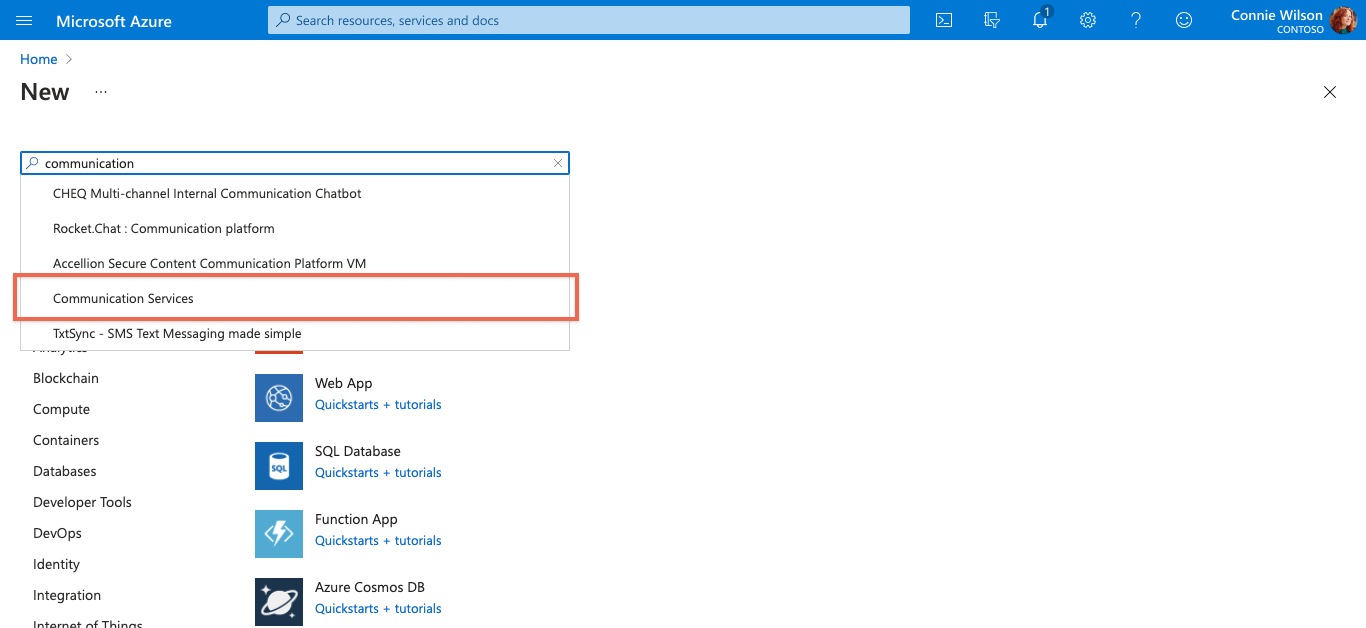
Enter Communication into either the Search the Marketplace input or the search bar at the top of the portal.
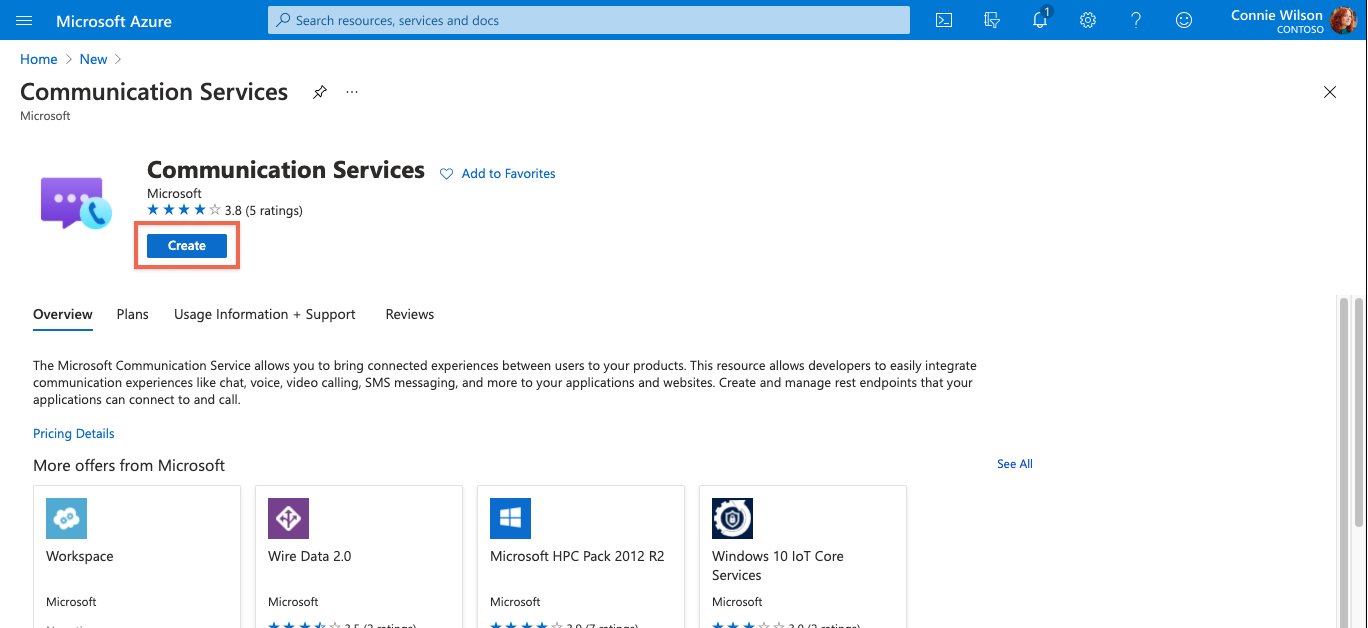
Select Communication Services in the results, and then select Create.
You can now configure your Communication Services resource. On the first page of the create process, you need to specify:
The subscription
The resource group (you can create a new one or choose an existing resource group)
Finally, you can review your configuration and Create the resource. Deployment takes a few minutes to complete.
Manage your Communication Services resource
To manage your Communication Services resource, sign in to the Azure portal, and search for and select Azure Communication Services.
On the Communication Services page, select the name of your resource.
The Overview page for your resource contains options for basic management like browse, stop, start, restart, and delete. For more configuration options, see the left menu of your resource page.
If you're planning on using phone numbers, you can't use the free trial account. Check that your subscription meets all the requirements if you plan to purchase phone numbers before creating your resource.
Create Azure Communication Services resource
To create an Azure Communication Services resource, sign in to Azure CLI. You can sign in running the az login command from the terminal and provide your credentials. Run the following command to create the resource:
Azure PowerShell
az communication create --name"<acsResourceName>" --location"Global" --data-location"United States" --resource-group"<resourceGroup>"
If you would like to select a specific subscription, you can also specify the --subscription flag and provide the subscription ID.
Azure PowerShell
az communication create --name"<acsResourceName>" --location"Global" --data-location"United States" --resource-group"<resourceGroup>" --subscription"<subscriptionId>"
You can configure your Communication Services resource with the following options:
To add tags to your Communication Services resource, run the following commands. You can target a specific subscription as well.
Azure PowerShell
az communication update --name"<communicationName>" --tags newTag="newVal1" --resource-group"<resourceGroup>"
az communication update --name"<communicationName>" --tags newTag="newVal2" --resource-group"<resourceGroup>" --subscription"<subscriptionId>"
az communication show --name"<communicationName>" --resource-group"<resourceGroup>"
az communication show --name"<communicationName>" --resource-group"<resourceGroup>" --subscription"<subscriptionId>"
If you're planning on using phone numbers, you can't use the free trial account. Check that your subscription meets all the requirements if you plan to purchase phone numbers before creating your resource.
Installing the SDK
First, include the Communication Services Management SDK in your C# project:
C#
using Azure.ResourceManager.Communication;
Subscription ID
You need to know the ID of your Azure subscription. This can be acquired from the portal:
For the examples in this quickstart to work, you need to store your subscription ID in an environment variable called AZURE_SUBSCRIPTION_ID.
Authentication
To communicate with Azure Communication Services, you must first authenticate yourself to Azure. You'll usually do this using a service principal identity.
Option 1: Managed Identity
If your code is running as a service in Azure, the easiest way to authenticate is to acquire a managed identity from Azure. For more information, see:
using Azure.Identity;
using Azure.ResourceManager.Communication;
using Azure.ResourceManager.Communication.Models;
using System;
...
var subscriptionId = "AZURE_SUBSCRIPTION_ID";
var acsClient = new CommunicationManagementClient(subscriptionId, new ManagedIdentityCredential());
ClientId of the managed identity that you created must be passed to the ManagedIdentityCredential explicitly.
C#
using Azure.Identity;
using Azure.ResourceManager.Communication;
using Azure.ResourceManager.Communication.Models;
using System;
...
var subscriptionId = "AZURE_SUBSCRIPTION_ID";
var managedIdentityCredential = new ManagedIdentityCredential("AZURE_CLIENT_ID");
var acsClient = new CommunicationManagementClient(subscriptionId, managedIdentityCredential);
After you create your service principal, you need to collect the following information about it from the Azure portal:
Client ID
Client Secret
Tenant ID
Store these values as environment variables named AZURE_CLIENT_ID, AZURE_CLIENT_SECRET, and AZURE_TENANT_ID, respectively. You can then create a Communication Services management client like this:
C#
using Azure.Identity;
using Azure.ResourceManager.Communication;
using Azure.ResourceManager.Communication.Models;
using System;
...
var subscriptionId = Environment.GetEnvironmentVariable("AZURE_SUBSCRIPTION_ID");
var acsClient = new CommunicationManagementClient(subscriptionId, new EnvironmentCredential());
Option 3: User Identity
If you want to call Azure on behalf of an interactive user, rather than using a service identity, you can use the following code to create an Azure Communication Services Management client. This opens a browser window to prompt the user for their MSA or Microsoft Entra credentials.
C#
using Azure.Identity;
using Azure.ResourceManager.Communication;
using Azure.ResourceManager.Communication.Models;
using System;
...
var subscriptionId = Environment.GetEnvironmentVariable("AZURE_SUBSCRIPTION_ID");
var communicationServiceClient = new CommunicationManagementClient(subscriptionId, new InteractiveBrowserCredential());
Managing Communication Services Resources
Interacting with Azure resources
Now that you're authenticated, you can use your management client to make API calls.
For each of the following examples, we assign our Communication Services resources to an existing resource group.
Create and manage a Communication Services resource
You can use the instance of the Communication Services Management SDK client (Azure.ResourceManager.Communication.CommunicationManagementClient) to perform operations on Communication Services resources.
Create a Communication Services resource
When creating a Communication Services resource, specify the resource group name and resource name. The Location property is always global, and during public preview the DataLocation value must be UnitedStates.
C#
var resourceGroupName = "myResourceGroupName";
var resourceName = "myResource";
var resource = new CommunicationServiceResource { Location = "Global", DataLocation = "UnitedStates"  };
var operation = await acsClient.CommunicationService.StartCreateOrUpdateAsync(resourceGroupName, resourceName, resource);
await operation.WaitForCompletionAsync();
Update a Communication Services resource
C#
...
var resourceGroupName = "myResourceGroupName";
var resourceName = "myResource";
var resource = new CommunicationServiceResource { Location = "Global", DataLocation = "UnitedStates" };
resource.Tags.Add("environment","test");
resource.Tags.Add("department","tech");
// Use existing resource name and new resource objectvar operation = await acsClient.CommunicationService.StartCreateOrUpdateAsync(resourceGroupName, resourceName, resource);
await operation.WaitForCompletionAsync();
List all Communication Services resources
C#
var resources = acsClient.CommunicationService.ListBySubscription();
foreach (var resource in resources)
{
    Console.WriteLine(resource.Name);
}
Delete a Communication Services resource
C#
var resourceGroupName = "myResourceGroupName";
var resourceName = "myResource";
await acsClient.CommunicationService.StartDeleteAsync(resourceGroupName, resourceName);
Managing keys and connection strings
Every Communication Services resource has a pair of access keys and corresponding connection strings. You can access these keys using the Management SDK and then make them available to other Communication Services SDKs to authenticate themselves to Azure Communication Services.
Get access keys for a Communication Services resource
C#
var resourceGroupName = "myResourceGroupName";
var resourceName = "myResource";
var keys = await acsClient.CommunicationService.ListKeysAsync(resourceGroupName, resourceName);

Console.WriteLine(keys.Value.PrimaryConnectionString);
Console.WriteLine(keys.Value.SecondaryConnectionString);
Regenerate an access key for a Communication Services resource
C#
var resourceGroupName = "myResourceGroupName";
var resourceName = "myResource";
var keyParams = new RegenerateKeyParameters { KeyType = KeyType.Primary };
var keys = await acsClient.CommunicationService.RegenerateKeyAsync(resourceGroupName, resourceName, keyParams);

Console.WriteLine(keys.Value.PrimaryKey);
If you're planning on using phone numbers, you can't use the free trial account. Check that your subscription meets all the requirements if you plan to purchase phone numbers before creating your resource.
Create Azure Communication Services resource
To create an Azure Communication Services resource, sign in to Azure CLI. You can create a resource through the terminal using the Connect-AzAccount command and providing your credentials.
First, install the Azure Communication Services module Az.Communication using the following command.
Access your connection strings and service endpoints
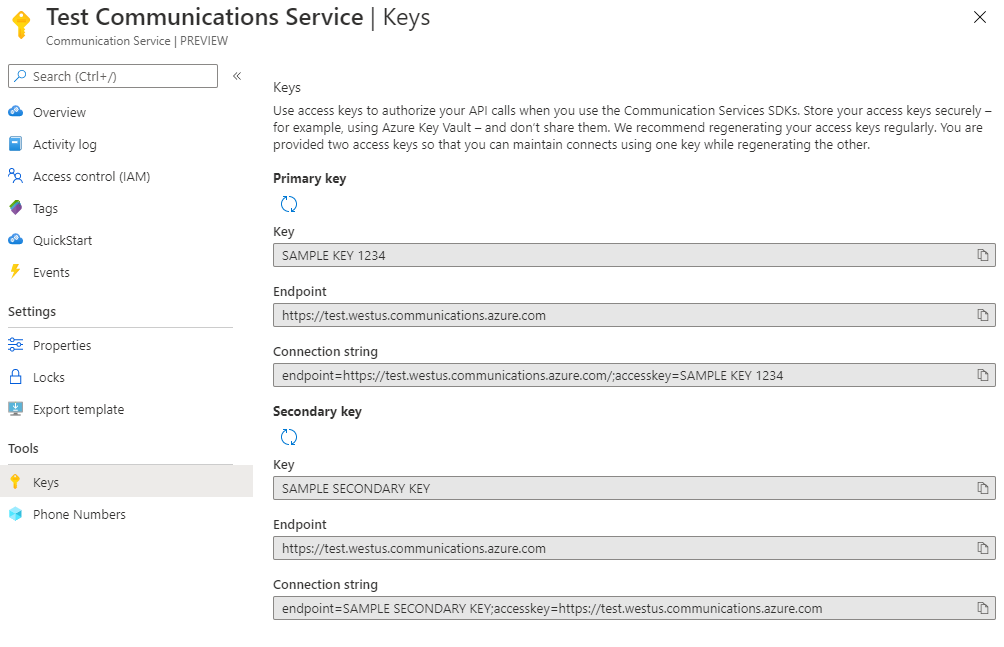
Connection strings enable the Communication Services SDKs to connect and authenticate to Azure. You can access your Communication Services connection strings and service endpoints from the Azure portal or programmatically with Azure Resource Manager APIs.
After navigating to your Communication Services resource, select Keys from the navigation menu and copy the Connection string or Endpoint values for usage by the Communication Services SDKs. You have access to primary and secondary keys. This can be useful when you would like to provide temporary access to your Communication Services resources to a third-party or staging environment.
Access your connection strings and service endpoints using Azure CLI
You can also access key information using Azure CLI, like your resource group or the keys for a specific resource.
Install Azure CLI and use the following command to sign in. You need to provide your credentials to connect with your Azure account.
Azure PowerShell
az login
Now you can access important information about your resources.
Azure PowerShell
az communication list --resource-group"<resourceGroup>"
az communication list-key --name"<acsResourceName>" --resource-group"<resourceGroup>"
If you would like to select a specific subscription, you can also specify the --subscription flag and provide the subscription ID.
Azure PowerShell
az communication list --resource-group"<resourceGroup>" --subscription"<subscriptionId>"
az communication list-key --name"<acsResourceName>" --resource-group"<resourceGroup>" --subscription"<subscriptionId>"
Store your connection string
Communication Services SDKs use connection strings to authorize requests made to Communication Services. You have several options for storing your connection string:
An application running on the desktop or on a device can store the connection string in an app.config or web.config file. Add the connection string to the AppSettings section in these files.
An application running in an Azure App Service can store the connection string in the App Service application settings. Add the connection string to the Connection Strings section of the Application Settings tab within the portal.
If you're running your application locally, you may want to store your connection string in an environment variable.
Store your connection string in an environment variable
To configure an environment variable, open a console window and select your operating system from the following tabs. Replace <yourconnectionstring> with your actual connection string.
After you add the environment variable, you may need to restart any running programs that read the environment variable, including the console window. For example, if you're using Visual Studio as your editor, restart Visual Studio before running the example.
Edit your .zshrc file, and add the environment variable:
After you add the environment variable, run source ~/.zshrc from your console window to make the changes effective. If you created the environment variable with your IDE open, you may need to close and reopen the editor, IDE, or shell to access the variable.
Edit your .bash_profile file, and add the environment variable:
After you add the environment variable, run source ~/.bash_profile from your console window to make the changes effective. If you created the environment variable with your IDE open, you may need to close and reopen the editor, IDE, or shell to access the variable.
Clean up resources
If you want to clean up and remove a Communication Services subscription, you can delete the resource or resource group. To delete your communication resource, run the following command.
Azure CLI
az communication delete --name"acsResourceName"--resource-group"resourceGroup"
If you have any phone numbers assigned to your resource upon resource deletion, the phone numbers are automatically released from your resource at the same time.
Note
Resource deletion is permanent and no data, including event grid filters, phone numbers, or other data tied to your resource, can be recovered if you delete the resource.