Create an Angular app with Azure Cosmos DB's API for MongoDB - Create an Azure Cosmos DB account
APPLIES TO:
![]() MongoDB
MongoDB
This multi-part tutorial demonstrates how to create a new app written in Node.js with Express and Angular and then connect it to your Azure Cosmos DB account configured with Azure Cosmos DB's API for MongoDB.
Part 4 of the tutorial builds on Part 3 and covers the following tasks:
- Create an Azure resource group using the Azure CLI
- Create an Azure Cosmos DB account using the Azure CLI
Video walkthrough
Prerequisites
Before starting this part of the tutorial, ensure you've completed the steps in Part 3 of the tutorial.
In this tutorial section, you can either use the Azure Cloud Shell (in your internet browser) or the Azure CLI installed locally.
Azure Cloud Shell
Azure hosts Azure Cloud Shell, an interactive shell environment that you can use through your browser. You can use either Bash or PowerShell with Cloud Shell to work with Azure services. You can use the Cloud Shell preinstalled commands to run the code in this article, without having to install anything on your local environment.
To start Azure Cloud Shell:
| Option | Example/Link |
|---|---|
| Select Try It in the upper-right corner of a code or command block. Selecting Try It doesn't automatically copy the code or command to Cloud Shell. |  |
| Go to https://shell.azure.com, or select the Launch Cloud Shell button to open Cloud Shell in your browser. |  |
| Select the Cloud Shell button on the menu bar at the upper right in the Azure portal. |  |
To use Azure Cloud Shell:
Start Cloud Shell.
Select the Copy button on a code block (or command block) to copy the code or command.
Paste the code or command into the Cloud Shell session by selecting Ctrl+Shift+V on Windows and Linux, or by selecting Cmd+Shift+V on macOS.
Select Enter to run the code or command.
Sign in to Azure
You'll use the Azure CLI to create the resources needed to host your app in Azure. If you run Azure CLI commands in the Cloud Shell, you're already signed in. To run Azure CLI commands locally, sign in to your Azure subscription with the az login command and follow the on-screen directions.
az login
Create a resource group
A resource group is a logical container into which Azure resources, such as web apps, databases, and storage accounts, are deployed and managed. For example, you can choose to delete the entire resource group in one simple step later.
In the Cloud Shell, create a resource group with the az group create command. The following example creates a resource group named myResourceGroup in the West Europe location. To see all supported locations for App Service in Free tier, run the az appservice list-locations --sku FREE command.
az group create --name myResourceGroup --location "West Europe"
You generally create your resource group and the resources in a region near you.
When the command finishes, a JSON output shows you the resource group properties.
Tip
This tutorial walks you through the steps to build the application step-by-step. If you want to download the finished project, you can get the completed application from the angular-cosmosdb repo on GitHub.
Create an Azure Cosmos DB account
Create an Azure Cosmos DB account with the az cosmosdb create command.
az cosmosdb create --name <cosmosdb-name> --resource-group myResourceGroup --kind MongoDB
- For
<cosmosdb-name>use your own unique Azure Cosmos DB account name, the name needs to be unique across all Azure Cosmos DB account names in Azure. - The
--kind MongoDBsetting enables the Azure Cosmos DB to have MongoDB client connections.
It may take a minute or two for the command to complete. When it's done, the terminal window displays information about the new database.
Once the Azure Cosmos DB account has been created:
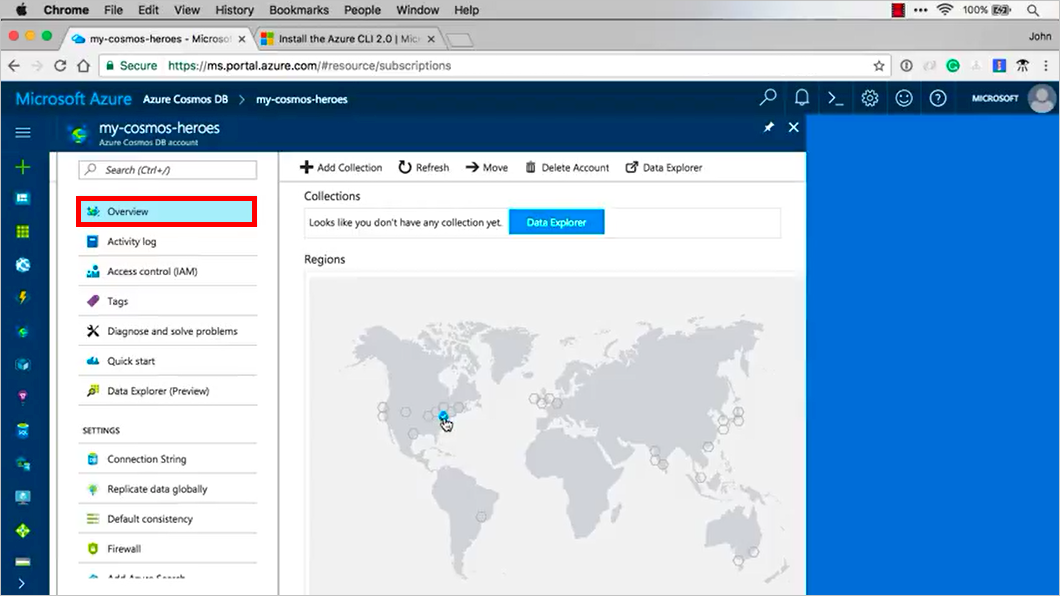
Open a new browser window and go to https://portal.azure.com
Click the Azure Cosmos DB logo
 on the left bar, and it shows you all the Azure Cosmos DB s you have.
Click on the Azure Cosmos DB account you just created, select the Overview tab and scroll down to view the map where the database is located.
Scroll down on the left navigation and click the Replicate data globally tab, this displays a map where you can see the different areas you can replicate into. For example, you can click Australia Southeast or Australia East and replicate your data to Australia. You can learn more about global replication in How to distribute data globally with Azure Cosmos DB. For now, let's just keep the once instance and when we want to replicate, we know how.

Next steps
In this part of the tutorial, you've done the following:
- Created an Azure resource group using the Azure CLI
- Created an Azure Cosmos DB account using the Azure CLI
You can proceed to the next part of the tutorial to connect Azure Cosmos DB to your app using Mongoose.
Trying to do capacity planning for a migration to Azure Cosmos DB? You can use information about your existing database cluster for capacity planning.
- If all you know is the number of vcores and servers in your existing database cluster, read about estimating request units using vCores or vCPUs
- If you know typical request rates for your current database workload, read about estimating request units using Azure Cosmos DB capacity planner
Feedback
Coming soon: Throughout 2024 we will be phasing out GitHub Issues as the feedback mechanism for content and replacing it with a new feedback system. For more information see: https://aka.ms/ContentUserFeedback.
Submit and view feedback for