Quickstart: Create an Azure Data Factory using PowerShell
APPLIES TO:  Azure Data Factory
  Azure Synapse Analytics
Tip
Try out Data Factory in Microsoft Fabric, an all-in-one analytics solution for enterprises. Microsoft Fabric covers everything from data movement to data science, real-time analytics, business intelligence, and reporting. Learn how to start a new trial for free!
This quickstart describes how to use PowerShell to create an Azure Data Factory. The pipeline you create in this data factory copies data from one folder to another folder in an Azure blob storage. For a tutorial on how to transform data using Azure Data Factory, see Tutorial: Transform data using Spark.
Note
This article does not provide a detailed introduction of the Data Factory service. For an introduction to the Azure Data Factory service, see Introduction to Azure Data Factory.
Prerequisites
Azure subscription
If you don't have an Azure subscription, create a free account before you begin.
Azure roles
To create Data Factory instances, the user account that you use to sign in to Azure must be a member of the contributor or owner role, or an administrator of the Azure subscription. To view the permissions that you have in the subscription, go to the Azure portal, select your username in the upper-right corner, select "..." icon for more options, and then select My permissions. If you have access to multiple subscriptions, select the appropriate subscription.
To create and manage child resources for Data Factory - including datasets, linked services, pipelines, triggers, and integration runtimes - the following requirements are applicable:
- To create and manage child resources in the Azure portal, you must belong to the Data Factory Contributor role at the resource group level or above.
- To create and manage child resources with PowerShell or the SDK, the contributor role at the resource level or above is sufficient.
For sample instructions about how to add a user to a role, see the Add roles article.
For more info, see the following articles:
Azure Storage account
You use a general-purpose Azure Storage account (specifically Blob storage) as both source and destination data stores in this quickstart. If you don't have a general-purpose Azure Storage account, see Create a storage account to create one.
Get the storage account name
You need the name of your Azure Storage account for this quickstart. The following procedure provides steps to get the name of your storage account:
- In a web browser, go to the Azure portal and sign in using your Azure username and password.
- From the Azure portal menu, select All services, then select Storage > Storage accounts. You can also search for and select Storage accounts from any page.
- In the Storage accounts page, filter for your storage account (if needed), and then select your storage account.
You can also search for and select Storage accounts from any page.
Create a blob container
In this section, you create a blob container named adftutorial in Azure Blob storage.
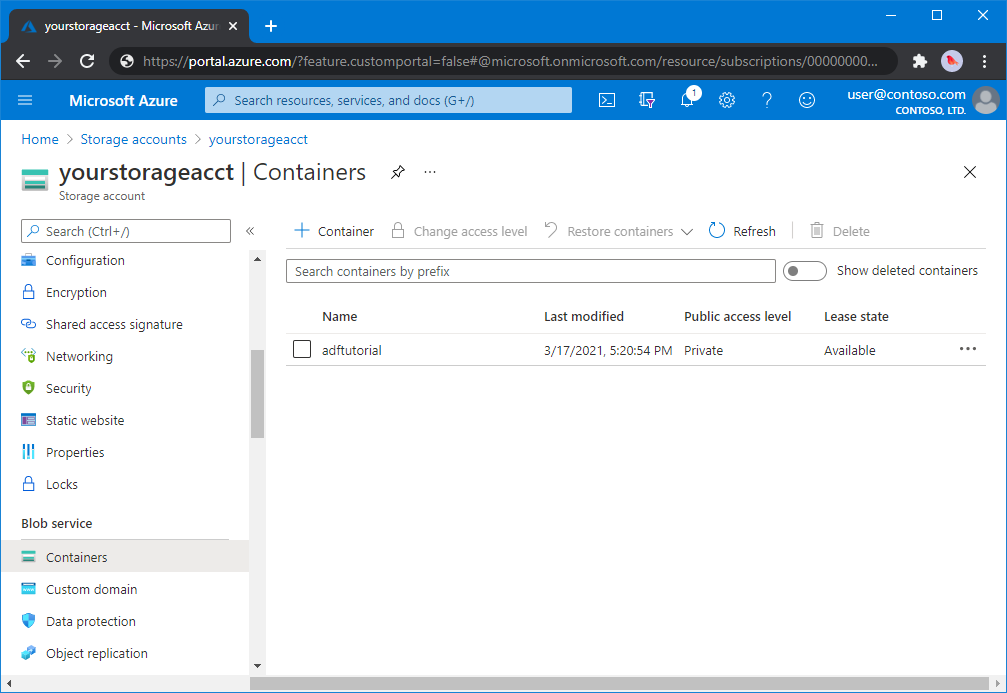
From the storage account page, select Overview > Containers.
On the <Account name> - Containers page's toolbar, select Container.
In the New container dialog box, enter adftutorial for the name, and then select OK. The <Account name> - Containers page is updated to include adftutorial in the list of containers.
Add an input folder and file for the blob container
In this section, you create a folder named input in the container you created, and then upload a sample file to the input folder. Before you begin, open a text editor such as Notepad, and create a file named emp.txt with the following content:
John, Doe
Jane, Doe
Save the file in the C:\ADFv2QuickStartPSH folder. (If the folder doesn't already exist, create it.) Then return to the Azure portal and follow these steps:
In the <Account name> - Containers page where you left off, select adftutorial from the updated list of containers.
- If you closed the window or went to another page, sign in to the Azure portal again.
- From the Azure portal menu, select All services, then select Storage > Storage accounts. You can also search for and select Storage accounts from any page.
- Select your storage account, and then select Containers > adftutorial.
On the adftutorial container page's toolbar, select Upload.
In the Upload blob page, select the Files box, and then browse to and select the emp.txt file.
Expand the Advanced heading. The page now displays as shown:
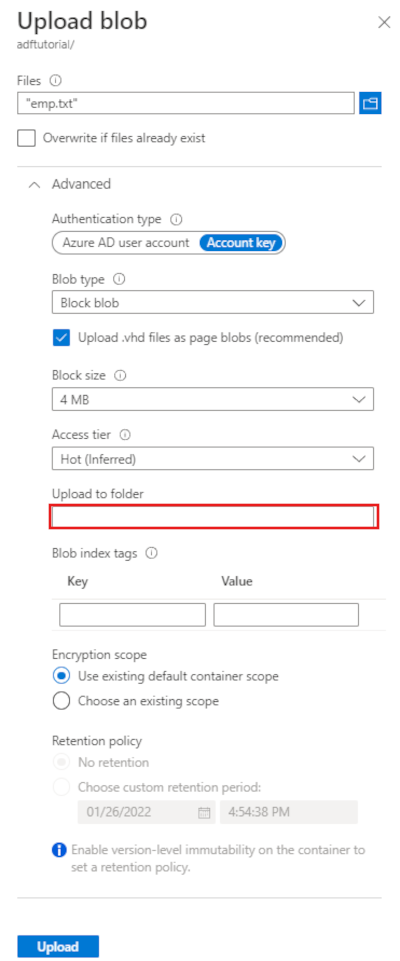
In the Upload to folder box, enter input.
Select the Upload button. You should see the emp.txt file and the status of the upload in the list.
Select the Close icon (an X) to close the Upload blob page.
Keep the adftutorial container page open. You use it to verify the output at the end of this quickstart.
Azure PowerShell
Note
We recommend that you use the Azure Az PowerShell module to interact with Azure. See Install Azure PowerShell to get started. To learn how to migrate to the Az PowerShell module, see Migrate Azure PowerShell from AzureRM to Az.
Install the latest Azure PowerShell modules by following instructions in How to install and configure Azure PowerShell.
Warning
If you do not use latest versions of PowerShell and Data Factory module, you may run into deserialization errors while running the commands.
Log in to PowerShell
Launch PowerShell on your machine. Keep PowerShell open until the end of this quickstart. If you close and reopen, you need to run these commands again.
Run the following command, and enter the same Azure user name and password that you use to sign in to the Azure portal:
Connect-AzAccountRun the following command to view all the subscriptions for this account:
Get-AzSubscriptionIf you see multiple subscriptions associated with your account, run the following command to select the subscription that you want to work with. Replace SubscriptionId with the ID of your Azure subscription:
Select-AzSubscription -SubscriptionId "<SubscriptionId>"
Create a data factory
Define a variable for the resource group name that you use in PowerShell commands later. Copy the following command text to PowerShell, specify a name for the Azure resource group in double quotes, and then run the command. For example:
"ADFQuickStartRG".$resourceGroupName = "ADFQuickStartRG";If the resource group already exists, you may not want to overwrite it. Assign a different value to the
$ResourceGroupNamevariable and run the command againTo create the Azure resource group, run the following command:
$ResGrp = New-AzResourceGroup $resourceGroupName -location 'East US'If the resource group already exists, you may not want to overwrite it. Assign a different value to the
$ResourceGroupNamevariable and run the command again.Define a variable for the data factory name.
Important
Update the data factory name to be globally unique. For example, ADFTutorialFactorySP1127.
$dataFactoryName = "ADFQuickStartFactory";To create the data factory, run the following Set-AzDataFactoryV2 cmdlet, using the Location and ResourceGroupName property from the $ResGrp variable:
$DataFactory = Set-AzDataFactoryV2 -ResourceGroupName $ResGrp.ResourceGroupName `
    -Location $ResGrp.Location -Name $dataFactoryName
Note the following points:
The name of the Azure Data Factory must be globally unique. If you receive the following error, change the name and try again.
The specified Data Factory name 'ADFv2QuickStartDataFactory' is already in use. Data Factory names must be globally unique.To create Data Factory instances, the user account you use to log in to Azure must be a member of contributor or owner roles, or an administrator of the Azure subscription.
For a list of Azure regions in which Data Factory is currently available, select the regions that interest you on the following page, and then expand Analytics to locate Data Factory: Products available by region. The data stores (Azure Storage, Azure SQL Database, etc.) and computes (HDInsight, etc.) used by data factory can be in other regions.
Create a linked service
Create linked services in a data factory to link your data stores and compute services to the data factory. In this quickstart, you create an Azure Storage linked service that is used as both the source and sink stores. The linked service has the connection information that the Data Factory service uses at runtime to connect to it.
Tip
In this quickstart, you use Account key as the authentication type for your data store, but you can choose other supported authentication methods: SAS URI,Service Principal and Managed Identity if needed. Refer to corresponding sections in this article for details. To store secrets for data stores securely, it's also recommended to use an Azure Key Vault. Refer to this article for detailed illustrations.
Create a JSON file named AzureStorageLinkedService.json in C:\ADFv2QuickStartPSH folder with the following content: (Create the folder ADFv2QuickStartPSH if it does not already exist.).
Important
Replace <accountName> and <accountKey> with name and key of your Azure storage account before saving the file.
{
    "name": "AzureStorageLinkedService",
    "properties": {
        "annotations": [],
        "type": "AzureBlobStorage",
        "typeProperties": {
            "connectionString": "DefaultEndpointsProtocol=https;AccountName=<accountName>;AccountKey=<accountKey>;EndpointSuffix=core.windows.net"
        }
    }
}
If you are using Notepad, select All files for the Save as type filed in the Save as dialog box. Otherwise, it may add
.txtextension to the file. For example,AzureStorageLinkedService.json.txt. If you create the file in File Explorer before opening it in Notepad, you may not see the.txtextension since the Hide extensions for known files types option is set by default. Remove the.txtextension before proceeding to the next step.In PowerShell, switch to the ADFv2QuickStartPSH folder.
Set-Location 'C:\ADFv2QuickStartPSH'Run the Set-AzDataFactoryV2LinkedService cmdlet to create the linked service: AzureStorageLinkedService.
Set-AzDataFactoryV2LinkedService -DataFactoryName $DataFactory.DataFactoryName `
    -ResourceGroupName $ResGrp.ResourceGroupName -Name "AzureStorageLinkedService" `
    -DefinitionFile ".\AzureStorageLinkedService.json"
Here is the sample output:
LinkedServiceName : AzureStorageLinkedService
ResourceGroupName : <resourceGroupName>
DataFactoryName   : <dataFactoryName>
Properties        : Microsoft.Azure.Management.DataFactory.Models.AzureBlobStorageLinkedService
Create datasets
In this procedure, you create two datasets: InputDataset and OutputDataset. These datasets are of type Binary. They refer to the Azure Storage linked service that you created in the previous section. The input dataset represents the source data in the input folder. In the input dataset definition, you specify the blob container (adftutorial), the folder (input), and the file (emp.txt) that contain the source data. The output dataset represents the data that's copied to the destination. In the output dataset definition, you specify the blob container (adftutorial), the folder (output), and the file to which the data is copied.
Create a JSON file named InputDataset.json in the C:\ADFv2QuickStartPSH folder, with the following content:
{
    "name": "InputDataset",
    "properties": {
        "linkedServiceName": {
            "referenceName": "AzureStorageLinkedService",
            "type": "LinkedServiceReference"
        },
        "annotations": [],
        "type": "Binary",
        "typeProperties": {
            "location": {
                "type": "AzureBlobStorageLocation",
                "fileName": "emp.txt",
                "folderPath": "input",
                "container": "adftutorial"
            }
        }
    }
}
To create the dataset: InputDataset, run the Set-AzDataFactoryV2Dataset cmdlet.
Set-AzDataFactoryV2Dataset -DataFactoryName $DataFactory.DataFactoryName `
    -ResourceGroupName $ResGrp.ResourceGroupName -Name "InputDataset" `
    -DefinitionFile ".\InputDataset.json"
Here is the sample output:
DatasetName       : InputDataset
ResourceGroupName : <resourceGroupname>
DataFactoryName   : <dataFactoryName>
Structure         :
Properties        : Microsoft.Azure.Management.DataFactory.Models.BinaryDataset
Repeat the steps to create the output dataset. Create a JSON file named OutputDataset.json in the C:\ADFv2QuickStartPSH folder, with the following content:
{
    "name": "OutputDataset",
    "properties": {
        "linkedServiceName": {
            "referenceName": "AzureStorageLinkedService",
            "type": "LinkedServiceReference"
        },
        "annotations": [],
        "type": "Binary",
        "typeProperties": {
            "location": {
                "type": "AzureBlobStorageLocation",
                "folderPath": "output",
                "container": "adftutorial"
            }
        }
    }
}
Run the Set-AzDataFactoryV2Dataset cmdlet to create the OutDataset.
Set-AzDataFactoryV2Dataset -DataFactoryName $DataFactory.DataFactoryName `
    -ResourceGroupName $ResGrp.ResourceGroupName -Name "OutputDataset" `
    -DefinitionFile ".\OutputDataset.json"
Here is the sample output:
DatasetName       : OutputDataset
ResourceGroupName : <resourceGroupname>
DataFactoryName   : <dataFactoryName>
Structure         :
Properties        : Microsoft.Azure.Management.DataFactory.Models.BinaryDataset
Create a pipeline
In this procedure, you create a pipeline with a copy activity that uses the input and output datasets. The copy activity copies data from the file you specified in the input dataset settings to the file you specified in the output dataset settings.
Create a JSON file named Adfv2QuickStartPipeline.json in the C:\ADFv2QuickStartPSH folder with the following content:
{
    "name": "Adfv2QuickStartPipeline",
    "properties": {
        "activities": [
            {
                "name": "CopyFromBlobToBlob",
                "type": "Copy",
                "dependsOn": [],
                "policy": {
                    "timeout": "7.00:00:00",
                    "retry": 0,
                    "retryIntervalInSeconds": 30,
                    "secureOutput": false,
                    "secureInput": false
                },
                "userProperties": [],
                "typeProperties": {
                    "source": {
                        "type": "BinarySource",
                        "storeSettings": {
                            "type": "AzureBlobStorageReadSettings",
                            "recursive": true
                        }
                    },
                    "sink": {
                        "type": "BinarySink",
                        "storeSettings": {
                            "type": "AzureBlobStorageWriteSettings"
                        }
                    },
                    "enableStaging": false
                },
                "inputs": [
                    {
                        "referenceName": "InputDataset",
                        "type": "DatasetReference"
                    }
                ],
                "outputs": [
                    {
                        "referenceName": "OutputDataset",
                        "type": "DatasetReference"
                    }
                ]
            }
        ],
        "annotations": []
    }
}
To create the pipeline: Adfv2QuickStartPipeline, Run the Set-AzDataFactoryV2Pipeline cmdlet.
$DFPipeLine = Set-AzDataFactoryV2Pipeline `
    -DataFactoryName $DataFactory.DataFactoryName `
    -ResourceGroupName $ResGrp.ResourceGroupName `
    -Name "Adfv2QuickStartPipeline" `
    -DefinitionFile ".\Adfv2QuickStartPipeline.json"
Create a pipeline run
In this step, you create a pipeline run.
Run the Invoke-AzDataFactoryV2Pipeline cmdlet to create a pipeline run. The cmdlet returns the pipeline run ID for future monitoring.
$RunId = Invoke-AzDataFactoryV2Pipeline `
  -DataFactoryName $DataFactory.DataFactoryName `
  -ResourceGroupName $ResGrp.ResourceGroupName `
  -PipelineName $DFPipeLine.Name
Monitor the pipeline run
Run the following PowerShell script to continuously check the pipeline run status until it finishes copying the data. Copy/paste the following script in the PowerShell window, and press ENTER.
while ($True) {
    $Run = Get-AzDataFactoryV2PipelineRun `
        -ResourceGroupName $ResGrp.ResourceGroupName `
        -DataFactoryName $DataFactory.DataFactoryName `
        -PipelineRunId $RunId

    if ($Run) {
        if ( ($Run.Status -ne "InProgress") -and ($Run.Status -ne "Queued") ) {
            Write-Output ("Pipeline run finished. The status is: " +  $Run.Status)
            $Run
            break
        }
        Write-Output ("Pipeline is running...status: " + $Run.Status)
    }

    Start-Sleep -Seconds 10
}
Here is the sample output of pipeline run:
Pipeline is running...status: InProgress
Pipeline run finished. The status is:  Succeeded

ResourceGroupName : ADFQuickStartRG
DataFactoryName   : ADFQuickStartFactory
RunId             : 00000000-0000-0000-0000-0000000000000
PipelineName      : Adfv2QuickStartPipeline
LastUpdated       : 8/27/2019 7:23:07 AM
Parameters        : {}
RunStart          : 8/27/2019 7:22:56 AM
RunEnd            : 8/27/2019 7:23:07 AM
DurationInMs      : 11324
Status            : Succeeded
Message           :
Run the following script to retrieve copy activity run details, for example, size of the data read/written.
Write-Output "Activity run details:"
$Result = Get-AzDataFactoryV2ActivityRun -DataFactoryName $DataFactory.DataFactoryName -ResourceGroupName $ResGrp.ResourceGroupName -PipelineRunId $RunId -RunStartedAfter (Get-Date).AddMinutes(-30) -RunStartedBefore (Get-Date).AddMinutes(30)
$Result

Write-Output "Activity 'Output' section:"
$Result.Output -join "`r`n"

Write-Output "Activity 'Error' section:"
$Result.Error -join "`r`n"
Confirm that you see the output similar to the following sample output of activity run result:
ResourceGroupName : ADFQuickStartRG
DataFactoryName   : ADFQuickStartFactory
ActivityRunId     : 00000000-0000-0000-0000-000000000000
ActivityName      : CopyFromBlobToBlob
PipelineRunId     : 00000000-0000-0000-0000-000000000000
PipelineName      : Adfv2QuickStartPipeline
Input             : {source, sink, enableStaging}
Output            : {dataRead, dataWritten, filesRead, filesWritten...}
LinkedServiceName :
ActivityRunStart  : 8/27/2019 7:22:58 AM
ActivityRunEnd    : 8/27/2019 7:23:05 AM
DurationInMs      : 6828
Status            : Succeeded
Error             : {errorCode, message, failureType, target}

Activity 'Output' section:
"dataRead": 20
"dataWritten": 20
"filesRead": 1
"filesWritten": 1
"sourcePeakConnections": 1
"sinkPeakConnections": 1
"copyDuration": 4
"throughput": 0.01
"errors": []
"effectiveIntegrationRuntime": "DefaultIntegrationRuntime (Central US)"
"usedDataIntegrationUnits": 4
"usedParallelCopies": 1
"executionDetails": [
  {
    "source": {
      "type": "AzureBlobStorage"
    },
    "sink": {
      "type": "AzureBlobStorage"
    },
    "status": "Succeeded",
    "start": "2019-08-27T07:22:59.1045645Z",
    "duration": 4,
    "usedDataIntegrationUnits": 4,
    "usedParallelCopies": 1,
    "detailedDurations": {
      "queuingDuration": 3,
      "transferDuration": 1
    }
  }
]

Activity 'Error' section:
"errorCode": ""
"message": ""
"failureType": ""
"target": "CopyFromBlobToBlob"
Review deployed resources
The pipeline automatically creates the output folder in the adftutorial blob container. Then, it copies the emp.txt file from the input folder to the output folder.
In the Azure portal, on the adftutorial container page, select Refresh to see the output folder.
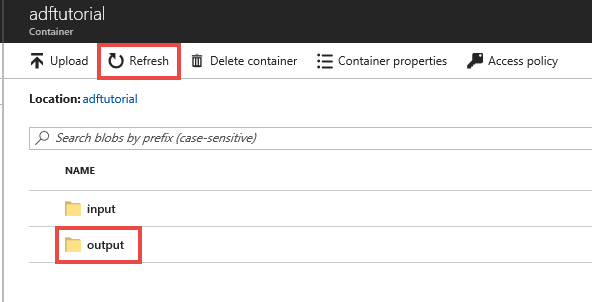
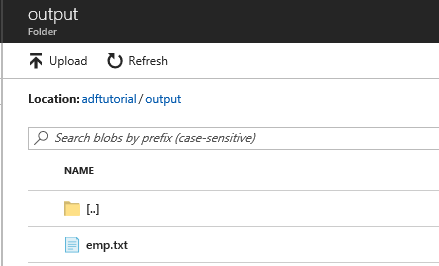
Select output in the folder list.
Confirm that the emp.txt is copied to the output folder.
Clean up resources
You can clean up the resources that you created in the Quickstart in two ways. You can delete the Azure resource group, which includes all the resources in the resource group. If you want to keep the other resources intact, delete only the data factory you created in this tutorial.
Deleting a resource group deletes all resources including data factories in it. Run the following command to delete the entire resource group:
Remove-AzResourceGroup -ResourceGroupName $resourcegroupname
Note
Dropping a resource group may take some time. Please be patient with the process
If you want to delete just the data factory, not the entire resource group, run the following command:
Remove-AzDataFactoryV2 -Name $dataFactoryName -ResourceGroupName $resourceGroupName
Related content
The pipeline in this sample copies data from one location to another location in an Azure blob storage. Go through the tutorials to learn about using Data Factory in more scenarios.
Feedback
Coming soon: Throughout 2024 we will be phasing out GitHub Issues as the feedback mechanism for content and replacing it with a new feedback system. For more information see: https://aka.ms/ContentUserFeedback.
Submit and view feedback for