Adopt a Git branching strategy
Azure DevOps Services | Azure DevOps Server 2022 - Azure DevOps Server 2019
Distributed version control systems like Git give you flexibility in how you use version control to share and manage code. Your team should find a balance between this flexibility and the need to collaborate and share code in a consistent manner.
Team members publish, share, review, and iterate on code changes through Git branches shared with others. Adopt a branching strategy for your team. You can collaborate better and spend less time managing version control and more time developing code.
The following branching strategies are based on the way we use Git here at Microsoft. For more information, see How we use Git at Microsoft.
Keep your branch strategy simple
Keep your branch strategy simple. Build your strategy from these three concepts:
- Use feature branches for all new features and bug fixes.
- Merge feature branches into the main branch using pull requests.
- Keep a high quality, up-to-date main branch.
A strategy that extends these concepts and avoids contradictions will result in a version control workflow for your team that is consistent and easy to follow.
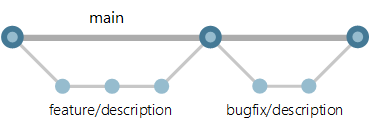
Use feature branches for your work
Develop your features and fix bugs in feature branches based off your main branch. These branches are also known as topic branches. Feature branches isolate work in progress from the completed work in the main branch. Git branches are inexpensive to create and maintain. Even small fixes and changes should have their own feature branch.
Creating feature branches for all your changes makes reviewing history simple. Look at the commits made in the branch and look at the pull request that merged the branch.
Name your feature branches by convention
Use a consistent naming convention for your feature branches to identify the work done in the branch. You can also include other information in the branch name, such as who created the branch.
Some suggestions for naming your feature branches:
- users/username/description
- users/username/workitem
- bugfix/description
- feature/feature-name
- feature/feature-area/feature-name
- hotfix/description
Note
For information on setting policies to enforce a branch naming strategy, see Require branch folders.
Use feature flags to manage long-running branches
Learn more about using feature flags in your code.
Review and merge code with pull requests
The review that takes place in a pull request is critical for improving code quality. Only merge branches through pull requests that pass your review process. Avoid merging branches to the main branch without a pull request.
Reviews in pull requests take time to complete. Your team should agree on what's expected from pull request creators and reviewers. Distribute reviewer responsibilities to share ideas across your team and spread out knowledge of your codebase.
Some suggestions for successful pull requests:
- Two reviewers is an optimal number based on research.
- If your team already has a code review process, bring pull requests into what you're already doing.
- Take care assigning the same reviewers to a large number of pull requests. Pull requests work better when reviewer responsibilities are shared across the team.
- Provide enough detail in the description to quickly bring reviewers up to speed with your changes.
- Include a build or linked version of your changes running in a staged environment with your pull request. Others can easily test the changes.
Keep a high quality, up-to-date main branch
The code in your main branch should pass tests, build cleanly, and always be current. Your main branch needs these qualities so that feature branches created by your team start from a known good version of code.
Set up a branch policy for your main branch that:
- Requires a pull request to merge code. This approach prevents direct pushes to the main branch and ensures discussion of proposed changes.
- Automatically adds reviewers when a pull request is created. The added team members review the code and comment on the changes in the pull request.
- Requires a successful build to complete a pull request. Code merged into the main branch should build cleanly.
Tip
The build pipeline for your pull requests should be quick to complete, so it doesn't interfere with the review process.
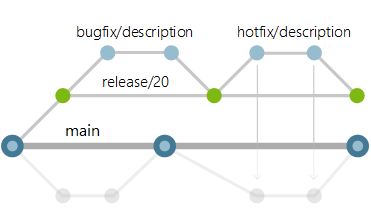
Manage releases
Use release branches to coordinate and stabilize changes in a release of your code. This branch is long-lived and isn't merged back into the main branch in a pull request, unlike the feature branches. Create as many release branches as you need. Keep in mind that each active release branch represents another version of the code you need to support. Lock release branches when you're ready to stop supporting a particular release.
Use release branches
Create a release branch from the main branch when you get close to your release or other milestone, such as the end of a sprint. Give this branch a clear name associating it with the release, for example release/20.
Create branches to fix bugs from the release branch and merge them back into the release branch in a pull request.
Port changes back to the main branch
Make sure that fixes land in both your release branch and your main branch. One approach is to make fixes in the release branch, then bring changes into your main branch to prevent regression in your code. Another approach (and the one employed by the Azure DevOps team) is to always make changes in the mainline, then port those to the release branch. You can read more about our Release Flow strategy.
In this topic, we'll cover making changes in the release branch and porting them into mainline. Use cherry-picking instead of merging so that you have exact control over which commits are ported back to the main branch. Merging the release branch into the main branch can bring over release-specific changes you don't want in the main branch.
Update the main branch with a change made in the release branch with these steps:
- Create a new feature branch off the main branch to port the changes.
- Cherry-pick the changes from the release branch to your new feature branch.
- Merge the feature branch back into the main branch in a second pull request.

This release branch workflow keeps the pillars of the basic workflow intact: feature branches, pull requests, and a strong main branch that always has the latest version of the code.
Why not use tags for releases?
Other branching workflows use Git tags to mark a specific commit as a release. Tags are useful for marking points in your history as important. Tags introduce extra steps in your workflow that aren't necessary if you're using branches for your releases.
Tags are maintained and pushed separately from your commits. Team members can easily miss tagging a commit and then have to go back through the history afterwards to fix the tag. You can also forget the extra step to push the tag, leaving the next developer working from an older version of the code when supporting the release.
The release branch strategy extends the basic feature branch workflow to handle releases. Your team doesn't have to adopt any new version control process other than the cherry-pick to port changes.
Manage deployments
You can handle multiple deployments of your code in the same way you handle multiple releases. Create a clear naming convention, such as deploy/performance-test, and treat the environment branches like release branches. Your team should agree on a process to update deployment branches with the code from your main branch. Cherry-pick bug fixes in the deployment branch back to the main branch. Use the same steps as porting changes from a release branch.
An exception to this recommendation is if you're using a form of continuous deployment. Use Azure Pipelines when working with continuous deployment to promote builds from your main branch to your deployment targets.
Feedback
Coming soon: Throughout 2024 we will be phasing out GitHub Issues as the feedback mechanism for content and replacing it with a new feedback system. For more information see: https://aka.ms/ContentUserFeedback.
Submit and view feedback for