Integrate an Azure Storage account with Azure Front Door
Azure Front Door can be used to deliver high-bandwidth content by caching blobs from Azure Storage. In this article, you create an Azure Storage account and then enable Front Door to cache and accelerate contents from Azure Storage.
Prerequisites
- An Azure account with an active subscription. Create an account for free.
Sign in to the Azure portal
Sign in to the Azure portal with your Azure account.
Create a storage account
A storage account gives access to the Azure Storage services. The storage account represents the highest level of the namespace for accessing each of the Azure Storage service components: Azure Blob, Queue, and Table storage. For more information, see Introduction to Microsoft Azure Storage.
In the Azure portal, select + Create a resource in the upper left corner. The Create a resource pane appears.
On the Create a resource page, search for Storage account and select Storage account from the list. Then select Create.

On the Create a storage account page, enter or select the following information for the new storage account:
Setting Value Resource group Select Create new and enter the name AFDResourceGroup. You may also select an existing resource group. Storage account name Enter a name for the account using 3-24 lowercase letters and numbers only. The name must be unique across Azure, and becomes the host name in the URL that's used to address blob, queue, or table resources for the subscription. To address a container resource in Blob storage, use a URI in the following format: http://<storageaccountname>.blob.core.windows.net/<container-name>. Region Select an Azure region closest to you from the drop-down list. Leave all other settings as default. Select the Review tab, select Create, and then select Review + Create.
The creation of the storage account may take a few minutes to complete. Once creation is complete, select Go to resource to go to the new storage account resource.
Enable Azure Front Door CDN for the storage account
From the storage account resource, select Front Door and CDN from under Security + networking on the left side menu pane.
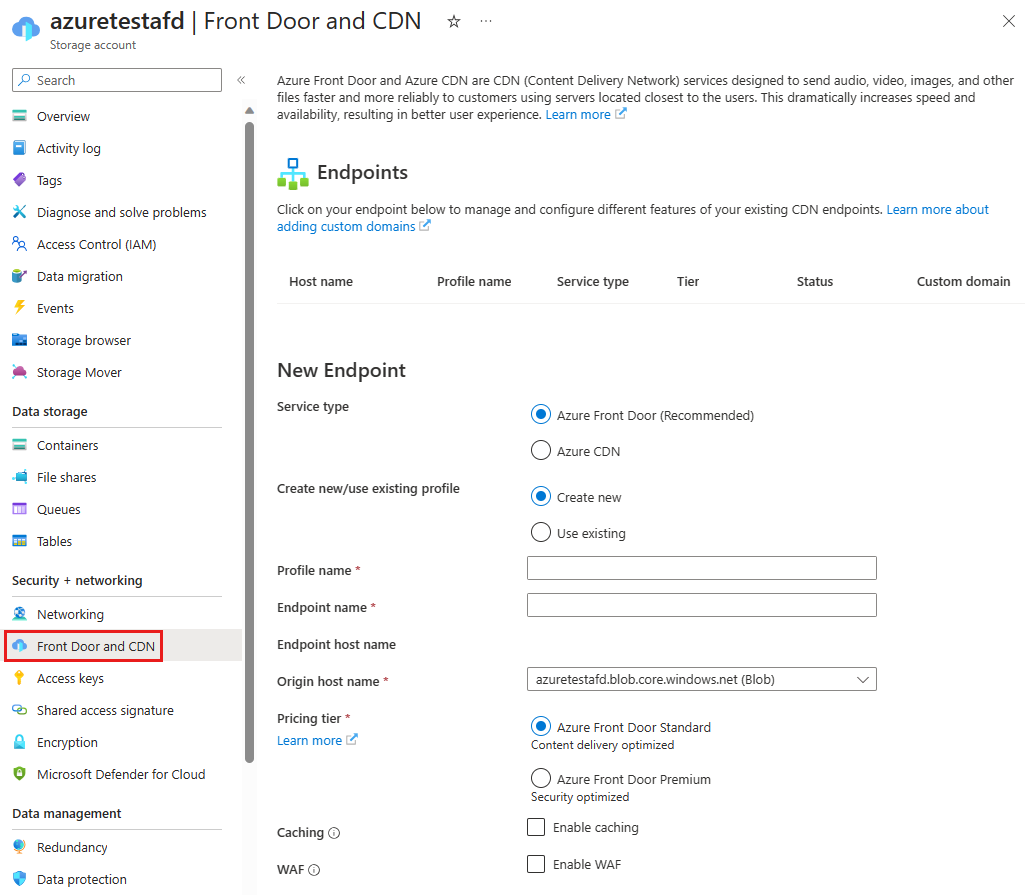
In the New endpoint section, enter the following information:
Setting Value Service type Select Azure Front Door. Create new/use existing profile You can create a new Front Door profile or select an existing one. Profile name Enter a name for the Front Door profile. You have a list of available Front Door profiles if you selected Use existing. Endpoint name Enter your endpoint hostname, such as contoso1234. This name is used to access your cached resources at the URL <endpoint-name + hash value>.z01.azurefd.net. Origin hostname By default, a new Front Door endpoint uses the hostname of your storage account as the origin server. Pricing tier Select Standard if you want to do content delivery or select Premium if you want to do content delivery and use security features. Caching Optional - Toggle on if you want to enable caching for your static content. Choose an appropriate query string behavior. Enable compression if required. WAF Optional - Toggle on if you want to protect your endpoint from common vulnerabilities, malicious actor and bots with Web Application Firewall. You can use an existing policy from the WAF policy dropdown or create a new one. Private link Optional - Toggle on if you want to keep your storage account private that is, not exposed to public internet. Select the region that is the same region as your storage account or closest to your origin. Select target sub resource as blob. 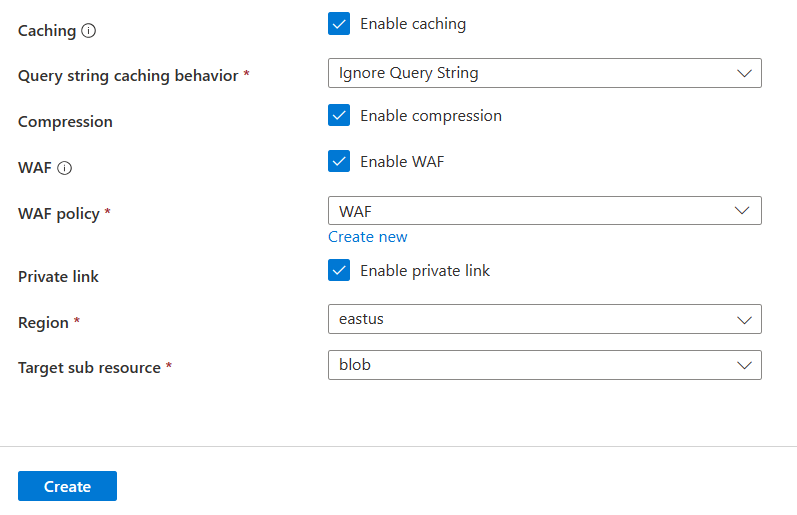
Note
- With Standard tier, you can only use custom rules with WAF. To deploy managed rules and bot protection, choose Premium tier. For detailed comparison, see Azure Front Door tier comparison.
- Private Link feature is only available with Premium tier.
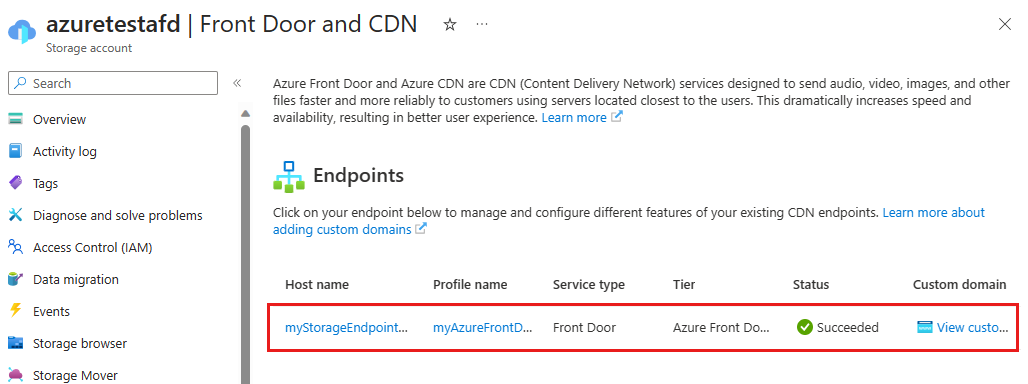
Select Create to create the new endpoint. After the endpoint is created, it appears in the endpoint list.
Note
- The endpoint list will only show Front Door and CDN profiles within the same subscription.
Extra features
From the storage account Front Door and CDN page, select the endpoint from the list to open the Front Door endpoint configuration page. You can enable more Front Door features for your delivery, such as rules engine and configure how traffic gets load balanced.
For best practices, refer to Use Azure Front Door with Azure Storage blobs.
Enable SAS
If you want to grant limited access to private storage containers, you can use the Shared Access Signature (SAS) feature of your Azure Storage account. A SAS is a URI that grants restricted access rights to your Azure Storage resources without exposing your account key.
Access CDN content
To access cached content with Azure Front Door, use the Front Door URL provided in the portal. The address for a cached blob has the following format:
http://<endpoint-name-with-hash-value>.z01.azurefd.net/<myPublicContainer>/<BlobName>
Note
After you enable Azure Front Door access to a storage account, all publicly available objects are eligible for Front Door POP (Point-of-presence) caching. If you modify an object that is currently cached in Front Door, the new content won't be available through Azure Front Door until Front Door refreshes its content after the time-to-live period for the cached content expires.
Add a custom domain
When you use Azure Front Door for content delivery, a custom domain is necessary if you would like your own domain name to be visible in your end-user requests. Having a visible domain name can be convenient for your customers and useful for branding purposes.
From the storage account Front Door and CDN page, select View custom domains for the Front Door endpoint. On the domains page, you can add a new custom domain to access your storage account. For more information, see Configure a custom domain with Azure Front Door.
Purge cached content from Front Door
If you no longer want to cache an object in Azure Front Door, you can purge the cached content.
From the storage account Front Door and CDN page, select the Front Door endpoint from the list to open the Front Door endpoint configuration page. Select Purge cache option at the top of the page and then select the endpoint, domain, and path to purge.
Note
An object that's already cached in Azure Front Door remains cached until the time-to-live period for the object expires or until the endpoint is purged.
Clean up resources
In the preceding steps, you created an Azure Front Door profile and an endpoint in a resource group. However, if you don't expect to use these resources in the future, you can delete them by deleting the resource group to avoid any charges.
From the left-hand menu in the Azure portal, select Resource groups and then select AFDResourceGroup*.
On the Resource group page, select Delete resource group, enter AFDResourceGroup in the text box, then select Delete.
This action deletes the resource group, profile, and endpoint that you created in this quickstart.
To delete your storage account, select it from the dashboard, then select Delete from the top menu.
Next steps
- Learn how to use Azure Front Door with Azure Storage blobs
- Learn how to enable Azure Front Door Private Link with Azure Blob Storage
- Learn how to enable Azure Front Door Private Link with Storage Static Website
Feedback
Coming soon: Throughout 2024 we will be phasing out GitHub Issues as the feedback mechanism for content and replacing it with a new feedback system. For more information see: https://aka.ms/ContentUserFeedback.
Submit and view feedback for