Quickstart: Create a Front Door for a highly available global web application using Azure CLI
Important
Azure Front Door (classic) will be retired on March 31, 2027. To avoid any service disruption, it is important that you migrate your Azure Front Door (classic) profiles to Azure Front Door Standard or Premium tier by March 2027. For more information, see Azure Front Door (classic) retirement.
Get started with Azure Front Door by using Azure CLI to create a highly available and high-performance global web application.
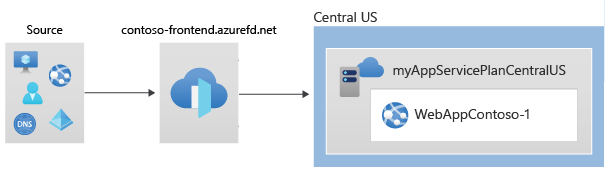
The Front Door directs web traffic to specific resources in a backend pool. You defined the frontend domain, add resources to a backend pool, and create a routing rule. This article uses a simple configuration of one backend pool with a web app resource and a single routing rule using default path matching "/*".
Prerequisites
- An Azure account with an active subscription. Create an account for free.
- Azure CLI installed locally or Azure Cloud Shell
- Ensure that the front-door extension is added to your Azure CLI
az extension add --name front-door
Azure Cloud Shell
Azure hosts Azure Cloud Shell, an interactive shell environment that you can use through your browser. You can use either Bash or PowerShell with Cloud Shell to work with Azure services. You can use the Cloud Shell preinstalled commands to run the code in this article, without having to install anything on your local environment.
To start Azure Cloud Shell:
| Option | Example/Link |
|---|---|
| Select Try It in the upper-right corner of a code or command block. Selecting Try It doesn't automatically copy the code or command to Cloud Shell. |  |
| Go to https://shell.azure.com, or select the Launch Cloud Shell button to open Cloud Shell in your browser. |  |
| Select the Cloud Shell button on the menu bar at the upper right in the Azure portal. |  |
To use Azure Cloud Shell:
Start Cloud Shell.
Select the Copy button on a code block (or command block) to copy the code or command.
Paste the code or command into the Cloud Shell session by selecting Ctrl+Shift+V on Windows and Linux, or by selecting Cmd+Shift+V on macOS.
Select Enter to run the code or command.
If you choose to install and use the CLI locally, this quickstart requires Azure CLI version 2.0.28 or later. To find the version, run az --version. If you need to install or upgrade, see Install the Azure CLI.
Create a resource group
In Azure, you allocate related resources to a resource group. You can either use an existing resource group or create a new one.
For this quickstart, you need a resource group in Central US.
Create a resource group with az group create:
az group create \
    --name myRGFDCentral \
    --location centralus
Create two instances of a web app
Two instances of a web application that run in different Azure regions is required for this quickstart. Both the web application instances run in Active/Active mode, so either one can service traffic.
If you don't already have a web app, use the following script to set up two example web apps.
Create app service plans
Before you can create the web app you will need an app service plan in Central US.
Create app service plans with az appservice plan create:
az appservice plan create \
--name myAppServicePlanCentralUS \
--resource-group myRGFDCentral
Create web apps
Running the following commands will create a web app in the app service plans in the previous step. Web app names have to be globally unique.
Create web app with az webapp create:
az webapp create \
--name WebAppContoso-1 \
--resource-group myRGFDCentral \
--plan myAppServicePlanCentralUS
Make note of the default host name of the web app so you can define the backend addresses when you deploy the Front Door in the next step.
Create the Front Door
Create a basic Front Door with default load balancing settings, health probe, and routing rules by running to follow:
Create Front Door with az network front-door create:
az network front-door create \
--resource-group myRGFDCentral \
--name contoso-frontend \
--accepted-protocols Http Https \
--backend-address webappcontoso-1.azurewebsites.net
--resource-group: Specify a resource group where you want to deploy the Front Door.
--name: Specify a globally unique name for your Azure Front Door.
--accepted-protocols: Accepted values are Http and Https. If you want to use both, specific both separated by a space.
--backend-address: Define the web app host name.
Once the deployment has successfully completed, make note of the host name in the frontEndpoints section.
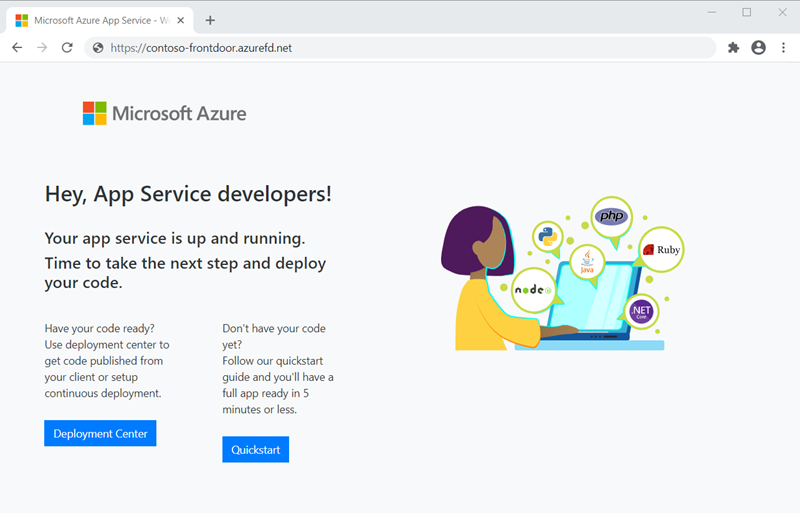
Test the Front Door
Open a web browser and enter the hostname obtain from the commands. The Front Door will direct your request to one of the backend resources.
Clean up resources
When you no longer need the resources that you created with the Front Door, delete both resource groups. When you delete the resource group, you also delete the Front Door and all its related resources.
To delete the resource group use az group delete:
az group delete \
--name myRGFDCentral
Next steps
In this quickstart, you created a:
- Front Door
- A web app
To learn how to add a custom domain to your Front Door, continue to the Front Door tutorials.
Feedback
Coming soon: Throughout 2024 we will be phasing out GitHub Issues as the feedback mechanism for content and replacing it with a new feedback system. For more information see: https://aka.ms/ContentUserFeedback.
Submit and view feedback for