Safely manage Python environment on Azure HDInsight using Script Action
HDInsight has two built-in Python installations in the Spark cluster, Anaconda Python 2.7 and Python 3.5. Customers may need to customize the Python environment like installing external Python packages. Here, we show the best practice of safely managing Python environments for Apache Spark clusters on HDInsight.
Prerequisites
An Apache Spark cluster on HDInsight. For instructions, see Create Apache Spark clusters in Azure HDInsight. If you don't already have a Spark cluster on HDInsight, you can run script actions during cluster creation. Visit the documentation on how to use custom script actions.
Support for open-source software used on HDInsight clusters
The Microsoft Azure HDInsight service uses an environment of open-source technologies formed around Apache Hadoop. Microsoft Azure provides a general level of support for open-source technologies. For more information, see Azure Support FAQ website. The HDInsight service provides an additional level of support for built-in components.
There are two types of open-source components that are available in the HDInsight service:
| Component | Description |
|---|---|
| Built-in | These components are pre-installed on HDInsight clusters and provide core functionality of the cluster. For example, Apache Hadoop YARN Resource Manager, the Apache Hive query language (HiveQL), and the Mahout library belong to this category. A full list of cluster components is available in What's new in the Apache Hadoop cluster versions provided by HDInsight. |
| Custom | You, as a user of the cluster, can install or use in your workload any component available in the community or created by you. |
Important
Components provided with the HDInsight cluster are fully supported. Microsoft Support helps to isolate and resolve issues related to these components.
Custom components receive commercially reasonable support to help you to further troubleshoot the issue. Microsoft support may be able to resolve the issue OR they may ask you to engage available channels for the open source technologies where deep expertise for that technology is found. For example, there are many community sites that can be used, like: Microsoft Q&A question page for HDInsight, https://stackoverflow.com. Also Apache projects have project sites on https://apache.org.
Understand default Python installation
HDInsight Spark clusters have Anaconda installed. There are two Python installations in the cluster, Anaconda Python 2.7 and Python 3.5. The following table shows the default Python settings for Spark, Livy, and Jupyter.
| Setting | Python 2.7 | Python 3.5 |
|---|---|---|
| Path | /usr/bin/anaconda/bin | /usr/bin/anaconda/envs/py35/bin |
| Spark version | Default set to 2.7 | Can change config to 3.5 |
| Livy version | Default set to 2.7 | Can change config to 3.5 |
| Jupyter | PySpark kernel | PySpark3 kernel |
For the Spark 3.1.2 version, the Apache PySpark kernel is removed and a new Python 3.8 environment is installed under /usr/bin/miniforge/envs/py38/bin, which is used by the PySpark3 kernel. The PYSPARK_PYTHON and PYSPARK3_PYTHON environment variables are updated with the following:
export PYSPARK_PYTHON=${PYSPARK_PYTHON:-/usr/bin/miniforge/envs/py38/bin/python}
export PYSPARK3_PYTHON=${PYSPARK_PYTHON:-/usr/bin/miniforge/envs/py38/bin/python}
Safely install external Python packages
HDInsight cluster depends on the built-in Python environment, both Python 2.7 and Python 3.5. Directly installing custom packages in those default built-in environments may cause unexpected library version changes. And break the cluster further. To safely install custom external Python packages for your Spark applications, follow the steps.
Create Python virtual environment using conda. A virtual environment provides an isolated space for your projects without breaking others. When creating the Python virtual environment, you can specify Python version that you want to use. You still need to create virtual environment even though you would like to use Python 2.7 and 3.5. This requirement is to make sure the cluster's default environment not getting broke. Run script actions on your cluster for all nodes with following script to create a Python virtual environment.
--prefixspecifies a path where a conda virtual environment lives. There are several configs that need to be changed further based on the path specified here. In this example, we use the py35new, as the cluster has an existing virtual environment called py35 already.python=specifies the Python version for the virtual environment. In this example, we use version 3.5, the same version as the cluster built in one. You can also use other Python versions to create the virtual environment.anacondaspecifies the package_spec as anaconda to install Anaconda packages in the virtual environment.
sudo /usr/bin/anaconda/bin/conda create --prefix /usr/bin/anaconda/envs/py35new python=3.5 anaconda=4.3 --yesInstall external Python packages in the created virtual environment if needed. Run script actions on your cluster for all nodes with following script to install external Python packages. You need to have sudo privilege here to write files to the virtual environment folder.
Search the package index for the complete list of packages that are available. You can also get a list of available packages from other sources. For example, you can install packages made available through conda-forge.
Use following command if you would like to install a library with its latest version:
Use conda channel:
seabornis the package name that you would like to install.-n py35newspecify the virtual environment name that just gets created. Make sure to change the name correspondingly based on your virtual environment creation.
sudo /usr/bin/anaconda/bin/conda install seaborn -n py35new --yesOr use PyPi repo, change
seabornandpy35newcorrespondingly:sudo /usr/bin/anaconda/envs/py35new/bin/pip install seaborn
Use the following command if you would like to install a library with a specific version:
Use conda channel:
numpy=1.16.1is the package name and version that you would like to install.-n py35newspecify the virtual environment name that just gets created. Make sure to change the name correspondingly based on your virtual environment creation.
sudo /usr/bin/anaconda/bin/conda install numpy=1.16.1 -n py35new --yesOr use PyPi repo, change
numpy==1.16.1andpy35newcorrespondingly:sudo /usr/bin/anaconda/envs/py35new/bin/pip install numpy==1.16.1
If you don't know the virtual environment name, you can SSH to the head node of the cluster and run
/usr/bin/anaconda/bin/conda info -eto show all virtual environments.Change Spark and Livy configs and point to the created virtual environment.
Open Ambari UI, go to Spark 2 page, Configs tab.
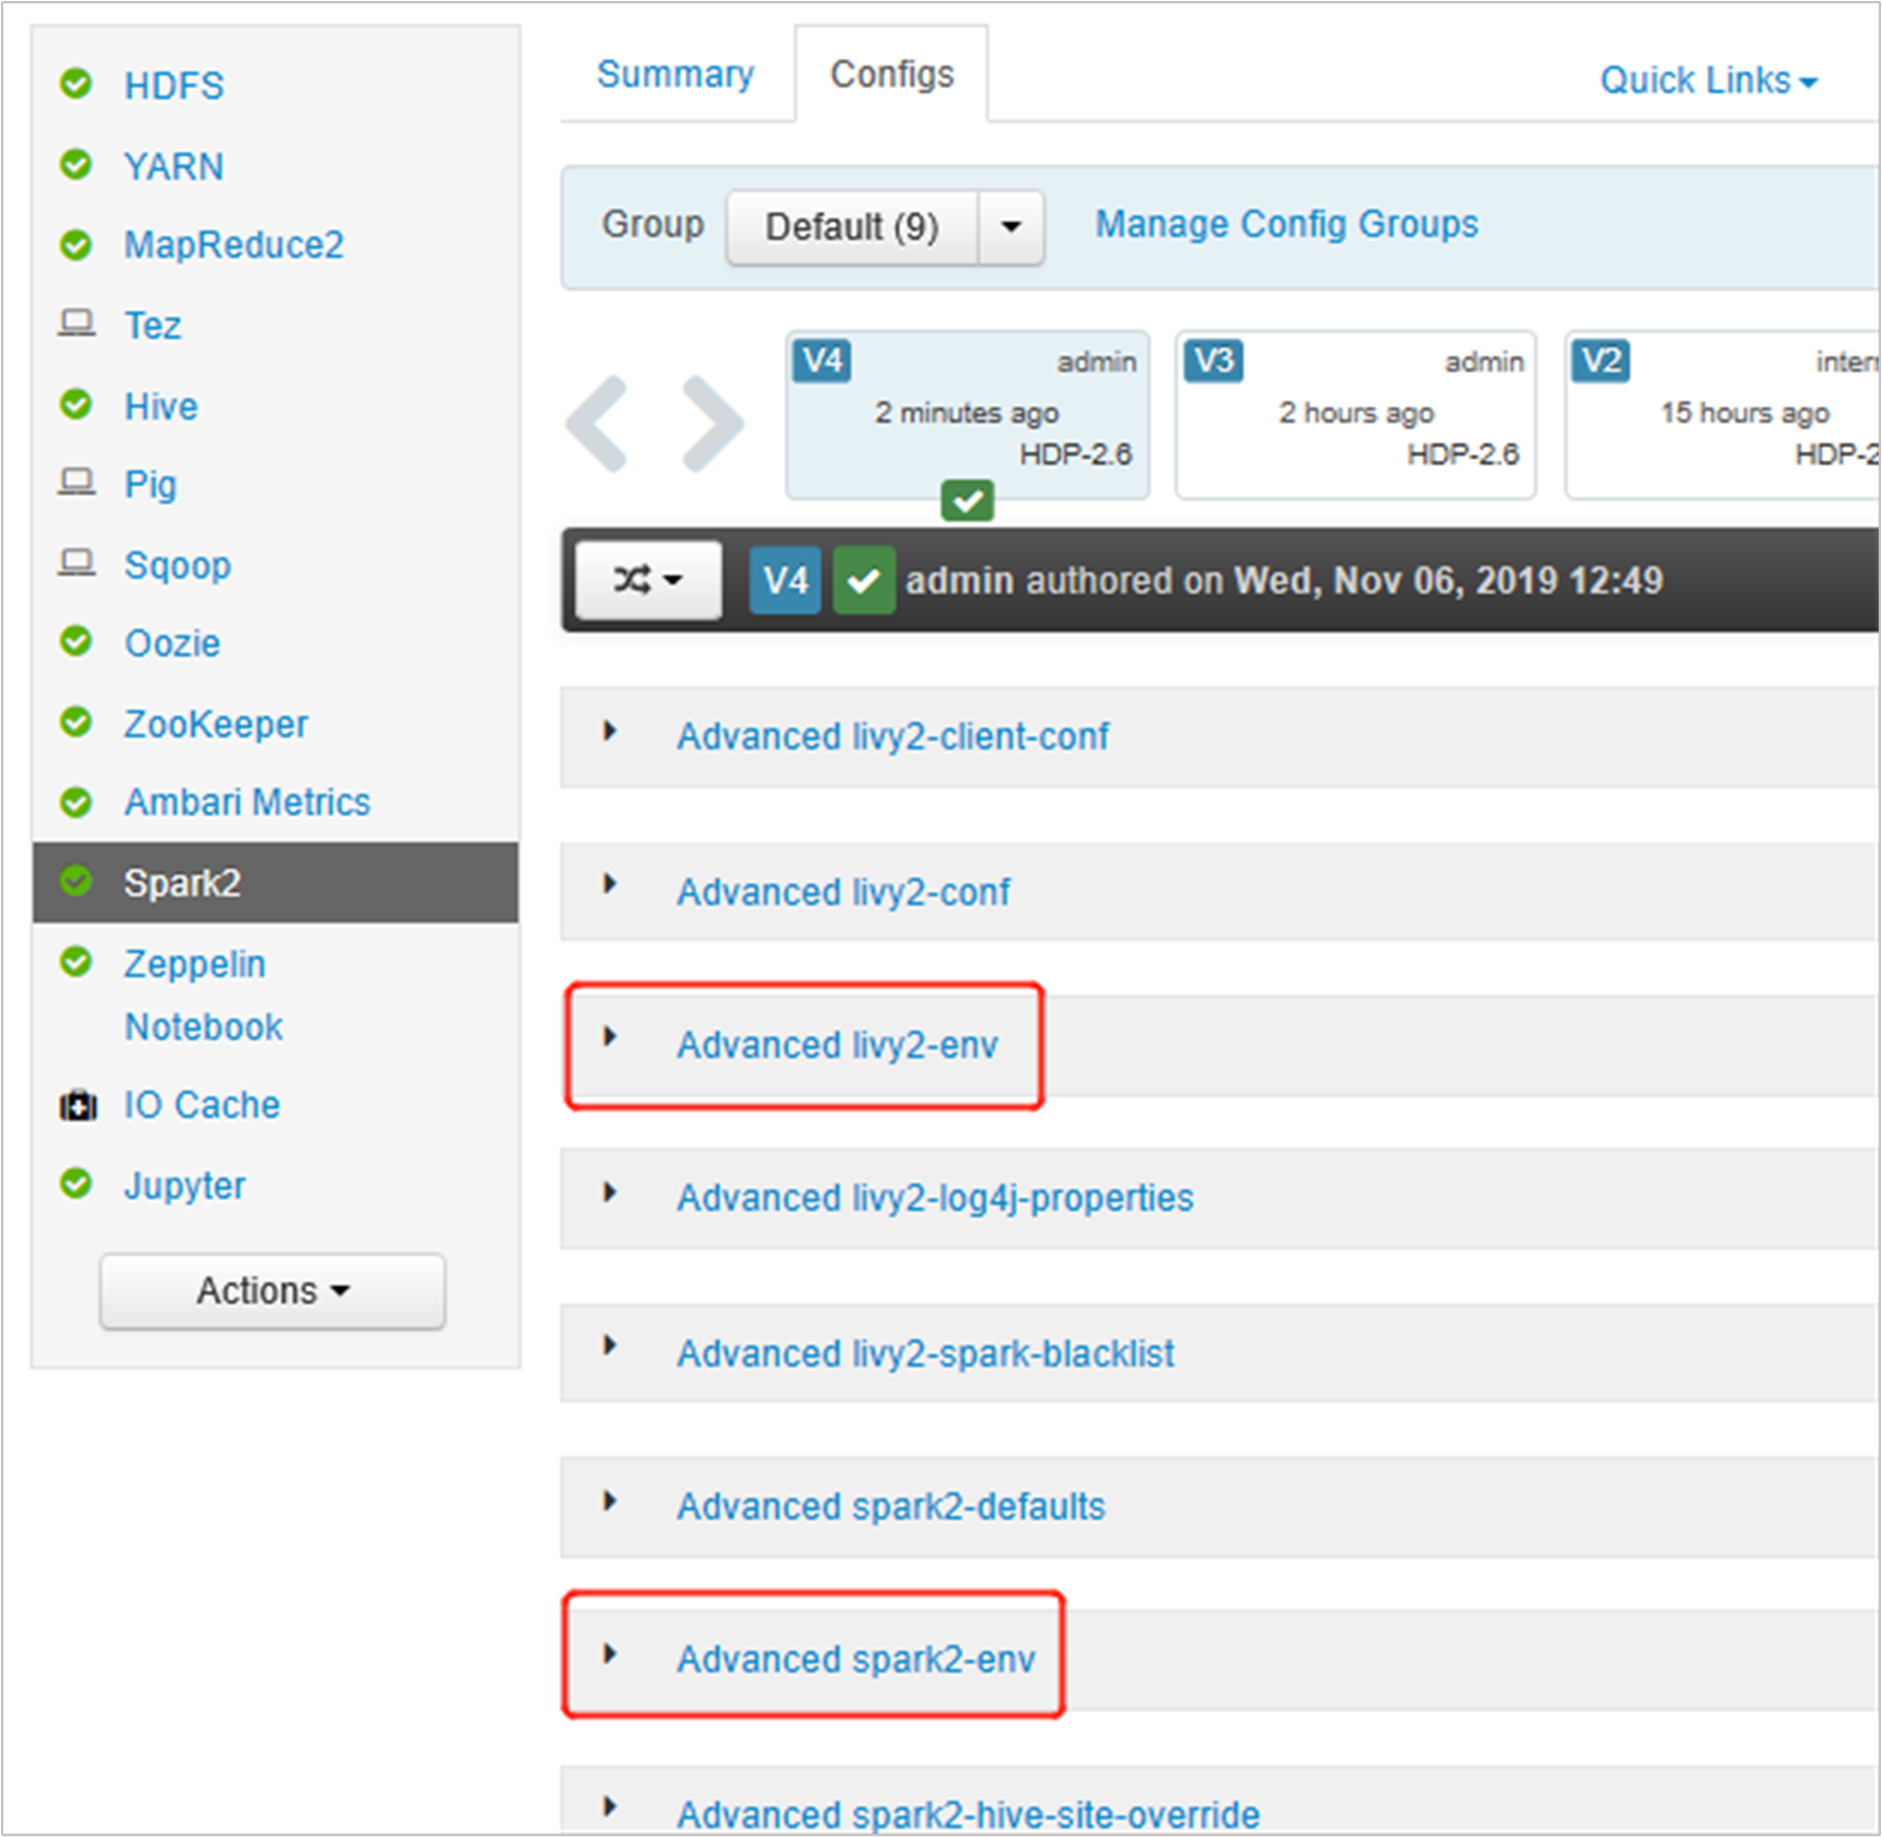
Expand Advanced livy2-env, add following statements at bottom. If you installed the virtual environment with a different prefix, change the path correspondingly.
export PYSPARK_PYTHON=/usr/bin/anaconda/envs/py35new/bin/python
export PYSPARK_DRIVER_PYTHON=/usr/bin/anaconda/envs/py35new/bin/python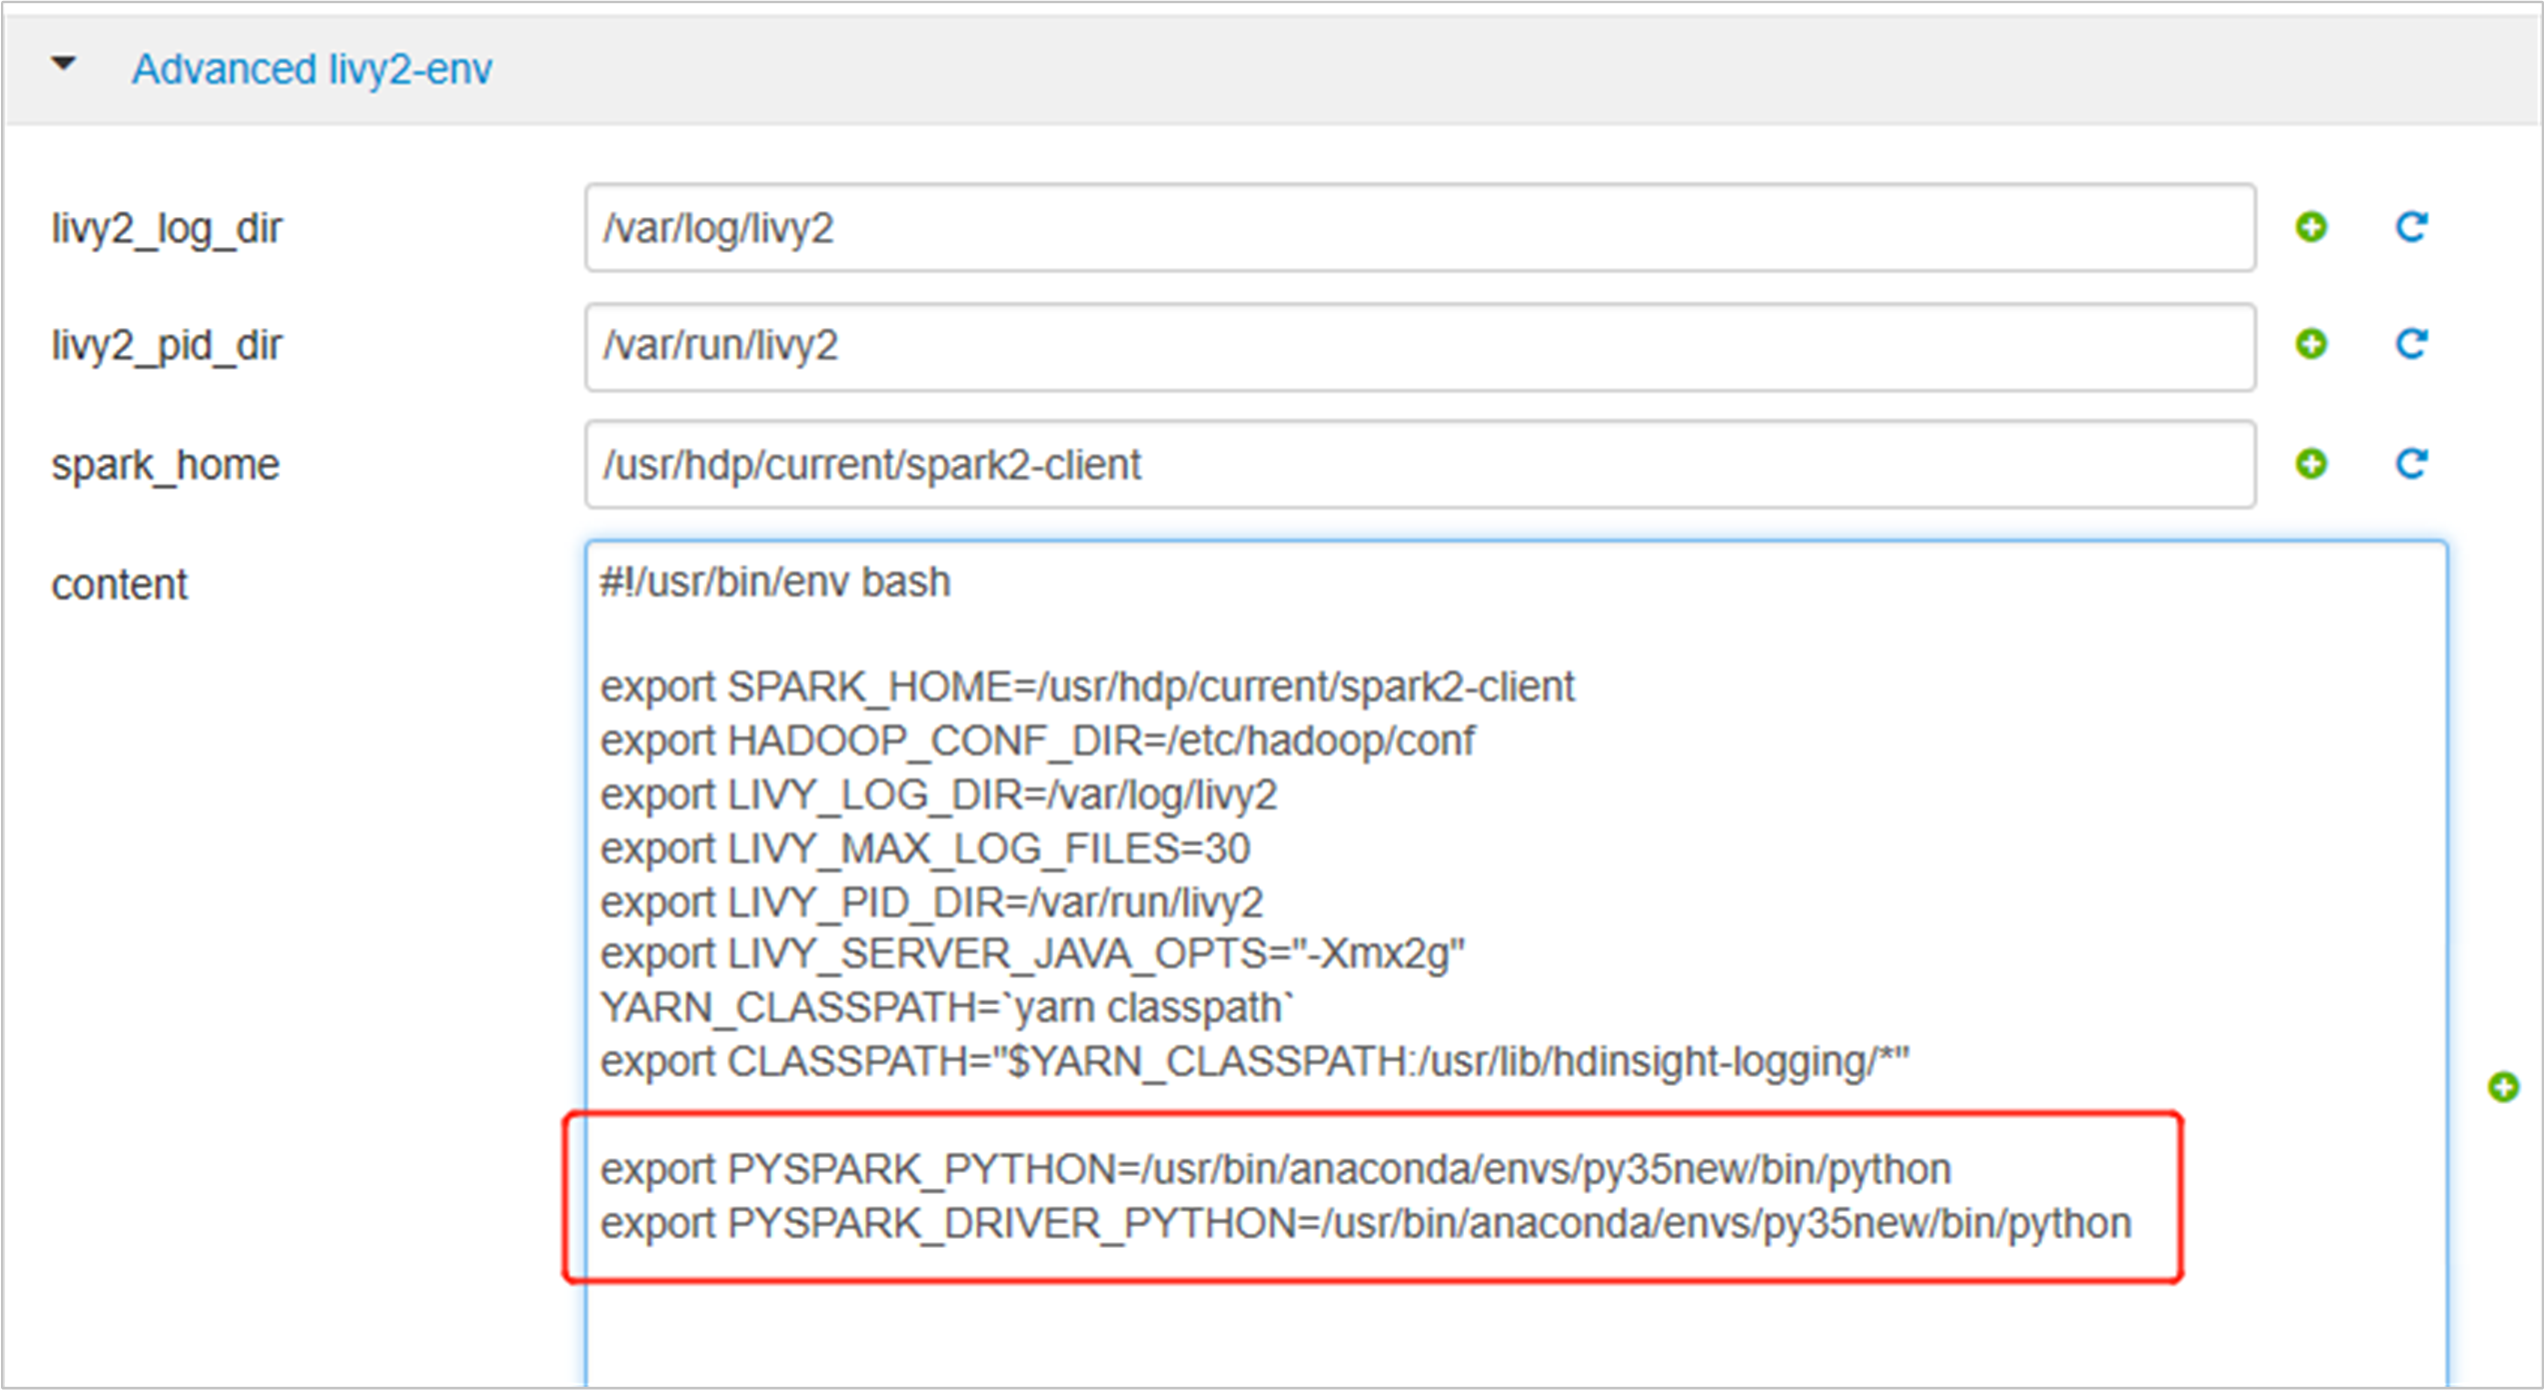
Expand Advanced spark2-env, replace the existing export PYSPARK_PYTHON statement at bottom. If you installed the virtual environment with a different prefix, change the path correspondingly.
export PYSPARK_PYTHON=${PYSPARK_PYTHON:-/usr/bin/anaconda/envs/py35new/bin/python}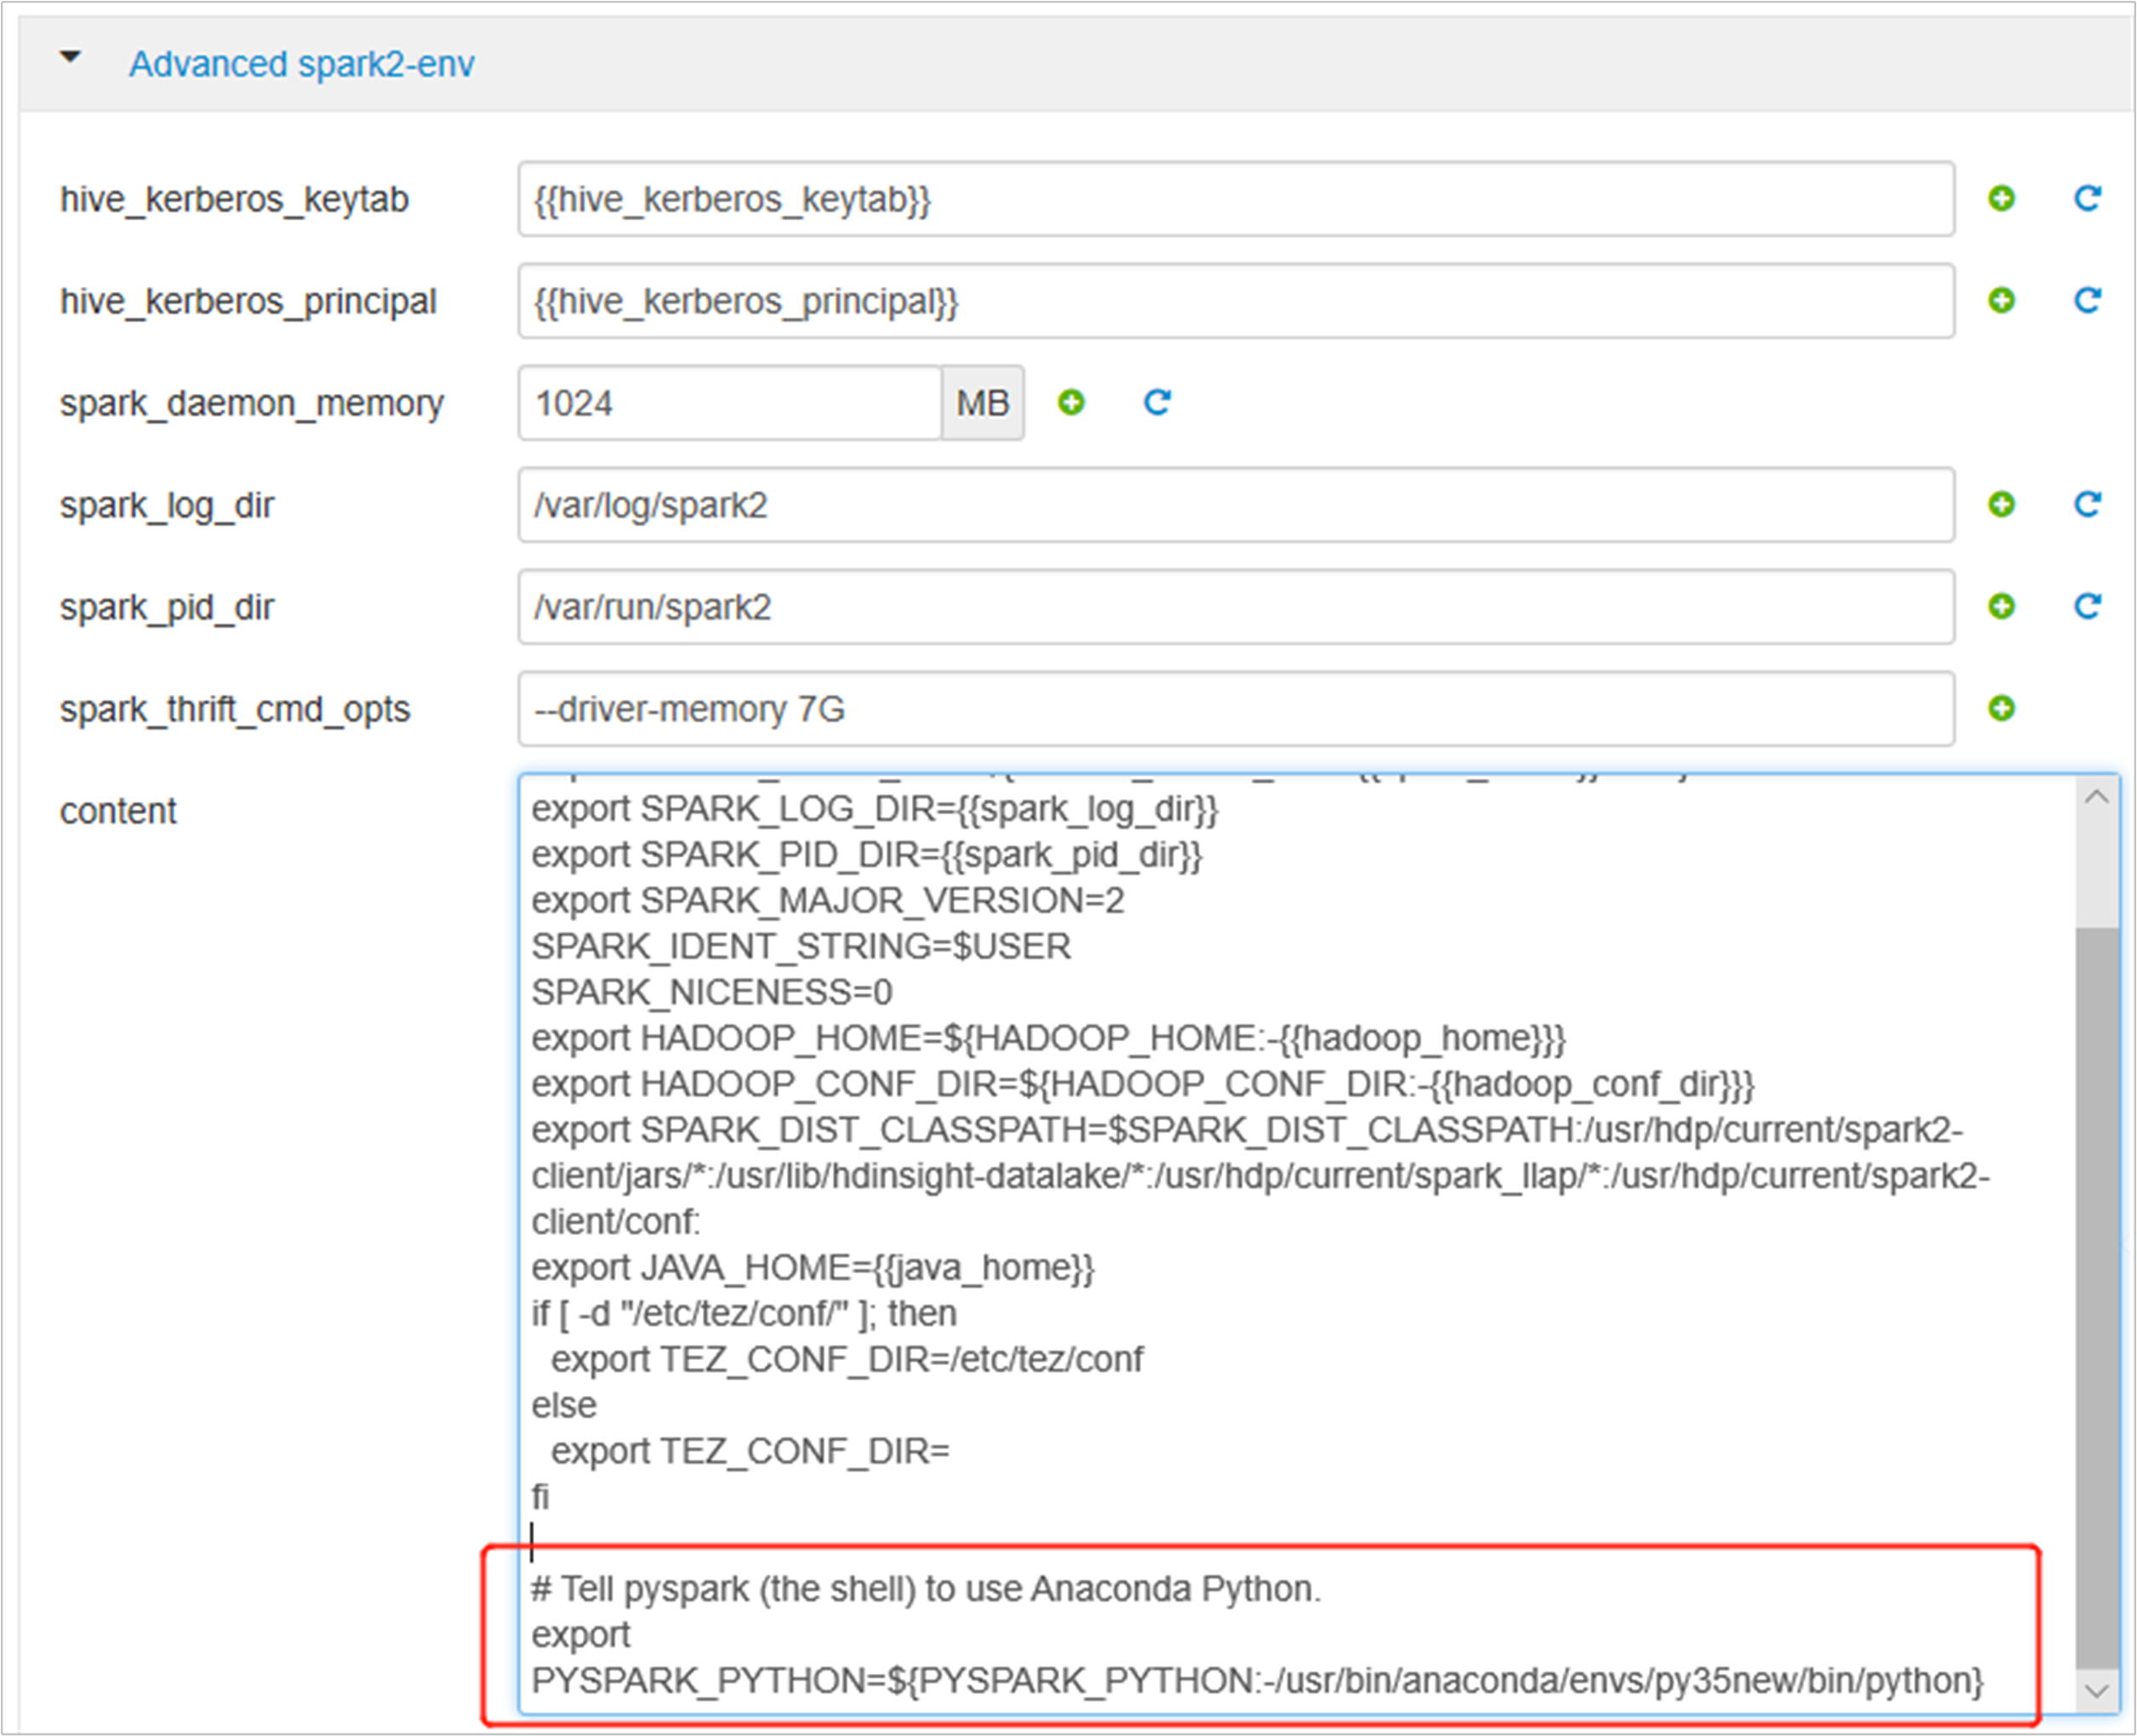
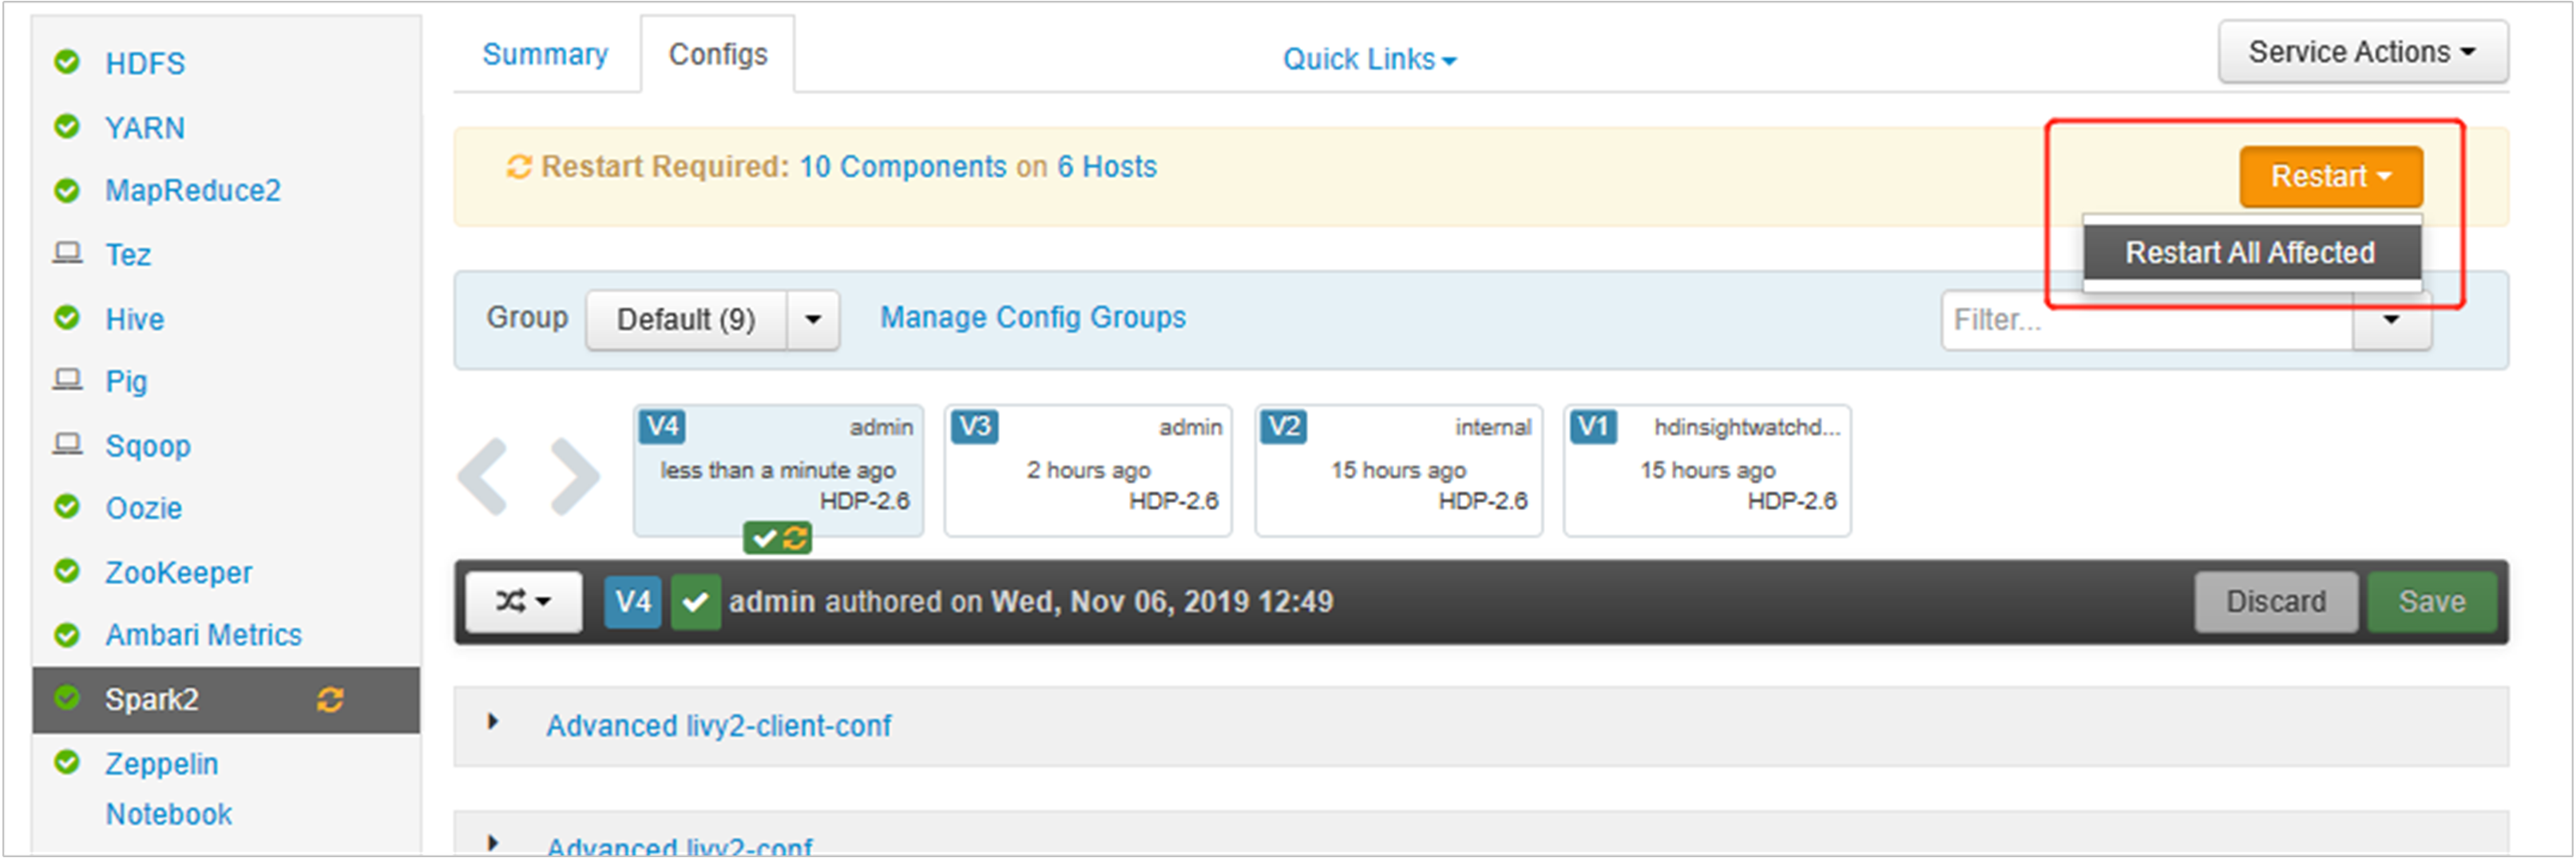
Save the changes and restart affected services. These changes need a restart of Spark 2 service. Ambari UI will prompt a required restart reminder, click Restart to restart all affected services.
Set two properties to your Spark session to ensure that the job points to the updated spark configuration:
spark.yarn.appMasterEnv.PYSPARK_PYTHONandspark.yarn.appMasterEnv.PYSPARK_DRIVER_PYTHON.Using the terminal or a notebook, use the
spark.conf.setfunction.spark.conf.set("spark.yarn.appMasterEnv.PYSPARK_PYTHON", "/usr/bin/anaconda/envs/py35/bin/python") spark.conf.set("spark.yarn.appMasterEnv.PYSPARK_DRIVER_PYTHON", "/usr/bin/anaconda/envs/py35/bin/python")If you are using
livy, add the following properties to the request body:"conf" : { "spark.yarn.appMasterEnv.PYSPARK_PYTHON":"/usr/bin/anaconda/envs/py35/bin/python", "spark.yarn.appMasterEnv.PYSPARK_DRIVER_PYTHON":"/usr/bin/anaconda/envs/py35/bin/python" }
If you would like to use the new created virtual environment on Jupyter. Change Jupyter configs and restart Jupyter. Run script actions on all header nodes with following statement to point Jupyter to the new created virtual environment. Make sure to modify the path to the prefix you specified for your virtual environment. After running this script action, restart Jupyter service through Ambari UI to make this change available.
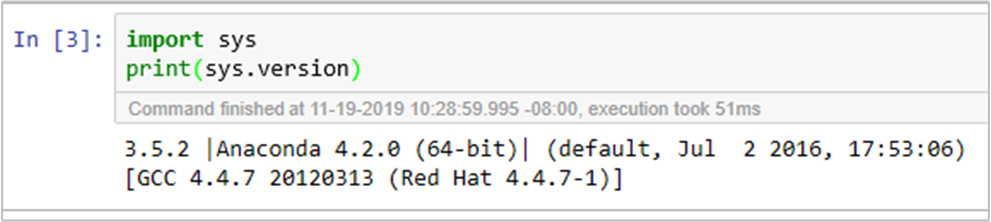
sudo sed -i '/python3_executable_path/c\ \"python3_executable_path\" : \"/usr/bin/anaconda/envs/py35new/bin/python3\"' /home/spark/.sparkmagic/config.jsonYou could double confirm the Python environment in Jupyter Notebook by running the code:
Next steps
Feedback
Coming soon: Throughout 2024 we will be phasing out GitHub Issues as the feedback mechanism for content and replacing it with a new feedback system. For more information see: https://aka.ms/ContentUserFeedback.
Submit and view feedback for