Tutorial: Develop C IoT Edge modules using Windows containers
Applies to: ![]() IoT Edge 1.1
IoT Edge 1.1
Important
IoT Edge 1.1 end of support date was December 13, 2022. Check the Microsoft Product Lifecycle for information about how this product, service, technology, or API is supported. For more information about updating to the latest version of IoT Edge, see Update IoT Edge.
This article shows you how to use Visual Studio to develop C code and deploy it to a Windows device that's running Azure IoT Edge.
Note
IoT Edge 1.1 LTS is the last release channel that supports Windows containers. Starting with version 1.2, Windows containers are not supported. Consider using or moving to IoT Edge for Linux on Windows to run IoT Edge on Windows devices.
You can use Azure IoT Edge modules to deploy code that implements your business logic directly in your IoT Edge devices. This tutorial walks you through creating and deploying an IoT Edge module that filters sensor data.
In this tutorial, you learn how to:
- Use Visual Studio to create an IoT Edge module that's based on the C SDK.
- Use Visual Studio and Docker to create a Docker image and publish it to your registry.
- Deploy the module to your IoT Edge device.
- View generated data.
The IoT Edge module that you create in this tutorial filters the temperature data that's generated by your device. The module sends messages upstream only if the temperature exceeds a specified threshold. This type of analysis at the edge is useful for reducing the amount of data that's communicated to and stored in the cloud.
If you don't have an Azure subscription, create an Azure free account before you begin.
Prerequisites
This tutorial demonstrates how to develop a module in C by using Visual Studio 2019 and then deploy it to a Windows device. If you're developing modules using Linux containers, go to Develop C IoT Edge modules using Linux containers instead.
To understand your options for developing and deploying C modules using Windows containers, refer to the following table:
| C | Visual Studio Code | Visual Studio 2017 and 2019 |
|---|---|---|
| Windows AMD64 |  |
Before you begin this tutorial, set up your development environment by following the instructions in the Develop IoT Edge modules using Windows containers tutorial. After you complete it, your environment will contain the following prerequisites:
- A free or standard-tier IoT hub in Azure.
- A Windows device that's running Azure IoT Edge.
- A container registry, such as Azure Container Registry.
- Visual Studio 2019, configured with the Azure IoT Edge Tools extension.
- Docker Desktop, configured to run Windows containers.
Install the Azure IoT C SDK for Windows x64 through vcpkg by running the following commands:
git clone https://github.com/Microsoft/vcpkg
cd vcpkg
.\bootstrap-vcpkg.bat
.\vcpkg install azure-iot-sdk-c:x64-windows
.\vcpkg --triplet x64-windows integrate install
Tip
If you're using Visual Studio 2017 (version 15.7 or later), download and install Azure IoT Edge Tools for Visual Studio 2017 from Visual Studio Marketplace.
Create a module project
In this section, you create an IoT Edge module project that's based on the C SDK by using Visual Studio and the Azure IoT Edge Tools extension. After you create a project template, you'll add new code so that the module filters out messages based on their reported properties.
Create a new project
Create a C solution template that you can customize with your own code.
Open Visual Studio 2019, and then select Create New Project.
On the Create a new project pane, search for IoT Edge and then, in the results list, select the Azure IoT Edge (Windows amd64) project.
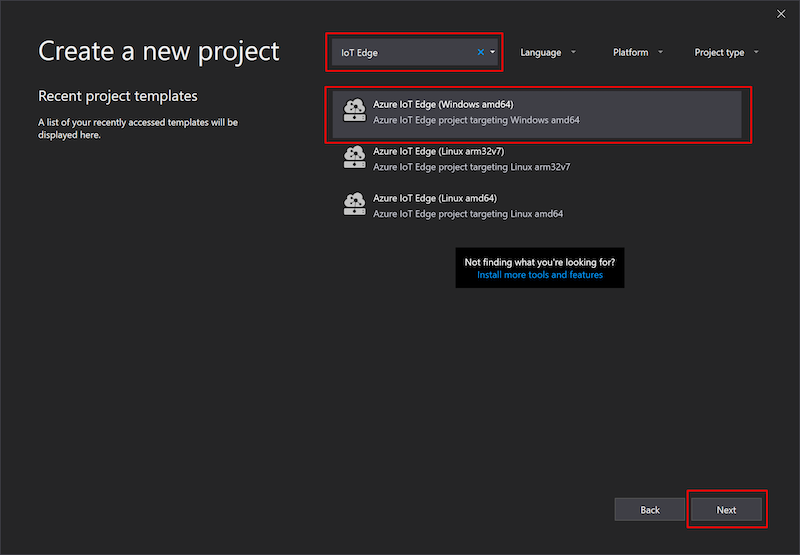
Select Next.
The Configure your new project pane opens.

On the Configure your new project pane, rename the project and solution to something more descriptive, such as CTutorialApp.
Select Create to create the project.
The Add Module pane opens.
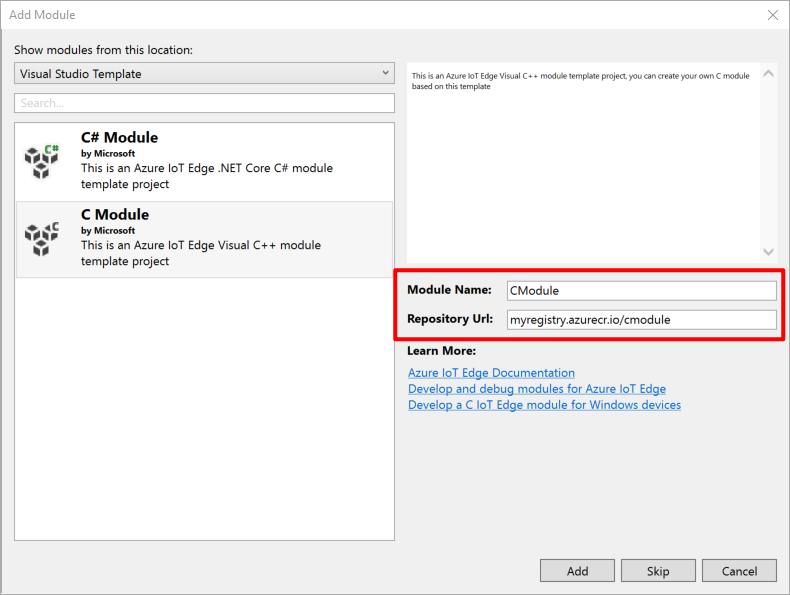
On the Configure your new project page, do the following:
a. On the left pane, select the C Module template.
b. In the Module Name box, enter CModule.
c. In the Repository Url box, replace localhost:5000 with the Login server value from your Azure container registry, in the following format:<registry name>.azurecr.io/cmoduleNote
An image repository includes the name of your container registry and the name of your container image. Your container image is prepopulated from the module project-name value. You can retrieve the login server from the overview page of your container registry in the Azure portal.
Select Add to create the project.
Add your registry credentials
The deployment manifest shares the credentials for your container registry with the IoT Edge runtime. The runtime needs these credentials to pull your private images onto the IoT Edge device. Use the credentials from the Access keys section of your Azure container registry.
In Visual Studio Solution Explorer, open the deployment.template.json file.
Look for the registryCredentials property in the $edgeAgent desired properties. The registry address of the property should be autofilled with the information you provided when you created the project. The username and password fields should contain variable names. For example:
"registryCredentials": {
  "<registry name>": {
    "username": "$CONTAINER_REGISTRY_USERNAME_<registry name>",
    "password": "$CONTAINER_REGISTRY_PASSWORD_<registry name>",
    "address": "<registry name>.azurecr.io"
  }
}
Open the environment (ENV) file in your module solution. By default, the file is hidden in Solution Explorer, so you might need to select the Show All Files button to display it. The ENV file should contain the same username and password variables that you saw in the deployment.template.json file.
Add the Username and Password values from your Azure container registry.
Save your changes to the ENV file.
Update the module with custom code
The default module code receives messages in an input queue and passes them along through an output queue. Let's add some more code so that the module processes the messages at the edge before forwarding them to your IoT hub. Update the module so that it analyzes the temperature data in each message and sends the message to the IoT hub only if the temperature exceeds a certain threshold.
The data from the sensor in this scenario comes in JSON format. To filter messages in JSON format, import a JSON library for C. This tutorial uses Parson.
a. Download the Parson GitHub repository.
b. Copy the parson.c and parson.h files to the CModule project.
c. In Visual Studio, open the CMakeLists.txt file from the CModule project folder.
d. At the top of the file, import the Parson files as a library called my_parson.add_library(my_parson parson.c parson.h )e. Add
my_parsonto the list of libraries in the "target_link_libraries" section of the CMakeLists.txt file.
f. Save the CMakeLists.txt file.
g. Select CModule > main.c. At the bottom of the list of include statements, add a new statement to includeparson.hfor JSON support:#include "parson.h"In the main.c file, add a global variable called
temperatureThresholdnext to themessagesReceivedByInput1Queuevariable. This variable sets the value that the measured temperature must exceed for the data to be sent to your IoT hub.static double temperatureThreshold = 25;Find the
CreateMessageInstancefunction in main.c. Replace the inner if-else statement with the following code, which adds a few lines of functionality:if ((messageInstance->messageHandle = IoTHubMessage_Clone(message)) == NULL) { free(messageInstance); messageInstance = NULL; } else { messageInstance->messageTrackingId = messagesReceivedByInput1Queue; MAP_HANDLE propMap = IoTHubMessage_Properties(messageInstance->messageHandle); if (Map_AddOrUpdate(propMap, "MessageType", "Alert") != MAP_OK) { printf("ERROR: Map_AddOrUpdate Failed!\r\n"); } }The new lines of code in the else statement add a new property to the message, which labels the message as an alert. This code labels all messages as alerts, because we'll add functionality that sends messages to the IoT hub only if they report high temperatures.
Find the
InputQueue1Callbackfunction, and replace the whole function with the following code. This function implements the actual messaging filter. When a message is received, it checks whether the reported temperature exceeds the threshold. If the temperature does exceed the threshold, the function forwards the message through its output queue. If it doesn't exceed the threshold, the function ignores the message.static unsigned char *bytearray_to_str(const unsigned char *buffer, size_t len) { unsigned char *ret = (unsigned char *)malloc(len + 1); memcpy(ret, buffer, len); ret[len] = '\0'; return ret; } static IOTHUBMESSAGE_DISPOSITION_RESULT InputQueue1Callback(IOTHUB_MESSAGE_HANDLE message, void* userContextCallback) { IOTHUBMESSAGE_DISPOSITION_RESULT result; IOTHUB_CLIENT_RESULT clientResult; IOTHUB_MODULE_CLIENT_LL_HANDLE iotHubModuleClientHandle = (IOTHUB_MODULE_CLIENT_LL_HANDLE)userContextCallback; unsigned const char* messageBody; size_t contentSize; if (IoTHubMessage_GetByteArray(message, &messageBody, &contentSize) == IOTHUB_MESSAGE_OK) { messageBody = bytearray_to_str(messageBody, contentSize); } else { messageBody = "<null>"; } printf("Received Message [%zu]\r\n Data: [%s]\r\n", messagesReceivedByInput1Queue, messageBody); // Check whether the message reports temperatures that exceed the threshold JSON_Value *root_value = json_parse_string(messageBody); JSON_Object *root_object = json_value_get_object(root_value); double temperature; // If temperature exceeds the threshold, send to output1 if (json_object_dotget_value(root_object, "machine.temperature") != NULL && (temperature = json_object_dotget_number(root_object, "machine.temperature")) > temperatureThreshold) { printf("Machine temperature %f exceeds threshold %f\r\n", temperature, temperatureThreshold); // This message should be sent to next stop in the pipeline, namely "output1". What happens at "outpu1" is determined // by the configuration of the Edge routing table setup. MESSAGE_INSTANCE *messageInstance = CreateMessageInstance(message); if (NULL == messageInstance) { result = IOTHUBMESSAGE_ABANDONED; } else { printf("Sending message (%zu) to the next stage in pipeline\n", messagesReceivedByInput1Queue); clientResult = IoTHubModuleClient_LL_SendEventToOutputAsync(iotHubModuleClientHandle, messageInstance->messageHandle, "output1", SendConfirmationCallback, (void *)messageInstance); if (clientResult != IOTHUB_CLIENT_OK) { IoTHubMessage_Destroy(messageInstance->messageHandle); free(messageInstance); printf("IoTHubModuleClient_LL_SendEventToOutputAsync failed on sending msg#=%zu, err=%d\n", messagesReceivedByInput1Queue, clientResult); result = IOTHUBMESSAGE_ABANDONED; } else { result = IOTHUBMESSAGE_ACCEPTED; } } } // If message does not exceed the threshold, do not forward else { printf("Not sending message (%zu) to the next stage in pipeline.\r\n", messagesReceivedByInput1Queue); result = IOTHUBMESSAGE_ACCEPTED; } messagesReceivedByInput1Queue++; return result; }Add a
moduleTwinCallbackfunction. This method receives updates on the desired properties from the module twin, and updates the temperatureThreshold variable to match. All modules have their own module twin, which lets you configure the code that's running inside the module directly from the cloud.static void moduleTwinCallback(DEVICE_TWIN_UPDATE_STATE update_state, const unsigned char* payLoad, size_t size, void* userContextCallback) { printf("\r\nTwin callback called with (state=%s, size=%zu):\r\n%s\r\n", MU_ENUM_TO_STRING(DEVICE_TWIN_UPDATE_STATE, update_state), size, payLoad); JSON_Value *root_value = json_parse_string(payLoad); JSON_Object *root_object = json_value_get_object(root_value); if (json_object_dotget_value(root_object, "desired.TemperatureThreshold") != NULL) { temperatureThreshold = json_object_dotget_number(root_object, "desired.TemperatureThreshold"); } if (json_object_get_value(root_object, "TemperatureThreshold") != NULL) { temperatureThreshold = json_object_get_number(root_object, "TemperatureThreshold"); } }Look for the
SetupCallbacksForModulefunction. Replace the function with the following code, which adds an else-if statement to check whether the module twin has been updated.static int SetupCallbacksForModule(IOTHUB_MODULE_CLIENT_LL_HANDLE iotHubModuleClientHandle) { int ret; if (IoTHubModuleClient_LL_SetInputMessageCallback(iotHubModuleClientHandle, "input1", InputQueue1Callback, (void*)iotHubModuleClientHandle) != IOTHUB_CLIENT_OK) { printf("ERROR: IoTHubModuleClient_LL_SetInputMessageCallback(\"input1\")..........FAILED!\r\n"); ret = MU_FAILURE; } else if (IoTHubModuleClient_LL_SetModuleTwinCallback(iotHubModuleClientHandle, moduleTwinCallback, (void*)iotHubModuleClientHandle) != IOTHUB_CLIENT_OK) { printf("ERROR: IoTHubModuleClient_LL_SetModuleTwinCallback(default)..........FAILED!\r\n"); ret = MU_FAILURE; } else { ret = 0; } return ret; }Save the main.c file.
Open the deployment.template.json file.
Add the CModule module twin to the deployment manifest. Insert the following JSON content at the bottom of the
moduleContentsection, after the$edgeHubmodule twin:"CModule": { "properties.desired":{ "TemperatureThreshold":25 } }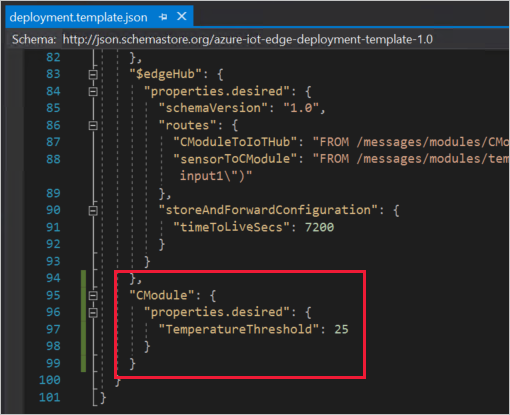
Save the deployment.template.json file.
Build and push your module
In the preceding section, you created an IoT Edge solution and added code to CModule to filter out messages where the reported machine temperature is below the acceptable threshold. Now you need to build the solution as a container image and push it to your container registry.
Sign in to Docker
Provide your container registry credentials to Docker on your development machine so that it can push your container image to be stored in the registry.
Open PowerShell or a Command Prompt window.
Sign in to Docker with the Azure container registry credentials that you saved after you created the registry.
docker login -u <ACR username> -p <ACR password> <ACR login server>You might receive a security warning that recommends the use of
--password-stdin. Although we recommend this as a best practice for production scenarios, it's outside the scope of this tutorial. For more information, see the docker login reference.
Build and push
Your development machine now has access to your container registry, and your IoT Edge devices will too. It's time to turn the project code into a container image.
In Visual Studio Solution Explorer, right-click the name of the project that you want to build. The default name is AzureIotEdgeApp1. For this tutorial, we chose the name CTutorialApp and, because you're building a Windows module, the extension should be Windows.Amd64.
Select Build and Push IoT Edge Modules.
The build and push command starts three operations:
- First, it creates a new folder in the solution named config, which holds the full deployment manifest. It's built from information in the deployment template and other solution files.
- Second, it runs
docker buildto build the container image, based on the appropriate Dockerfile for your target architecture. - Finally, it runs
docker pushto push the image repository to your container registry.
This process might take several minutes the first time, but it will go faster the next time you run the commands.
Deploy modules to the device
Use Visual Studio Cloud Explorer and the Azure IoT Edge Tools extension to deploy the module project to your IoT Edge device. You've already prepared a deployment manifest for your scenario, the deployment.windows-amd64.json file in the config folder. All you need to do now is select a device to receive the deployment.
Make sure that your IoT Edge device is up and running.
In Visual Studio Cloud Explorer, expand the resources to view your list of IoT devices.
Right-click the name of the IoT Edge device that you want to receive the deployment.
Select Create Deployment.
In Visual Studio File Explorer, select the deployment.windows-amd64.json file in the config folder of your solution.
Refresh Cloud Explorer to view the deployed modules that are listed under your device.
View generated data
After you apply the deployment manifest to your IoT Edge device, the IoT Edge runtime on the device collects the new deployment information and starts executing on it. Any modules that are running on the device but not included in the deployment manifest are stopped. Any modules that are missing from the device are started.
You can use the IoT Edge Tools extension to view messages as they arrive at your IoT hub.
In Visual Studio Cloud Explorer, select the name of your IoT Edge device.
In the Actions list, select Start Monitoring Built-in Event Endpoint.
View the messages that are arriving at your IoT hub. It might take a while for the messages to arrive, because the IoT Edge device has to receive its new deployment and start all the modules. The changes to the CModule code must wait until the machine temperature reaches 25 degrees before the messages can be sent. The code also adds the message type Alert to any messages that reach that temperature threshold.

Edit the module twin
You used the CModule module twin to set the temperature threshold at 25 degrees. You can use the module twin to change the functionality without having to update the module code.
In Visual Studio, open the deployment.windows-amd64.json file.
Do not open the deployment.template file. If you don't see the deployment manifest in the config file in Solution Explorer, select the Show all files icon in the Solution Explorer toolbar.
Look for the CModule twin, and change the value of the temperatureThreshold parameter to a new temperature that's 5 to 10 degrees higher than the latest reported temperature.
Save the deployment.windows-amd64.json file.
Follow the deployment instructions again to apply the updated deployment manifest to your device.
Monitor the incoming device-to-cloud messages. The messages should stop until the new temperature threshold is reached.
Clean up resources
If you plan to continue to the next recommended article, you can keep and reuse the resources and configurations that you created in this tutorial. You can also keep using the same IoT Edge device as a test device.
Otherwise, to avoid incurring charges, you can delete the local configurations and the Azure resources that you used here.
Delete Azure resources
Deleting Azure resources and resource groups is irreversible. Make sure that you don't accidentally delete the wrong resource group or resources. If you created the IoT hub inside an existing resource group that has resources that you want to keep, delete only the IoT hub resource itself, not the resource group.
To delete the resources:
Sign in to the Azure portal, and then select Resource groups.
Select the name of the resource group that contains your IoT Edge test resources.
Review the list of resources that are contained in your resource group. If you want to delete all of them, you can select Delete resource group. If you want to delete only some of them, you can click into each resource to delete them individually.
Next steps
In this tutorial, you created an IoT Edge module with code to filter raw data that's generated by your IoT Edge device.
To learn how Azure IoT Edge can help you deploy Azure cloud services to process and analyze data at the edge, continue on to the next tutorials.