Deploy a containerized Python app to App Service
This article is part of a tutorial about how to containerize and deploy a Python web app to Azure App Service. App Service enables you to run containerized web apps and deploy through continuous integration/continuous deployment (CI/CD) capabilities with Docker Hub, Azure Container Registry, and Visual Studio Team Services.
In this part of the tutorial, you learn how to deploy the containerized Python web app to App Service using the App Service Web App for Containers. Web App for Containers allows you to focus on composing your containers without worrying about managing and maintaining an underlying container orchestrator.
Following the steps here, you'll end up with an App Service website using a Docker container image. The App Service pulls the initial image from Azure Container Registry using managed identity for authentication.
The service diagram shown below highlights the components covered in this article.
1. Create the web app
Azure CLI commands can be run in the Azure Cloud Shell or on a workstation with the Azure CLI installed.
Step 1. Get the resource ID of the group containing Azure Container Registry with the az group show command.
# RESOURCE_GROUP_NAME='msdocs-web-app-rg'

RESOURCE_ID=$(az group show \
  --resource-group $RESOURCE_GROUP_NAME \
  --query id \
  --output tsv)
echo $RESOURCE_ID
In the command above, RESOURCE_GROUP_NAME should still be set in your environment to the resource group name you used in part 3. Build container in Azure of this tutorial. If it isn't, uncomment the first line and make sure it's set to the name you used.
Step 2. Create an App Service plan with the az appservice plan create command.
APP_SERVICE_PLAN_NAME='msdocs-web-app-plan'

az appservice plan create \
    --name $APP_SERVICE_PLAN_NAME \
    --resource-group $RESOURCE_GROUP_NAME \
    --sku B1 \
    --is-linux
Step 3. Create a web app with the az webapp create command.
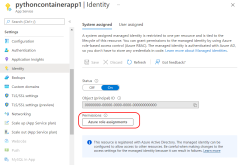
The following command also enables the system-assigned managed identity for the web app and assigns it the AcrPull role on the specified resource--in this case, the resource group that contains the Azure Container Registry. This grants the system-assigned managed identity pull privileges on any Azure Container Registry in the resource group.
APP_SERVICE_NAME='<website-name>'
# REGISTRY_NAME='<your Azure Container Registry name>'
CONTAINER_NAME=$REGISTRY_NAME'.azurecr.io/msdocspythoncontainerwebapp:latest'

az webapp create \
  --resource-group $RESOURCE_GROUP_NAME \
  --plan $APP_SERVICE_PLAN_NAME \
  --name $APP_SERVICE_NAME \
  --assign-identity '[system]' \
  --scope $RESOURCE_ID \
  --role acrpull \
  --deployment-container-image-name $CONTAINER_NAME
In the command above:
- APP_SERVICE_NAME must be globally unique as it becomes the website name in the URL
https://<website-name>.azurewebsites.net. - CONTAINER_NAME is of the form "yourregistryname.azurecr.io/repo_name:tag".
- REGISTRY_NAME should still be set in your environment to the registry name you used in part 3. Build container in Azure of this tutorial. If it isn't, uncomment the line where it's set above and make sure it's set to the name you used.
Note
You may see an error similar to the following when running the command:
No credential was provided to access Azure Container Registry. Trying to look up...
Retrieving credentials failed with an exception:'No resource or more than one were found with name ...'
This error occurs because the web app defaults to using the Azure Container Registry's admin credentials to authenticate with the registry and admin credentials haven't been enabled on the registry. You can safely ignore this error because you will set the web app to use the system-assigned managed identity for authentication in the next command.
2. Configure managed identity and webhook
Step 1. Configure the web app to use managed identities to pull from the Azure Container Registry with the az webapp config set command.
az webapp config set \
  --resource-group $RESOURCE_GROUP_NAME \
  --name $APP_SERVICE_NAME \
  --generic-configurations '{"acrUseManagedIdentityCreds": true}'
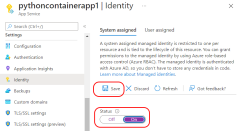
Because you enabled the system-assigned managed identity when you created the web app, it will be the managed identity used to pull from the Azure Container Registry.
Step 2. Get the application scope credential with the az webapp deployment list-publishing-credentials command.
CREDENTIAL=$(az webapp deployment list-publishing-credentials \
  --resource-group $RESOURCE_GROUP_NAME \
  --name $APP_SERVICE_NAME \
  --query publishingPassword \
  --output tsv)
echo $CREDENTIAL
Step 3. Use the application scope credential to create a webhook with the az acr webhook create command.
SERVICE_URI='https://$'$APP_SERVICE_NAME':'$CREDENTIAL'@'$APP_SERVICE_NAME'.scm.azurewebsites.net/api/registry/webhook'

az acr webhook create \
  --name webhookforwebapp \
  --registry $REGISTRY_NAME \
  --scope msdocspythoncontainerwebapp:* \
  --uri $SERVICE_URI \
  --actions push
By default, this command creates the webhook in the same resource group and location as the specified Azure Container registry. If desired, you can use the --resource-group and --location parameters to override this behavior.
3. Configure connection to MongoDB
In this step, you specify environment variables needed to connect to MongoDB.
If you need to create an Azure Cosmos DB for MongoDB, we recommend you follow the steps to set up Cosmos DB for MangoDB in part 2. Build and test container locally of this tutorial. When you're finished, you should have an Azure Cosmos DB for MongoDB connection string of the form mongodb://<server-name>:<password>@<server-name>.mongo.cosmos.azure.com:10255/?ssl=true&<other-parameters>.
You'll need the MongoDB connection string info to follow the steps below.
To set environment variables in App Service, you create app settings with the following az webapp config appsettings set command.
MONGO_CONNECTION_STRING='your Mongo DB connection string in single quotes'
MONGO_DB_NAME=restaurants_reviews
MONGO_COLLECTION_NAME=restaurants_reviews

az webapp config appsettings set \
   --resource-group $RESOURCE_GROUP_NAME \
   --name $APP_SERVICE_NAME \
   --settings CONNECTION_STRING=$MONGO_CONNECTION_STRING \
              DB_NAME=$MONGO_DB_NAME  \
              COLLECTION_NAME=$MONGO_COLLECTION_NAME
- CONNECTION_STRING: A connection string that starts with "mongodb://".
- DB_NAME: Use "restaurants_reviews".
- COLLECTION_NAME: Use "restaurants_reviews".
4. Browse the site
To verify the site is running, go to https://<website-name>.azurewebsites.net; where website name is your app service name. If successful, you should see the restaurant review sample app. It can take a few moments for the site to start the first time. When the site appears, add a restaurant, and a review for that restaurant to confirm the sample app is functioning.
If you're running the Azure CLI locally, you can use the az webapp browse command to browse to the web site. If you're using Cloud Shell, open a browser window and navigate to the website URL.
az webapp browse --name $APP_SERVICE_NAME --resource-group $RESOURCE_GROUP_NAME
Note
The az webapp browse command isn't supported in Cloud Shell. Open a browser window and navigate to the website URL instead.
5. Troubleshoot deployment
If you don't see the sample app, try the following steps.
- With container deployment and App Service, always check the Deployment Center / Logs page in the Azure portal. Confirm that the container was pulled and is running. The initial pull and running of the container can take a few moments.
- Try to restart the App Service and see if that resolves your issue.
- If there are programming errors, those errors will show up in the application logs. On the Azure portal page for the App Service, select Diagnose and solve problems/Application logs.
- The sample app relies on a connection to MongoDB. Confirm that the App Service has application settings with the correct connection info.
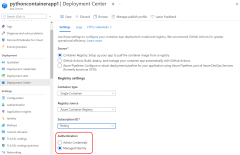
- Confirm that managed identity is enabled for the App Service and is used in the Deployment Center. On the Azure portal page for the App Service, go to the App Service Deployment Center resource and confirm that Authentication is set to Managed Identity.
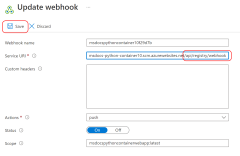
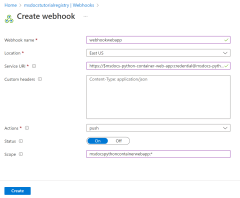
- Check that the webhook is defined in the Azure Container Registry. The webhook enables the App Service to pull the container image. In particular, check that Service URI ends with "/api/registry/webhook".
- Different Azure Container Registry skus have different features, including number of webhooks. If you're reusing an existing registry, you could see the message: "Quota exceeded for resource type webhooks for the registry SKU Basic. Learn more about different SKU quotas and upgrade process: https://aka.ms/acr/tiers". If you see this message, use a new registry, or reduce the number of registry webhooks in use.
Next step
Feedback
Coming soon: Throughout 2024 we will be phasing out GitHub Issues as the feedback mechanism for content and replacing it with a new feedback system. For more information see: https://aka.ms/ContentUserFeedback.
Submit and view feedback for


