2 - Create and load Search Index with Python
Continue to build your search-enabled website by following these steps:
- Create a search resource
- Create a new index
- Import data with Python using the sample script and Azure SDK azure-search-documents.
Create an Azure AI Search resource
Create a new search resource from the command line using either the Azure CLI or Azure PowerShell. You also retrieve a query key used for read-access to the index, and get the built-in admin key used for adding objects.
You must have Azure CLI or Azure PowerShell installed on your device. If you aren't a local admin on your device, choose Azure PowerShell and use the Scope parameter to run as the current user.
Note
This task doesn't require the Visual Studio Code extensions for Azure CLI and Azure PowerShell. Visual Studio Code recognizes the command line tools without the extensions.
In Visual Studio Code, under Terminal, select New Terminal.
Connect to Azure:
az loginBefore creating a new search service, list the existing services for your subscription:
az resource list --resource-type Microsoft.Search/searchServices --output tableIf you have a service that you want to use, note the name, and then skip ahead to the next section.
Create a new search service. Use the following command as a template, substituting valid values for the resource group, service name, tier, region, partitions, and replicas. The following statement uses the "cognitive-search-demo-rg" resource group created in a previous step and specifies the "free" tier. If your Azure subscription already has a free search service, specify a billable tier such as "basic" instead.
az search service create --name my-cog-search-demo-svc --resource-group cognitive-search-demo-rg --sku free --partition-count 1 --replica-count 1Get a query key that grants read access to a search service. A search service is provisioned with two admin keys and one query key. Substitute valid names for the resource group and search service. Copy the query key to Notepad so that you can paste it into the client code in a later step:
az search query-key list --resource-group cognitive-search-demo-rg --service-name my-cog-search-demo-svcGet a search service admin API key. An admin API key provides write access to the search service. Copy either one of the admin keys to Notepad so that you can use it in the bulk import step that creates and loads an index:
az search admin-key show --resource-group cognitive-search-demo-rg --service-name my-cog-search-demo-svc
Prepare the bulk import script for Search
The script uses the Azure SDK for Azure AI Search:
In Visual Studio Code, open the
bulk_upload.pyfile in the subdirectory,search-website-functions-v4/bulk-upload, replace the following variables with your own values to authenticate with the Azure Search SDK:- YOUR-SEARCH-SERVICE-NAME
- YOUR-SEARCH-SERVICE-ADMIN-API-KEY
import sys
import json
import requests
import pandas as pd
from azure.core.credentials import AzureKeyCredential
from azure.search.documents import SearchClient
from azure.search.documents.indexes import SearchIndexClient
from azure.search.documents.indexes.models import SearchIndex
from azure.search.documents.indexes.models import (
    ComplexField,
    CorsOptions,
    SearchIndex,
    ScoringProfile,
    SearchFieldDataType,
    SimpleField,
    SearchableField,
)

# Get the service name (short name) and admin API key from the environment
service_name = "YOUR-SEARCH-SERVICE-NAME"
key = "YOUR-SEARCH-SERVICE-ADMIN-API-KEY"
endpoint = "https://{}.search.windows.net/".format(service_name)

# Give your index a name
# You can also supply this at runtime in __main__
index_name = "good-books"

# Search Index Schema definition
index_schema = "./good-books-index.json"

# Books catalog
books_url = "https://raw.githubusercontent.com/Azure-Samples/azure-search-sample-data/main/good-books/books.csv"
batch_size = 1000

# Instantiate a client
class CreateClient(object):
    def __init__(self, endpoint, key, index_name):
        self.endpoint = endpoint
        self.index_name = index_name
        self.key = key
        self.credentials = AzureKeyCredential(key)

    # Create a SearchClient
    # Use this to upload docs to the Index
    def create_search_client(self):
        return SearchClient(
            endpoint=self.endpoint,
            index_name=self.index_name,
            credential=self.credentials,
        )

    # Create a SearchIndexClient
    # This is used to create, manage, and delete an index
    def create_admin_client(self):
        return SearchIndexClient(endpoint=endpoint, credential=self.credentials)


# Get Schema from File or URL
def get_schema_data(schema, url=False):
    if not url:
        with open(schema) as json_file:
            schema_data = json.load(json_file)
            return schema_data
    else:
        data_from_url = requests.get(schema)
        schema_data = json.loads(data_from_url.content)
        return schema_data


# Create Search Index from the schema
# If reading the schema from a URL, set url=True
def create_schema_from_json_and_upload(schema, index_name, admin_client, url=False):

    cors_options = CorsOptions(allowed_origins=["*"], max_age_in_seconds=60)
    scoring_profiles = []
    schema_data = get_schema_data(schema, url)

    index = SearchIndex(
        name=index_name,
        fields=schema_data["fields"],
        scoring_profiles=scoring_profiles,
        suggesters=schema_data["suggesters"],
        cors_options=cors_options,
    )

    try:
        upload_schema = admin_client.create_index(index)
        if upload_schema:
            print(f"Schema uploaded; Index created for {index_name}.")
        else:
            exit(0)
    except:
        print("Unexpected error:", sys.exc_info()[0])


# Convert CSV data to JSON
def convert_csv_to_json(url):
    df = pd.read_csv(url)
    convert = df.to_json(orient="records")
    return json.loads(convert)


# Batch your uploads to Azure Search
def batch_upload_json_data_to_index(json_file, client):
    batch_array = []
    count = 0
    batch_counter = 0
    for i in json_file:
        count += 1
        batch_array.append(
            {
                "id": str(i["book_id"]),
                "goodreads_book_id": int(i["goodreads_book_id"]),
                "best_book_id": int(i["best_book_id"]),
                "work_id": int(i["work_id"]),
                "books_count": i["books_count"] if i["books_count"] else 0,
                "isbn": str(i["isbn"]),
                "isbn13": str(i["isbn13"]),
                "authors": i["authors"].split(",") if i["authors"] else None,
                "original_publication_year": int(i["original_publication_year"])
                if i["original_publication_year"]
                else 0,
                "original_title": i["original_title"],
                "title": i["title"],
                "language_code": i["language_code"],
                "average_rating": int(i["average_rating"])
                if i["average_rating"]
                else 0,
                "ratings_count": int(i["ratings_count"]) if i["ratings_count"] else 0,
                "work_ratings_count": int(i["work_ratings_count"])
                if i["work_ratings_count"]
                else 0,
                "work_text_reviews_count": i["work_text_reviews_count"]
                if i["work_text_reviews_count"]
                else 0,
                "ratings_1": int(i["ratings_1"]) if i["ratings_1"] else 0,
                "ratings_2": int(i["ratings_2"]) if i["ratings_2"] else 0,
                "ratings_3": int(i["ratings_3"]) if i["ratings_3"] else 0,
                "ratings_4": int(i["ratings_4"]) if i["ratings_4"] else 0,
                "ratings_5": int(i["ratings_5"]) if i["ratings_5"] else 0,
                "image_url": i["image_url"],
                "small_image_url": i["small_image_url"],
            }
        )

        # In this sample, we limit batches to 1000 records.
        # When the counter hits a number divisible by 1000, the batch is sent.
        if count % batch_size == 0:
            client.upload_documents(documents=batch_array)
            batch_counter += 1
            print(f"Batch sent! - #{batch_counter}")
            batch_array = []

    # This will catch any records left over, when not divisible by 1000
    if len(batch_array) > 0:
        client.upload_documents(documents=batch_array)
        batch_counter += 1
        print(f"Final batch sent! - #{batch_counter}")

    print("Done!")


if __name__ == "__main__":
    start_client = CreateClient(endpoint, key, index_name)
    admin_client = start_client.create_admin_client()
    search_client = start_client.create_search_client()
    schema = create_schema_from_json_and_upload(
        index_schema, index_name, admin_client, url=False
    )
    books_data = convert_csv_to_json(books_url)
    batch_upload = batch_upload_json_data_to_index(books_data, search_client)
    print("Upload complete")
Open an integrated terminal in Visual Studio for the project directory's subdirectory,
search-website-functions-v4/bulk-upload, and run the following command to install the dependencies.python3 -m pip install -r requirements.txt
Run the bulk import script for Search
Continue using the integrated terminal in Visual Studio for the project directory's subdirectory,
search-website-functions-v4/bulk-upload, to run the following bash command to run thebulk_upload.pyscript:python3 bulk-upload.pyAs the code runs, the console displays progress.
When the upload is complete, the last statement printed to the console is "Done! Upload complete".
Review the new Search Index
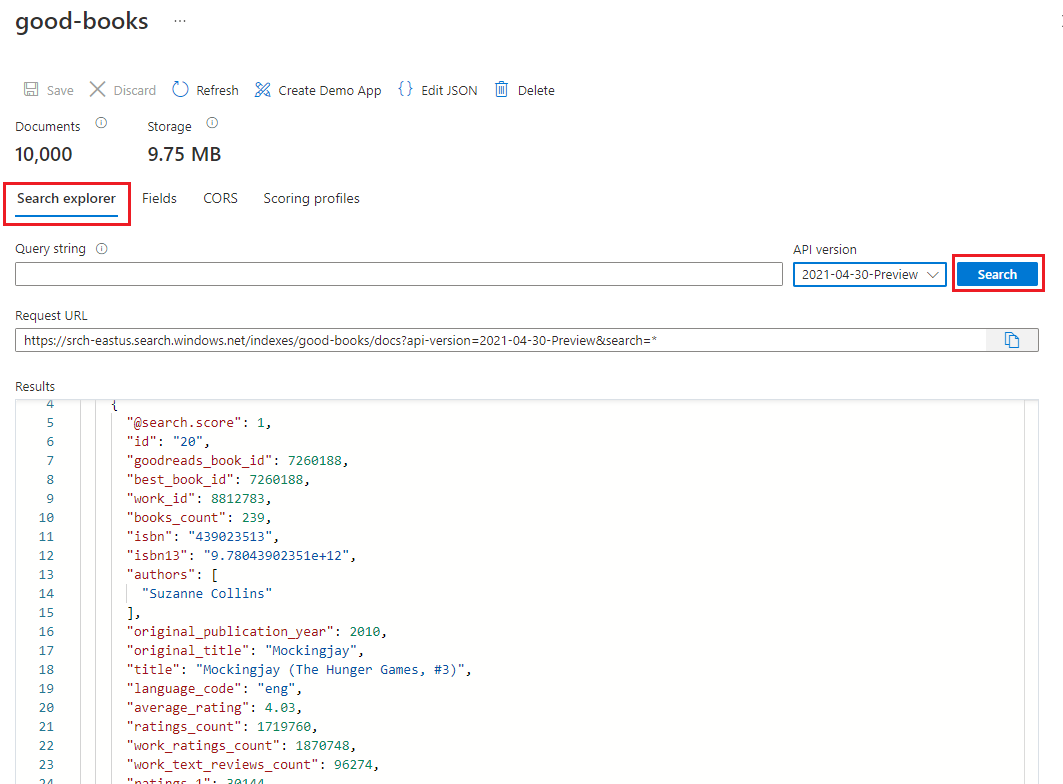
Once the upload completes, the search index is ready to use. Review your new index in Azure portal.
In Azure portal, find the search service you created in the previous step.
On the left, select Indexes, and then select the good-books index.

By default, the index opens in the Search explorer tab. Select Search to return documents from the index.


Rollback bulk import file changes
Use the following git command in the Visual Studio Code integrated terminal at the bulk-insert directory, to roll back the changes. They aren't needed to continue the tutorial and you shouldn't save or push these secrets to your repo.
git checkout .
Copy your Search resource name
Note your Search resource name. You'll need this to connect the Azure Function app to your search resource.
Caution
While you may be tempted to use your search admin key in the Azure Function, that isn't following the principle of least privilege. The Azure Function will use the query key to conform to least privilege.
Next steps
Feedback
Coming soon: Throughout 2024 we will be phasing out GitHub Issues as the feedback mechanism for content and replacing it with a new feedback system. For more information see: https://aka.ms/ContentUserFeedback.
Submit and view feedback for