Azure Log Integration tutorial: Process Azure Key Vault events by using Event Hubs
Important
The Azure Log integration feature will be deprecated by 06/15/2019. AzLog downloads were disabled on Jun 27, 2018. For guidance on what to do moving forward review the post Use Azure monitor to integrate with SIEM tools
You can use Azure Log Integration to retrieve logged events and make them available to your security information and event management (SIEM) system. This tutorial shows an example of how Azure Log Integration can be used to process logs that are acquired through Azure Event Hubs.
The preferred method for integrating Azure logs is by using your SIEM vendor's Azure Monitor connector and following these instructions. However, if your SIEM vendor doesn't provide a connector to Azure Monitor, you may be able to use Azure Log Integration as a temporary solution (if your SIEM is supported by Azure Log Integration) until such a connector is available.
Use this tutorial to get acquainted with how Azure Log Integration and Event Hubs work together by following the example steps and understanding how each step supports the solution. Then you can take what you've learned here to create your own steps to support your company's unique requirements.
Warning
The steps and commands in this tutorial are not intended to be copied and pasted. They're examples only. Do not use the PowerShell commands "as is" in your live environment. You must customize them based on your unique environment.
This tutorial walks you through the process of taking Azure Key Vault activity logged to an event hub and making it available as JSON files to your SIEM system. You can then configure your SIEM system to process the JSON files.
Note
Most of the steps in this tutorial involve configuring key vaults, storage accounts, and event hubs. The specific Azure Log Integration steps are at the end of this tutorial. Do not perform these steps in a production environment. They are intended for a lab environment only. You must customize the steps before using them in production.
Information provided along the way helps you understand the reasons behind each step. Links to other articles give you more detail on certain topics.
For more information about the services that this tutorial mentions, see:
Initial setup
Note
We recommend that you use the Azure Az PowerShell module to interact with Azure. See Install Azure PowerShell to get started. To learn how to migrate to the Az PowerShell module, see Migrate Azure PowerShell from AzureRM to Az.
Before you can complete the steps in this article, you need the following:
An Azure subscription and account on that subscription with administrator rights. If you don't have a subscription, you can create a free account.
A system with access to the internet that meets the requirements for installing Azure Log Integration. The system can be on a cloud service or hosted on-premises.
Azure Log Integration installed. To install it:
a. Use Remote Desktop to connect to the system mentioned in step 2.
b. Copy the Azure Log Integration installer to the system. c. Start the installer and accept the Microsoft Software License Terms.If you will provide telemetry information, leave the check box selected. If you'd rather not send usage information to Microsoft, clear the check box.
For more information about Azure Log Integration and how to install it, see Azure Log Integration with Azure Diagnostics logging and Windows Event Forwarding.
The latest PowerShell version.
If you have Windows Server 2016 installed, then you have at least PowerShell 5.0. If you're using any other version of Windows Server, you might have an earlier version of PowerShell installed. You can check the version by entering
get-hostin a PowerShell window. If you don't have PowerShell 5.0 installed, you can download it.After you have at least PowerShell 5.0, you can proceed to install the latest version by following the instructions in Install Azure PowerShell.
Create supporting infrastructure elements
Open an elevated PowerShell window and go to C:\Program Files\Microsoft Azure Log Integration.
Import the AzLog cmdlets by running the script LoadAzLogModule.ps1. Enter the
.\LoadAzLogModule.ps1command. (Notice the "." in that command.) You should see something like this: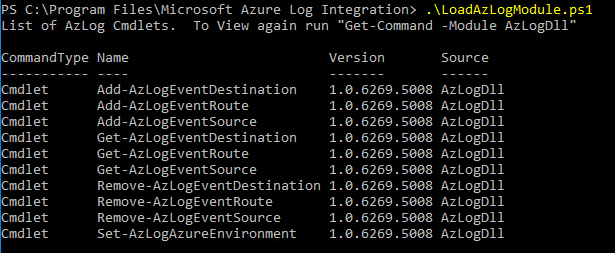
Enter the
Connect-AzAccountcommand. In the login window, enter the credential information for the subscription that you will use for this tutorial.Note
If this is the first time that you're logging in to Azure from this machine, you will see a message about allowing Microsoft to collect PowerShell usage data. We recommend that you enable this data collection because it will be used to improve Azure PowerShell.
After successful authentication, you're logged in. Take note of the subscription ID and subscription name, because you'll need them to complete later steps.
Create variables to store values that will be used later. Enter each of the following PowerShell lines. You might need to adjust the values to match your environment.
$subscriptionName = 'Visual Studio Ultimate with MSDN'(Your subscription name might be different. You can see it as part of the output of the previous command.)$location = 'West US'(This variable will be used to pass the location where resources should be created. You can change this variable to be any location of your choosing.)$random = Get-Random$name = 'azlogtest' + $random(The name can be anything, but it should include only lowercase letters and numbers.)$storageName = $name(This variable will be used for the storage account name.)$rgname = $name(This variable will be used for the resource group name.)$eventHubNameSpaceName = $name(This is the name of the event hub namespace.)
Specify the subscription that you will be working with:
Select-AzSubscription -SubscriptionName $subscriptionNameCreate a resource group:
$rg = New-AzResourceGroup -Name $rgname -Location $locationIf you enter
$rgat this point, you should see output similar to this screenshot:
Create a storage account that will be used to keep track of state information:
$storage = New-AzStorageAccount -ResourceGroupName $rgname -Name $storagename -Location $location -SkuName Standard_LRSCreate the event hub namespace. This is required to create an event hub.
$eventHubNameSpace = New-AzEventHubNamespace -ResourceGroupName $rgname -NamespaceName $eventHubnamespaceName -Location $locationGet the rule ID that will be used with the insights provider:
$sbruleid = $eventHubNameSpace.Id +'/authorizationrules/RootManageSharedAccessKey'Get all possible Azure locations and add the names to a variable that can be used in a later step:
a.
$locationObjects = Get-AzLocation
b.$locations = @('global') + $locationobjects.locationIf you enter
$locationsat this point, you see the location names without the additional information returned by Get-AzLocation.Create an Azure Resource Manager log profile:
Add-AzLogProfile -Name $name -ServiceBusRuleId $sbruleid -Locations $locationsFor more information about the Azure log profile, see Overview of the Azure Activity Log.
Note
You might get an error message when you try to create a log profile. You can then review the documentation for Get-AzLogProfile and Remove-AzLogProfile. If you run Get-AzLogProfile, you see information about the log profile. You can delete the existing log profile by entering the Remove-AzLogProfile -name 'Log Profile Name' command.

Create a key vault
Create the key vault:
$kv = New-AzKeyVault -VaultName $name -ResourceGroupName $rgname -Location $locationConfigure logging for the key vault:
Set-AzDiagnosticSetting -ResourceId $kv.ResourceId -ServiceBusRuleId $sbruleid -Enabled $true
Generate log activity
Requests need to be sent to Key Vault to generate log activity. Actions like key generation, storing secrets, or reading secrets from Key Vault will create log entries.
Display the current storage keys:
Get-AzStorageAccountKey -Name $storagename -ResourceGroupName $rgname | ft -aGenerate a new key2:
New-AzStorageAccountKey -Name $storagename -ResourceGroupName $rgname -KeyName key2Display the keys again and see that key2 holds a different value:
Get-AzStorageAccountKey -Name $storagename -ResourceGroupName $rgname | ft -aSet and read a secret to generate additional log entries:
a.
Set-AzKeyVaultSecret -VaultName $name -Name TestSecret -SecretValue (ConvertTo-SecureString -String 'Hi There!' -AsPlainText -Force)b.(Get-AzKeyVaultSecret -VaultName $name -Name TestSecret).SecretValueText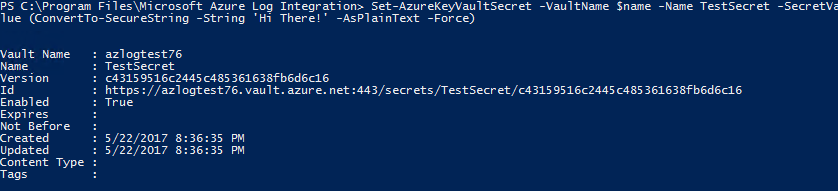
Configure Azure Log Integration
Now that you have configured all the required elements to have Key Vault logging to an event hub, you need to configure Azure Log Integration:
$storage = Get-AzStorageAccount -ResourceGroupName $rgname -Name $storagename$eventHubKey = Get-AzEventHubNamespaceKey -ResourceGroupName $rgname -NamespaceName $eventHubNamespace.name -AuthorizationRuleName RootManageSharedAccessKey$storagekeys = Get-AzStorageAccountKey -ResourceGroupName $rgname -Name $storagename$storagekey = $storagekeys[0].Value
Run the AzLog command for each event hub:
$eventhubs = Get-AzEventHub -ResourceGroupName $rgname -NamespaceName $eventHubNamespaceName$eventhubs.Name | %{Add-AzLogEventSource -Name $sub' - '$_ -StorageAccount $storage.StorageAccountName -StorageKey $storageKey -EventHubConnectionString $eventHubKey.PrimaryConnectionString -EventHubName $_}
After a minute or so of running the last two commands, you should see JSON files being generated. You can confirm that by monitoring the directory C:\users\AzLog\EventHubJson.