Run NAMD with Microsoft HPC Pack on Linux compute nodes in Azure
Important
Classic VMs will be retired on March 1, 2023.
If you use IaaS resources from ASM, please complete your migration by March 1, 2023. We encourage you to make the switch sooner to take advantage of the many feature enhancements in Azure Resource Manager.
For more information, see Migrate your IaaS resources to Azure Resource Manager by March 1, 2023.
This article shows you one way to run a Linux high-performance computing (HPC) workload on Azure virtual machines. Here, you set up a Microsoft HPC Pack cluster on Azure with Linux compute nodes and run a NAMD simulation to calculate and visualize the structure of a large biomolecular system.
Note
Azure has two different deployment models for creating and working with resources: Resource Manager and classic. This article covers using both models, but Microsoft recommends that most new deployments use the Resource Manager model.
- NAMD (for Nanoscale Molecular Dynamics program) is a parallel molecular dynamics package designed for high-performance simulation of large biomolecular systems containing up to millions of atoms. Examples of these systems include viruses, cell structures, and large proteins. NAMD scales to hundreds of cores for typical simulations and to more than 500,000 cores for the largest simulations.
- Microsoft HPC Pack provides features to run large-scale HPC and parallel applications in clusters of on-premises computers or Azure virtual machines. Originally developed as a solution for Windows HPC workloads, HPC Pack now supports running Linux HPC applications on Linux compute node VMs deployed in an HPC Pack cluster. See Get started with Linux compute nodes in an HPC Pack cluster in Azure for an introduction.
Prerequisites
- HPC Pack cluster with Linux compute nodes - Deploy an HPC Pack cluster with Linux compute nodes on Azure using either an Azure Resource Manager template or an Azure PowerShell script. See Get started with Linux compute nodes in an HPC Pack cluster in Azure for the prerequisites and steps for either option. If you choose the PowerShell script deployment option, see the sample configuration file in the sample files at the end of this article. This file configures an Azure-based HPC Pack cluster consisting of a Windows Server 2012 R2 head node and four size Large CentOS 6.6 compute nodes. Customize this file as needed for your environment.
- NAMD software and tutorial files - Download NAMD software for Linux from the NAMD site (registration required). This article is based on NAMD version 2.10, and uses the Linux-x86_64 (64-bit Intel/AMD with Ethernet) archive. Also download the NAMD tutorial files. The downloads are .tar files, and you need a Windows tool to extract the files on the cluster head node. To extract the files, follow the instructions later in this article.
- VMD (optional) - To see the results of your NAMD job, download and install the molecular visualization program VMD on a computer of your choice. The current version is 1.9.2. See the VMD download site to get started.
Set up mutual trust between compute nodes
Running a cross-node job on multiple Linux nodes requires the nodes to trust each other (by rsh or ssh). When you create the HPC Pack cluster with the Microsoft HPC Pack IaaS deployment script, the script automatically sets up permanent mutual trust for the administrator account you specify. For non-administrator users you create in the cluster's domain, you have to set up temporary mutual trust among the nodes when a job is allocated to them. Then, destroy the relationship after the job is complete. To do this for each user, provide an RSA key pair to the cluster which HPC Pack uses to establish the trust relationship. Instructions follow.
Generate an RSA key pair
It's easy to generate an RSA key pair, which contains a public key and a private key, by running the Linux ssh-keygen command.
Log on to a Linux computer.
Run the following command:
ssh-keygen -t rsaNote
Press Enter to use the default settings until the command is completed. Do not enter a passphrase here; when prompted for a password, just press Enter.
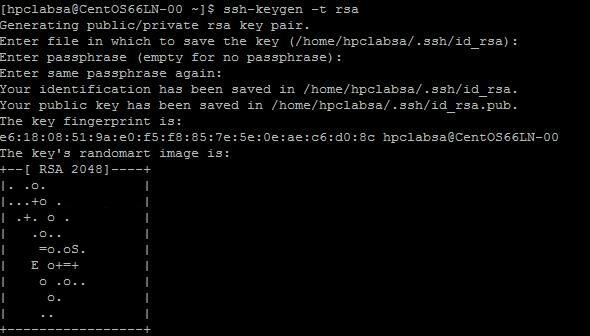
Change directory to the ~/.ssh directory. The private key is stored in id_rsa and the public key in id_rsa.pub.

Add the key pair to the HPC Pack cluster
Connect by Remote Desktop to the head node VM using the domain credentials you provided when you deployed the cluster (for example, hpc\clusteradmin). You manage the cluster from the head node.
Use standard Windows Server procedures to create a domain user account in the cluster's Active Directory domain. For example, use the Active Directory User and Computers tool on the head node. The examples in this article assume you create a domain user named hpcuser in the hpclab domain (hpclab\hpcuser).
Add the domain user to the HPC Pack cluster as a cluster user. For instructions, see Add or remove cluster users.
Create a file named C:\cred.xml and copy the RSA key data into it. You can find an example in the sample files at the end of this article.
<ExtendedData>
  <PrivateKey>Copy the contents of private key here</PrivateKey>
  <PublicKey>Copy the contents of public key here</PublicKey>
</ExtendedData>
Open a Command Prompt and enter the following command to set the credentials data for the hpclab\hpcuser account. You use the extendeddata parameter to pass the name of the C:\cred.xml file you created for the key data.
hpccred setcreds /extendeddata:c:\cred.xml /user:hpclab\hpcuser /password:<UserPassword>This command completes successfully without output. After setting the credentials for the user accounts you need to run jobs, store the cred.xml file in a secure location, or delete it.
If you generated the RSA key pair on one of your Linux nodes, remember to delete the keys after you finish using them. HPC Pack does not set up mutual trust if it finds an existing id_rsa file or id_rsa.pub file.
Important
We don’t recommend running a Linux job as a cluster administrator on a shared cluster, because a job submitted by an administrator runs under the root account on the Linux nodes. A job submitted by a non-administrator user runs under a local Linux user account with the same name as the job user. In this case, HPC Pack sets up mutual trust for this Linux user across all the nodes allocated to the job. You can set up the Linux user manually on the Linux nodes before running the job, or HPC Pack creates the user automatically when the job is submitted. If HPC Pack creates the user, HPC Pack deletes it after the job completes. To reduce security threat, the keys are removed after the job completes on the nodes.
Set up a file share for Linux nodes
Now set up an SMB file share, and mount the shared folder on all Linux nodes to allow the Linux nodes to access NAMD files with a common path. Following are steps to mount a shared folder on the head node. A share is recommended for distributions such as CentOS 6.6 that currently don’t support the Azure File service. If your Linux nodes support an Azure File share, see How to use Azure File storage with Linux. For additional file sharing options with HPC Pack, see Get started with Linux compute nodes in an HPC Pack Cluster in Azure.
Create a folder on the head node, and share it to Everyone by setting Read/Write privileges. In this example, \\CentOS66HN\Namd is the name of the folder, where CentOS66HN is the host name of the head node.
Create a subfolder named namd2 in the shared folder. In namd2, create another subfolder named namdsample.
Extract the NAMD files in the folder by using a Windows version of tar or another Windows utility that operates on .tar archives.
- Extract the NAMD tar archive to \\CentOS66HN\Namd\namd2.
- Extract the tutorial files under \\CentOS66HN\Namd\namd2\namdsample.
Open a Windows PowerShell window and run the following commands to mount the shared folder on the Linux nodes.
clusrun /nodegroup:LinuxNodes mkdir -p /namd2

clusrun /nodegroup:LinuxNodes mount -t cifs //CentOS66HN/Namd/namd2 /namd2 -o vers=2.1`,username=<username>`,password='<password>'`,dir_mode=0777`,file_mode=0777
The first command creates a folder named /namd2 on all nodes in the LinuxNodes group. The second command mounts the shared folder //CentOS66HN/Namd/namd2 onto the folder with dir_mode and file_mode bits set to 777. The username and password in the command should be the credentials of a user on the head node.
Note
The “`” symbol in the second command is an escape symbol for PowerShell. “`,” means the “,” (comma character) is a part of the command.
Create a Bash script to run a NAMD job
Your NAMD job needs a nodelist file for charmrun to determine the number of nodes to use when starting NAMD processes. You use a Bash script that generates the nodelist file and runs charmrun with this nodelist file. You can then submit a NAMD job in HPC Cluster Manager that calls this script.
Using a text editor of your choice, create a Bash script in the /namd2 folder containing the NAMD program files and name it hpccharmrun.sh. For a quick proof of concept, copy the example hpccharmrun.sh script provided at the end of this article and go to Submit a NAMD job.
Tip
Save your script as a text file with Linux line endings (LF only, not CR LF). This ensures that it runs properly on the Linux nodes.
Following are details about what this bash script does.
Define some variables.
#!/bin/bash

# The path of this script
SCRIPT_PATH="$( dirname "${BASH_SOURCE[0]}" )"
# Charmrun command
CHARMRUN=${SCRIPT_PATH}/charmrun
# Argument of ++nodelist
NODELIST_OPT="++nodelist"
# Argument of ++p
NUMPROCESS="+p"
Get node information from the environment variables. $NODESCORES stores a list of split words from $CCP_NODES_CORES. $COUNT is the size of $NODESCORES.
# Get node information from the environment variables
NODESCORES=(${CCP_NODES_CORES})
COUNT=${#NODESCORES[@]}
The format for the $CCP_NODES_CORES variable is as follows:
<Number of nodes> <Name of node1> <Cores of node1> <Name of node2> <Cores of node2>…This variable lists the total number of nodes, node names, and number of cores on each node that are allocated to the job. For example, if the job needs 10 cores to run, the value of $CCP_NODES_CORES is similar to:
3 CENTOS66LN-00 4 CENTOS66LN-01 4 CENTOS66LN-03 2If the $CCP_NODES_CORES variable is not set, start charmrun directly. (This should only occur when you run this script directly on your Linux nodes.)
if [ ${COUNT} -eq 0 ]
then
  # CCP_NODES is_CORES is not found or is empty, so just run charmrun without nodelist arg.
  #echo ${CHARMRUN} $*
  ${CHARMRUN} $*
Or create a nodelist file for charmrun.
else
  # Create the nodelist file
  NODELIST_PATH=${SCRIPT_PATH}/nodelist_$$

  # Write the head line
  echo "group main" > ${NODELIST_PATH}

  # Get every node name and number of cores and write into the nodelist file
  I=1
  while [ ${I} -lt ${COUNT} ]
  do
      echo "host ${NODESCORES[${I}]} ++cpus ${NODESCORES[$(($I+1))]}" >> ${NODELIST_PATH}
      let "I=${I}+2"
  done
Run charmrun with the nodelist file, get its return status, and remove the nodelist file at the end.
${CCP_NUMCPUS} is another environment variable set by the HPC Pack head node. It stores the number of total cores allocated to this job. We use it to specify the number of processes for charmrun.
# Run charmrun with nodelist arg
#echo ${CHARMRUN} ${NUMPROCESS}${CCP_NUMCPUS} ${NODELIST_OPT} ${NODELIST_PATH} $*
${CHARMRUN} ${NUMPROCESS}${CCP_NUMCPUS} ${NODELIST_OPT} ${NODELIST_PATH} $*

RTNSTS=$?
rm -f ${NODELIST_PATH}
fi
Exit with the charmrun return status.
exit ${RTNSTS}
Following is the information in the nodelist file, which the script generates:
group main
host <Name of node1> ++cpus <Cores of node1>
host <Name of node2> ++cpus <Cores of node2>
…
For example:
group main
host CENTOS66LN-00 ++cpus 4
host CENTOS66LN-01 ++cpus 4
host CENTOS66LN-03 ++cpus 2
Submit a NAMD job
Now you are ready to submit a NAMD job in HPC Cluster Manager.
Connect to your cluster head node and start HPC Cluster Manager.
In Resource Management, ensure that the Linux compute nodes are in the Online state. If they are not, select them and click Bring Online.
In Job Management, click New Job.
Enter a name for job such as hpccharmrun.
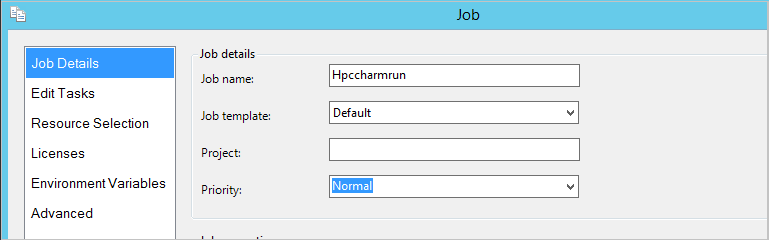
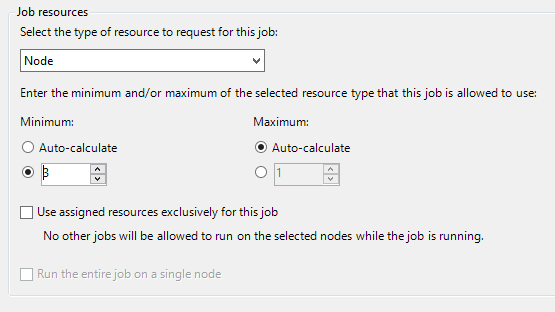
On the Job Details page, under Job Resources, select the type of resource as Node and set the Minimum to 3. , we run the job on three Linux nodes and each node has four cores.
Click Edit Tasks in the left navigation, and then click Add to add a task to the job.
On the Task Details and I/O Redirection page, set the following values:
Command line -
/namd2/hpccharmrun.sh ++remote-shell ssh /namd2/namd2 /namd2/namdsample/1-2-sphere/ubq_ws_eq.conf > /namd2/namd2_hpccharmrun.logTip
The preceding command line is a single command without line breaks. It wraps to appear on several lines under Command line.
Working directory - /namd2
Minimum - 3

Note
You set the working directory here because charmrun tries to navigate to the same working directory on each node. If the working directory isn't set, HPC Pack starts the command in a randomly named folder created on one of the Linux nodes. This causes the following error on the other nodes:
/bin/bash: line 37: cd: /tmp/nodemanager_task_94_0.mFlQSN: No such file or directory.To avoid this problem, specify a folder path that can be accessed by all nodes as the working directory.
Click OK and then click Submit to run this job.
By default, HPC Pack submits the job as your current logged-on user account. A dialog box might prompt you to enter the user name and password after you click Submit.
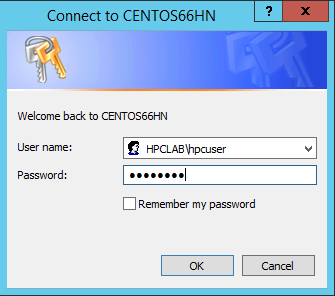
Under some conditions, HPC Pack remembers the user information you input before and doesn't show this dialog box. To make HPC Pack show it again, enter the following command at a Command Prompt and then submit the job.
hpccred delcredsThe job takes several minutes to finish.
Find the job log at \\Namd\namd2\namd2_hpccharmrun.log and the output files in \\Namd\namd2\namdsample\1-2-sphere.
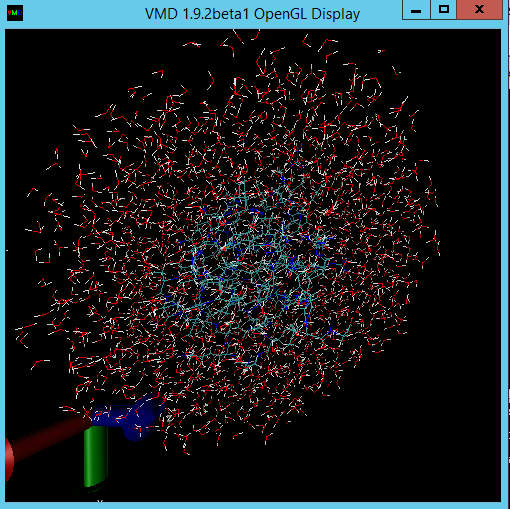
Optionally, start VMD to view your job results. The steps for visualizing the NAMD output files (in this case, a ubiquitin protein molecule in a water sphere) are beyond the scope of this article. See NAMD Tutorial for details.
Sample files
Sample XML configuration file for cluster deployment by PowerShell script
<?xml version="1.0" encoding="utf-8" ?>
<IaaSClusterConfig>
  <Subscription>
    <SubscriptionName>Subscription-1</SubscriptionName>
    <StorageAccount>mystorageaccount</StorageAccount>
  </Subscription>
      <Location>West US</Location>
  <VNet>
    <VNetName>MyVNet</VNetName>
    <SubnetName>Subnet-1</SubnetName>
  </VNet>
  <Domain>
    <DCOption>HeadNodeAsDC</DCOption>
    <DomainFQDN>hpclab.local</DomainFQDN>
  </Domain>
  <Database>
    <DBOption>LocalDB</DBOption>
  </Database>
  <HeadNode>
    <VMName>CentOS66HN</VMName>
    <ServiceName>MyHPCService</ServiceName>
    <VMSize>Large</VMSize>
    <EnableRESTAPI />
    <EnableWebPortal />
  </HeadNode>
  <LinuxComputeNodes>
    <VMNamePattern>CentOS66LN-%00%</VMNamePattern>
    <ServiceName>MyLnxCNService</ServiceName>
     <VMSize>Large</VMSize>
     <NodeCount>4</NodeCount>
    <ImageName>5112500ae3b842c8b9c604889f8753c3__OpenLogic-CentOS-66-20150325</ImageName>
  </LinuxComputeNodes>
</IaaSClusterConfig>
Sample cred.xml file
<ExtendedData>
  <PrivateKey>-----BEGIN RSA PRIVATE KEY-----
MIIEpQIBAAKCAQEAxJKBABhnOsE9eneGHvsjdoXKooHUxpTHI1JVunAJkVmFy8JC
qFt1pV98QCtKEHTC6kQ7tj1UT2N6nx1EY9BBHpZacnXmknpKdX4Nu0cNlSphLpru
lscKPR3XVzkTwEF00OMiNJVknq8qXJF1T3lYx3rW5EnItn6C3nQm3gQPXP0ckYCF
Jdtu/6SSgzV9kaapctLGPNp1Vjf9KeDQMrJXsQNHxnQcfiICp21NiUCiXosDqJrR
AfzePdl0XwsNngouy8t0fPlNSngZvsx+kPGh/AKakKIYS0cO9W3FmdYNW8Xehzkc
VzrtJhU8x21hXGfSC7V0ZeD7dMeTL3tQCVxCmwIDAQABAoIBAQCve8Jh3Wc6koxZ
qh43xicwhdwSGyliZisoozYZDC/ebDb/Ydq0BYIPMiDwADVMX5AqJuPPmwyLGtm6
9hu5p46aycrQ5+QA299g6DlF+PZtNbowKuvX+rRvPxagrTmupkCswjglDUEYUHPW
05wQaNoSqtzwS9Y85M/b24FfLeyxK0n8zjKFErJaHdhVxI6cxw7RdVlSmM9UHmah
wTkW8HkblbOArilAHi6SlRTNZG4gTGeDzPb7fYZo3hzJyLbcaNfJscUuqnAJ+6pT
iY6NNp1E8PQgjvHe21yv3DRoVRM4egqQvNZgUbYAMUgr30T1UoxnUXwk2vqJMfg2
Nzw0ESGRAoGBAPkfXjjGfc4HryqPkdx0kjXs0bXC3js2g4IXItK9YUFeZzf+476y
OTMQg/8DUbqd5rLv7PITIAqpGs39pkfnyohPjOe2zZzeoyaXurYIPV98hhH880uH
ZUhOxJYnlqHGxGT7p2PmmnAlmY4TSJrp12VnuiQVVVsXWOGPqHx4S4f9AoGBAMn/
vuea7hsCgwIE25MJJ55FYCJodLkioQy6aGP4NgB89Azzg527WsQ6H5xhgVMKHWyu
Q1snp+q8LyzD0i1veEvWb8EYifsMyTIPXOUTwZgzaTTCeJNHdc4gw1U22vd7OBYy
nZCU7Tn8Pe6eIMNztnVduiv+2QHuiNPgN7M73/x3AoGBAOL0IcmFgy0EsR8MBq0Z
ge4gnniBXCYDptEINNBaeVStJUnNKzwab6PGwwm6w2VI3thbXbi3lbRAlMve7fKK
B2ghWNPsJOtppKbPCek2Hnt0HUwb7qX7Zlj2cX/99uvRAjChVsDbYA0VJAxcIwQG
TxXx5pFi4g0HexCa6LrkeKMdAoGAcvRIACX7OwPC6nM5QgQDt95jRzGKu5EpdcTf
g4TNtplliblLPYhRrzokoyoaHteyxxak3ktDFCLj9eW6xoCZRQ9Tqd/9JhGwrfxw
MS19DtCzHoNNewM/135tqyD8m7pTwM4tPQqDtmwGErWKj7BaNZARUlhFxwOoemsv
R6DbZyECgYEAhjL2N3Pc+WW+8x2bbIBN3rJcMjBBIivB62AwgYZnA2D5wk5o0DKD
eesGSKS5l22ZMXJNShgzPKmv3HpH22CSVpO0sNZ6R+iG8a3oq4QkU61MT1CfGoMI
a8lxTKnZCsRXU1HexqZs+DSc+30tz50bNqLdido/l5B4EJnQP03ciO0=
-----END RSA PRIVATE KEY-----</PrivateKey>
  <PublicKey>ssh-rsa AAAAB3NzaC1yc2EAAAADAQABAAABAQDEkoEAGGc6wT16d4Ye+yN2hcqigdTGlMcjUlW6cAmRWYXLwkKoW3WlX3xAK0oQdMLqRDu2PVRPY3qfHURj0EEellpydeaSekp1fg27Rw2VKmEumu6Wxwo9HddXORPAQXTQ4yI0lWSerypckXVPeVjHetbkSci2foLedCbeBA9c/RyRgIUl227/pJKDNX2Rpqly0sY82nVWN/0p4NAyslexA0fGdBx+IgKnbU2JQKJeiwOomtEB/N492XRfCw2eCi7Ly3R8+U1KeBm+zH6Q8aH8ApqQohhLRw71bcWZ1g1bxd6HORxXOu0mFTzHbWFcZ9ILtXRl4Pt0x5Mve1AJXEKb username@servername;</PublicKey>
</ExtendedData>
Sample hpccharmrun.sh script
#!/bin/bash

# The path of this script
SCRIPT_PATH="$( dirname "${BASH_SOURCE[0]}" )"
# Charmrun command
CHARMRUN=${SCRIPT_PATH}/charmrun
# Argument of ++nodelist
NODELIST_OPT="++nodelist"
# Argument of ++p
NUMPROCESS="+p"

# Get node information from ENVs
# CCP_NODES_CORES=3 CENTOS66LN-00 4 CENTOS66LN-01 4 CENTOS66LN-03 4
NODESCORES=(${CCP_NODES_CORES})
COUNT=${#NODESCORES[@]}

if [ ${COUNT} -eq 0 ]
then
    # If CCP_NODES_CORES is not found or is empty, just run the charmrun without nodelist arg.
    #echo ${CHARMRUN} $*
    ${CHARMRUN} $*
else
    # Create the nodelist file
    NODELIST_PATH=${SCRIPT_PATH}/nodelist_$$

    # Write the head line
    echo "group main" > ${NODELIST_PATH}

    # Get every node name & cores and write into the nodelist file
    I=1
    while [ ${I} -lt ${COUNT} ]
    do
        echo "host ${NODESCORES[${I}]} ++cpus ${NODESCORES[$(($I+1))]}" >> ${NODELIST_PATH}
        let "I=${I}+2"
    done

    # Run the charmrun with nodelist arg
    #echo ${CHARMRUN} ${NUMPROCESS}${CCP_NUMCPUS} ${NODELIST_OPT} ${NODELIST_PATH} $*
    ${CHARMRUN} ${NUMPROCESS}${CCP_NUMCPUS} ${NODELIST_OPT} ${NODELIST_PATH} $*

    RTNSTS=$?
    rm -f ${NODELIST_PATH}
fi

exit ${RTNSTS}