Connect cross-tenant virtual networks to a Virtual WAN hub - with Azure CLI
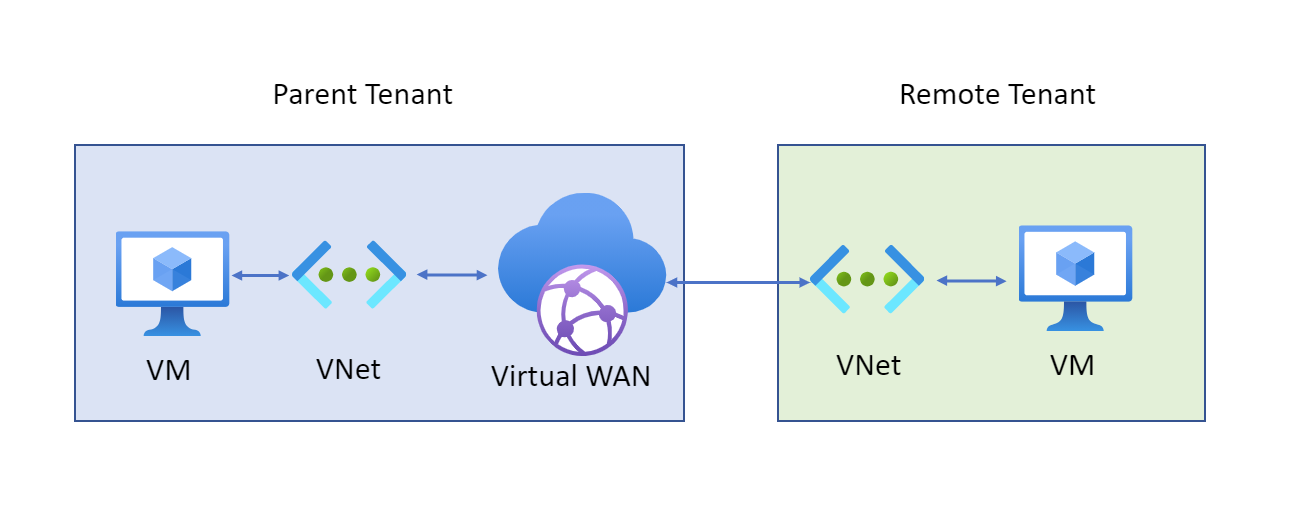
This article helps you use Azure Virtual WAN to connect a virtual network to a virtual hub in a different tenant. This architecture is useful if you have client workloads that must be connected to be the same network but are on different tenants. For example, as shown in the following diagram, you can connect a non-Contoso virtual network (the remote tenant) to a Contoso virtual hub (the parent tenant).
In this article, you learn how to:
- Add another tenant as a Contributor on your Azure subscription.
- Connect a cross-tenant virtual network to a virtual hub.
The steps for this configuration use a combination of the Azure portal and Azure CLI. However, the feature itself is available in PowerShell and the Azure CLI only.
Note
You can manage cross-tenant virtual network connections only through PowerShell or the Azure CLI. You cannot manage cross-tenant virtual network connections in the Azure portal.
Before you begin
Prerequisites
To use the steps in this article, you must have the following configuration already set up in your environment:
- A virtual WAN and virtual hub in your parent subscription
- A virtual network configured in a subscription in a different (remote) tenant
- Virtual WAN CLI extension, version 0.3.0 or higher. For more details about extension, go to Available Azure CLI extensions.
Make sure that the virtual network address space in the remote tenant doesn't overlap with any other address space within any other virtual networks already connected to the parent virtual hub.
Working with Azure CLI
This article uses Azure CLI commands. To run the commands, you can use Azure Cloud Shell. Cloud Shell is a free interactive shell that you can use to run the steps in this article. It has common Azure tools preinstalled and configured to use with your account.
To open Cloud Shell, just select Open Cloudshell from the upper-right corner of a code block. You can also open Cloud Shell on a separate browser tab by going to CloudShell. In the top left dropdown menu, select Bash instead of PowerShell.
Select Copy to copy the blocks of code, paste them into Cloud Shell, and select the Enter key to run them.
Assign permissions
In the subscription of the virtual network in the remote tenant, add the Contributor role assignment to the administrator (the user who administers the virtual hub). Contributor permissions will enable the administrator to modify and access the virtual networks in the remote tenant.
You can use either Azure CLI or the Azure portal to assign this role. See the following articles for steps:
Run the following command to add the remote tenant subscription and the parent tenant subscription to the current session of console. If you're signed in to the parent, you need to run the command for only the remote tenant.
az login --tenant "[tenant ID]"Verify that the role assignment is successful. Sign in to Azure CLI (if not already) by using the parent credentials and run the following command:
az account list -o tableIf the permissions have successfully propagated to the parent and have been added to the session, the subscriptions owned by the parent and the remote tenant will both appear in the output of the command.
Connect a virtual network to a hub
In the following steps, you'll be using Azure CLI commands to link a virtual hub to a virtual network in a subscription from a different tenant. Replace the example values to reflect your own environment.
Make sure you're in the context of your virtual hub account:
az account set --subscriptionId "[virtual hub subscription]"Connect the virtual network to the hub:
az network vhub connection create --resource-group "[resource_group_name]" --name "[connection_name]" --vhub-name "[virtual_hub_name]" --remote-vnet "/subscriptions/11111111-1111-1111-1111-111111111111/resourceGroups/rgName/providers/Microsoft.Network/virtualNetworks/vnetName"
You can view the new connection in either Azure CLI or the Azure portal:
- In the console, the metadata from the newly formed connection appears if the connection was successfully formed.
- In the Azure portal, go to the virtual hub and select Connectivity > Virtual Network Connections. You can then view the pointer to the connection. To see the actual resource, you'll need the proper permissions.
Troubleshoot
- Verify the virtual wan extension is 0.3.0 or higher using
az --version. - Verify that the remote subscription access is available from the cli
az account list -o table. - Make sure quotes are included around the names of resource groups or any other environment-specific variables (for example,
"VirtualHub1"or"VirtualNetwork1").
Next steps
- For more information about Virtual WAN, see the FAQ.
Feedback
Coming soon: Throughout 2024 we will be phasing out GitHub Issues as the feedback mechanism for content and replacing it with a new feedback system. For more information see: https://aka.ms/ContentUserFeedback.
Submit and view feedback for