Filter and copy data with Power Automate
This tutorial shows you how to create a cloud flow that monitors a source for new or changed items and then copies those changes to a destination. You may create a cloud flow like this one if your users enter data in one location, but your team needs it in a different location or format.
While this tutorial copies data from a Microsoft SharePoint list (the source) to an Azure SQL Database table (the destination), you can copy data among any of the more than 900 connectors that Power Automate supports.
Tip
For detailed information about using SharePoint with Power Automate, go to the SharePoint documentation.
Prerequisites
Access to a data source and a destination. This tutorial doesn’t include steps to create the source and destination.
Access to Power Automate.
A basic understanding of how your data is stored.
Familiarity with the basics of creating flows. You can review how to add actions, triggers, and conditions. The following steps assume that you know how to perform these actions.
Tip
Every column name in the source and destination doesn't need to match. However, you must provide data for all required columns when you insert or update an item. Power Automate identifies the required fields for you.
Quick overview of the steps
If you're comfortable with Power Automate, use these quick steps to copy data from one data source to another.
Important
Changes you make in the destination aren't copied to the source because two-way syncs aren't supported. If you attempt to set up a two-way sync, you'll create an infinite loop where changes are sent endlessly between the source and destination.
Identify the source you'll monitor and the destination to which you'll copy changed data. Confirm you've access to both.
Identify at least one column that uniquely identifies items in the source and destination. In the example that follows, we use the Title column, but you could use any column(s) you want.
Set up a trigger that monitors the source for changes.
Search the destination to determine if the changed item exists.
Use a Condition like this:
- If the new or changed item doesn't exist in the destination, create it.
- If the new or changed item exists in the destination, update it.
Trigger your flow, and then confirm that new or changed items are being copied from the source to the destination.
If you haven't created a connection to SharePoint or Azure SQL Database previously, follow the instructions when you're prompted to sign in.
Here are the detailed steps to create the flow.
Monitor the source for changes
Sign in to Power Automate.
Select My flows > Create from blank.
Search for SharePoint > select the SharePoint - When an item is created or modified trigger from the list of triggers.
Enter the Site Address and then select the List Name on the When an item is created or modified card.
Provide the Site Address and List Name for the SharePoint list your flow monitors for new or updated items.
Search the destination for the new or changed item
Use the SQL Server - Get rows action to search the destination for the new or changed item.
Select New step > Add an action.
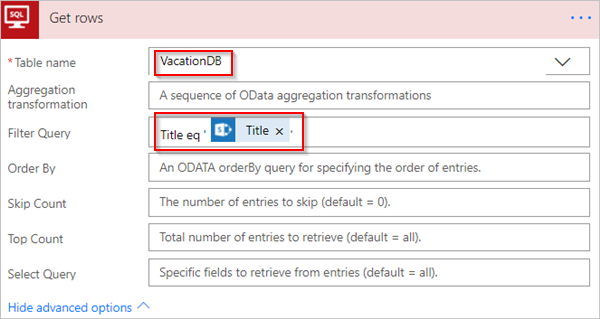
Search for Get rows, select SQL Server - Get rows, and then select the table you want to monitor from the Table name list.
Select Show advanced options.
In the Filter Query box, enter Title eq ', select the Title token from the dynamic content list, and then enter '.
The previous step assumes you're matching the titles of the rows in the source and the destination.
The Get rows card should now look like the following screenshot:
Check if the new or changed item was found
We use the Condition action to check if the new or changed item was found.
Select New step > Add a condition to open the Condition card.
On the condition card:
Select the box on the left.
The Add dynamic content from the apps and connectors used in this flow list opens.
Select value from the Get rows category.
Tip
Confirm you've selected value from the Get rows category. Don't select value from the When an item is created or modified category.
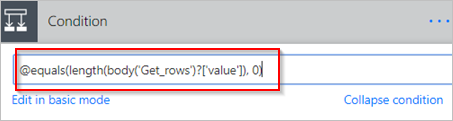
Select is equal to from the list in the center box.
Enter 0 (zero) in the box on the right side.
The Condition card now resembles this image:

Select Edit in advanced mode.
When advanced mode opens, you see @equals(body('Get_rows')?['value'], 0) expression in the box. Edit this expression by adding length() around the body('Get_items')?['value'] function. The entire expression now appears like this: @equals(length(body('Get_rows')?['value']), 0)
The Condition card now resembles this image:
Tip
Adding the length() function allows the flow to check the value list and determine if it contains any items.
When your flow gets items from the destination, there are two possible outcomes.
| Outcome | Next step |
|---|---|
| The item exists | Update the item |
| The item doesn't exist | Create a new item |
Note
The images of the Insert row and Update row cards shown next may differ from yours because these cards show the names of the columns in the Azure SQL Database table that's being used in the flow.
Create the item in the destination
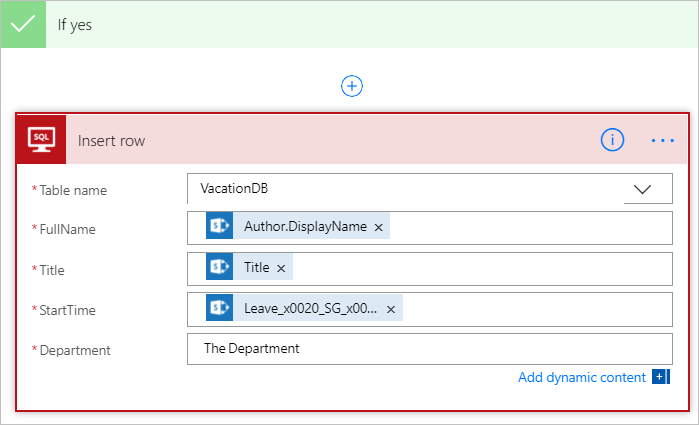
If the item doesn't exist in the destination, create it using the SQL Server - Insert row action.
On the If yes branch of the Condition:
Select Add an action, search for insert row, and then select SQL Server - Insert row.
The Insert row card opens.
From the Table name list, select the table into which the new item will be inserted.
The Insert row card expands and displays all columns in the selected table. Fields with an asterisk (*) are required and must be populated for the row to be valid.
Select each column that you want to populate and enter the data.
You can enter the data manually, select one or more tokens from the Dynamic content, or enter any combination of text and tokens into the columns.
The Insert row card now resembles this screenshot:
Update the item in the destination
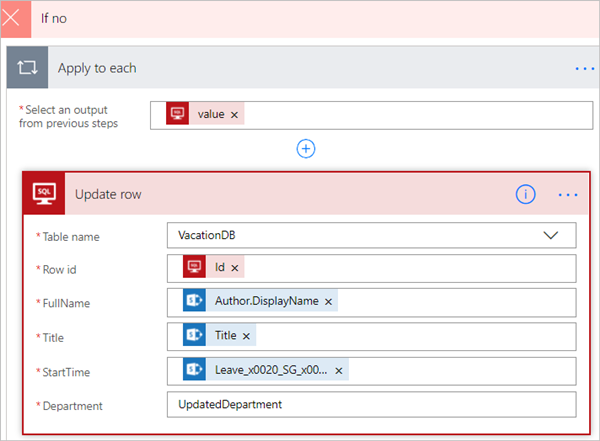
If the item exists in the destination, update it with the changes.
Add the SQL Server - Update row action to the If no branch of the Condition.
Follow the steps in the create the item section of this document to populate the columns of the table.
At the top of the page, enter a name for your flow in the Flow name box, and then select Create flow to save it.
Now, whenever an item in your SharePoint list (source) changes, your flow triggers and either inserts a new item or updates an existing item in your Azure SQL Database (destination).
Note
Your flow isn't triggered when an item is deleted from the source. If this is an important scenario, consider adding a separate column that indicates when an item is no longer needed.
See also
Feedback
Coming soon: Throughout 2024 we will be phasing out GitHub Issues as the feedback mechanism for content and replacing it with a new feedback system. For more information see: https://aka.ms/ContentUserFeedback.
Submit and view feedback for