Integrating the Microsoft Game Development Kit with your PC Unity game
This topic describes how to integrate the GDK with your Unity PC game.
- Overview
- Prerequisites
- Testing your GDK and Unity package setup using the Hello World Unity sample
- Creating a product in Partner Center
- Associating your game with Microsoft Store
- Creating a test account
- Adding Xbox services to your game
- Additional considerations
- Publishing on Partner Center
Overview
The basic components for building a Unity game that appears in Microsoft Store or PC Game Pass are:
- A Windows Standalone, x86_x64 Unity project
- The runtime libraries that are provided in the GDK
- The Unity package that's provided by Microsoft.
This unlocks access to Microsoft Gameplay Services such as Xbox achievements, leaderboards, cloud saves, Azure PlayFab Party chat, cross-platform multiplayer, and more.
Required software
The following tools and SDKs need to be installed to use Unity with the GDK:
- A development PC by using the latest version of Windows 10.
- Visual Studio 2017 or later
GDK
Ensure that you have access to these helpful resources. If you don't have access, contact your Microsoft representative.
The GDK Unity private forums
Download the GDK.
Note: If you only need to publish to PC, you can download the GDK from GitHub.
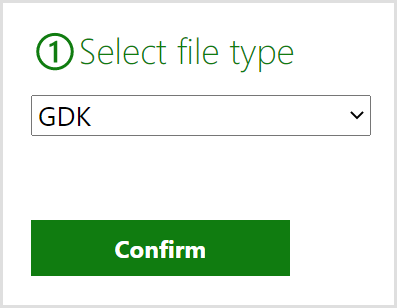
Go to Secure Xbox downloads.
Select Game Core, and then select Confirm as shown in the following screenshot.
Download the latest Tools and Recovery as shown in the following screenshot. Note that you don't need the Recovery if you are shipping only on PC.
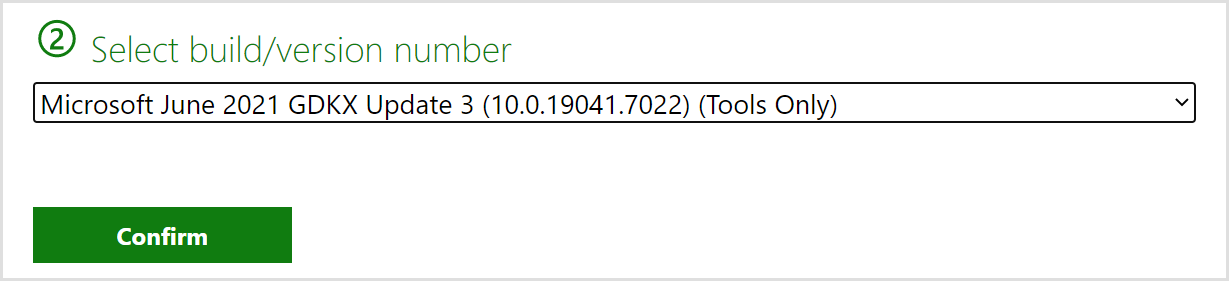
To download each, select Download Now.
Install the GDK.
Browse to where you downloaded the files. Extract each of the packages.
Browse to the extracted GDK folder, find setup.exe, and then double-click it to open Setup.
Complete the steps in the Setup pages.
Up to date Gaming Runtime Services (GRTS) and PC Bootstrapper
Starting with the May 2202 GRTS release, a PC Bootstrapper has been added to the PC game launch experience. The PC Bootstrapper has a dependency on the Gaming RunTime Service (GRTS) and If GRTS is out of date on your development PC, it can generate an error (E_FAIL) when attempting to sign in. See the PC Bootstrapper overview for more information.
Unity package
Download the Unity package from GitHub.
The package is in the Assets section of each release and will be named gdk-pc.[version number].unitypackage.Import the Unity package.
Create a new Unity project. We recommend that you first go through this process with a new project before using it on your actual game.
In the new Unity project, go to the main menu and select Assets > Import Package > Custom Package.
In the file dialog that opened, select the GDK .unitypackage file you downloaded, and then click Open.
If you see import errors on the console, select Clear. If the errors are no longer there, you can ignore them.
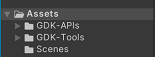
Upon completion, the asset package is listed on the Project tab under the Assets folder as shown in the following screenshot.
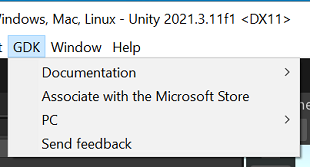
A new menu option, named GDK, now appears in the Unity main menu as shown in the following screenshot.
If you are developing for Xbox you will also need to install the Unity package for Xbox.
Go to Unity private forums for Game Core. Go to a pinned post called Unity for Game Core Downloads, and then select that link.
There are links to download packages. The GDK Package is already included in this package, so you don't need to download it. You might not need to download the other packages. To decide if you need to download them, read their descriptions.
You should now have everything you need to start integrating the GDK into your Unity game.
Testing your GDK and Unity package setup using the Hello World Unity sample
This section describes how to run the Hello World Unity sample.
Select File > Open Scene and then open the sample scene under [Your project directory]\Assets\GDK-Tools\Examples\Sign-in\SignIn.unity.
Open the Build Settings window in the Unity main menu by selecting File > Build Settings.
Add the sample scene by selecting Add Open Scenes.
Cancel the selection for any other scenes that you might have selected. This ensures that only the sample scene is selected: GDK-Tools/Examples/Sign-in/SignIn.
Close the Build Settings dialog box.
In the main menu, select GDK > PC > Build and Run.
In the GDK - PC Build And Run dialog box, there should only be one sample scene listed: Assets/GDK-Tools/Examples/Sign-in/Basic.unity.
Check Define MICROSOFT_GAME_CORE in the dialog box.
Select Build and Run in the dialog box.
When the sample game launches, if it prompts you to sign in to Xbox services, the GDK and Unity package are properly set up.
Note that Unlock achievement won't yet work in the achievements sample scene.
You've built and run your first Unity game. Now you're ready to integrate the GDK into your own game.
Creating a product in Partner Center
Before you can test Xbox services functionality or publish a game to the Microsoft Store, you need to create your Xbox services-enabled product in Partner Center. For more information about Partner Center, see Setting up an app or game in Partner Center, for Managed Partners.
Associate your game with Microsoft Store
For your game to be able to access Xbox services, you need to its game configuration to match the values for the Partner Center project you created in the last step.
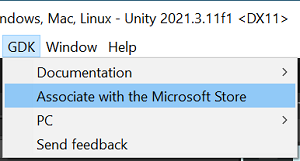
Open the Microsoft Game Configuration Editor, by going to Unity; in the top-level menu, select GDK > Associate with the Microsoft Store as shown in the following screenshot.
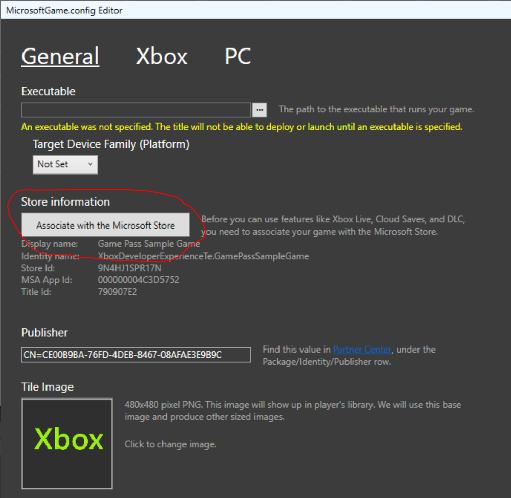
In the window that opened, select Associate with the Store as shown in the following screenshot.
In the window that opened, follow the steps listed in the wizard.
Enter the rest of the required information with the values from your Partner Center project.
- The Publisher field is necessary. You can find the value in Partner Center under the Package/Identity/Publisher row.
- The Tile Image field can be left with the default image.
- Selecting the PC tab allows you to specify any additional features like multiplayer protocol, custom installers, or framework dependencies.
Click Save.
Creating a test account
You'll need to create a test account with access to your development sandbox to be able to test Xbox services functionality. For information about creating test accounts, see Creating test accounts.
Downloading the Xbox App
The Xbox app is helpful for verifying that your test account is signed in. You can download it here: Xbox App
Switching to your development sandbox
After you've created a test account, you can use the account to access your development sandbox by using the following steps.
To find your sandbox ID, go to Partner Center.
Navigate to your game.
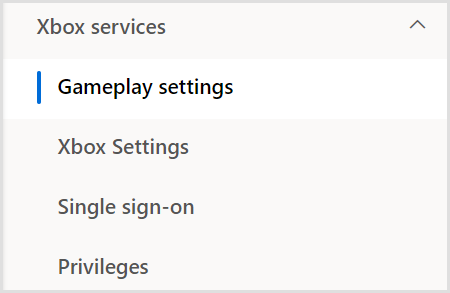
Select Xbox services > Gameplay settings in the left navigation pane.
Note
Your sandbox ID is on the first tab in the upper-left corner of the Gameplay Setting page. It's named something like "ABCDEF.0".
In Unity, open the Sandbox Switcher by going to GDK > PC > Switch Sandbox.
Your sandbox is automatically populated in the sandbox drop-down list as shown in the following screenshot.
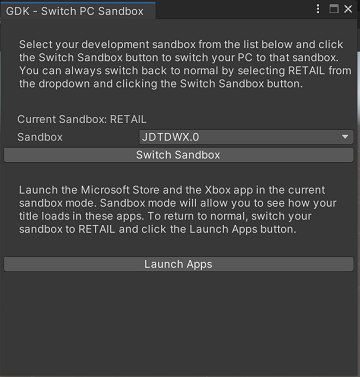
Select the Switch Sandbox button.
To verify that you successfully switched your sandbox, select Launch Apps to reopen the Microsoft Store app, Xbox app, and Xbox Console Companion.
Sign in to the Xbox App with the username and password from the Xbox test account that you created earlier. Verify that you can sign in.
To switch back to RETAIL mode from your development sandbox
In Unity, go to GDK > PC > Switch Sandbox.
Select Retail from the sandbox drop-down list.
Select the Switch Sandbox button.
Select Launch Apps.
Open one of the apps. Try to sign in with a non-test account, and then verify that you can sign in.
Adding Xbox services to your game
This section describes how to add Xbox services sign-in, cloud saves, achievements, and commerce to your game.
Building and Running your game with Xbox services enabled
Prior to 2207 GDK Unity Package
Prior to the 2207 GDK Unity Package, in order to run your game with Xbox services enabled you had to run your game using the GDK Build and Run command (GDK > PC > Build and Run).
2207 GDK Unity Package
As of the 2207 GDK Unity Package, you can run your game through the standard Unity Build and Run command (File > Build and Run), and through the GDK Build and Run command (GDK > PC > Build and Run) if you're using the March 2022 GDK Update 1 or June 2022 GDK or later.
In addition Xbox services can be enabled when running within the editor.
To enable playing within the editor, use GDK > PC > Update Editor Game Config after you've associated your project with a Microsoft Store app (or each time you make any changes to your MicrosoftGame.Config). It will give a permissions prompt and then copy your MicrosofGame.Config to the editor's executable location. Then, enable Define MICROSOFT_GAME_CORE in the GDK > PC > Build and Run menu. From then on, you'll be able to test within the editor.
Sign-in
To implement sign-in in Unity you need to add the GdkHelper prefab into your scene.
In Unity, in the Project window, go to \Assets\GDK-Tools\Prefabs\GdkHelper.prefab, and then drag the GdkHelper prefab into your scene.
To test your new functionality, switch to your development sandbox using the steps in the Switching to your development sandbox section above and then build and run your game by selecting GDK > PC > Build and Run.
If you have trouble getting sign-in to work, refer to the Troubleshooting sign-in and sandboxes article for help.
Cloud saves
To add cloud save functionality to your game you'll need to use the GDK.Helpers.Save and GDK.Helpers.LoadSaveData functions.
For an example of integrating cloud save, review the sample code in the Project window under Assets\GDK-Tools\Examples\Cloud Saves\GameSaveSampleLogic.cs.
To test your new functionality, switch to your development sandbox using the steps in the Switching to your development sandbox section above and then build and run your game by selecting GDK > PC > Build and Run.
Achievements
To add support for achievements to your game, you'll need to use the GDK.Hellpers.UnlockAchievement function.
For an example of integrating achievement unlocking, review the sample code in the Project window under Assets\GDK-Tools\Examples\Achievements\UnlockAchievementSampleLogic.cs
In addition to adding support for achievements in your game, you'll need to enable publishing achievements and create your achievements in Partner Center as described in the following sections.
To enable publishing achievements in Partner Center
Ensure that you have sign-in working before implementing achievements.
Go to Partner Center.
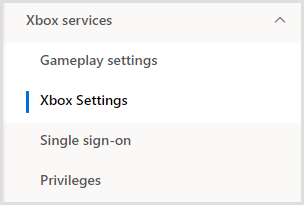
On the left pane, select Xbox Settings as shown in the following screenshot.
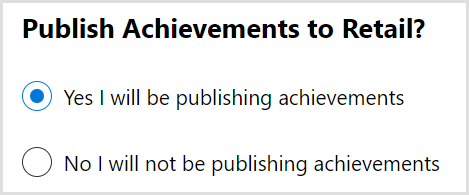
Under Publish Achievements to Retail?, select Yes I will be publishing achievements as shown in the following screenshot.
To publish a new achievement in Partner Center
Select Gameplay settings under the Xbox services section on the left pane as shown in the following screenshot.
To go to the Achievements page, select the Achievements link.
Select New achievement. Enter the required information.
When the new achievement is created, take note of the achievement's ID in the ID field. It's autogenerated and will be a string like "1".
To open the Publish gameplay settings dialog box, select Publish.
Change the To: field to your developer sandbox that you created earlier. Select Confirm.
Wait for the publishing process to be completed.
To test your new functionality, switch to your development sandbox using the steps in the Switching to your development sandbox section above and then build and run your game by selecting GDK > Build And Run.
Adding commerce to your game
To make purchases in your game, you'll use the GDK.Helpers.ShowPurchaseUIAsync and Gdk.Helpers.GetAssociatedProductsAsync functions. For an example of an in-game store implementation, look at the In Game Store example in the Project window under Assets\GDK-Tools\Examples\In Game Store.
Once you've added commerce support to your game, you'll need to create add-ons for purchase and prepare your game for testing commerce by following the steps in Creating add-ons for your game and Preparing for testing commerce.
Creating add-ons for your game
This section shows you how to create listings for your in-game items in Partner Center.
Go to Partner Center.
Navigate to your game.
In the navigation pane on the left, select Add-ons.
Click the Create a new... button at the top. Select the appropriate category
Fill out the required information and create any additional in-game items you need.
Click on the add-on in the table to see its details.
In the left navigation, select the Durable setup page (or Consumable setup if you created a consumable).
Click the Show details button in the Identity Details section.
Copy the value of the Store ID field. This value will be passed to the ShowPurchaseUIAsync API later in this section.
Fill in the rest of the required fields. Set the price to free for easier testing.
When you are finished, publish to your developer sandbox.
Testing your commerce functionality
This section shows you how to prepare your environment for testing store APIs. See Enabling XStore development and testing for more details.
In order to test your commerce functionality, you will have to have first uploaded the package for your game to Partner Center as described in the Publishing on Partner Center section (you will need to select a development sandbox to upload to instead of RETAIL).
Switch to your development sandbox using the steps in the Switching to your development sandbox section above.
Search for your game in the Xbox App.
Download and install your game. This is an important step because it will give your test account a license to the game. Without a license, you will get an E_IAP_UNEXPECTED error.
For console, you can get the value of the Content ID and EKB ID by running
xbapp list /din the Gaming Command Prompt.For PC, you can get the value of the Content ID by opening a command prompt and type:
reg query HKEY_CURRENT_USER\SOFTWARE\Microsoft\Windows\CurrentVersion\Store\ContentIdFind the Content ID value for your game package.
Go to \GDK-Tools\ProjectMetadata and open the MicrosoftGame.config file. Note: You cannot open it in Unity. Instead, you will need to browse to the folder in the file explorer and open it in another program.
Replace the ContentIdOverride value with the value obtained above. For console, you will also need to set an EKBIDOverride. But note that the MicrosoftGame.config values for console are set in a different location than PC. For Xbox, they can be found under Player Settings... > Publishing Settings for the Xbox build platform.
See Also
Enabling XStore development and testing Troubleshooting store integration Troubleshooting sign-in and sandboxes
Additional considerations before shipping
Checking for mandatory updates
Checking for mandatory updates happens automatically, without you having to write code, on the console, and through the PC Bootstrapper on the PC.
Certification test cases
Before you ship it is a good idea to look through the policies and Xbox requirements.
Unity considerations with TCUI dialogs
It is recommended that "Application.runInBackground" is set to true for any game that expects to display a title-callable UI (TCUI) dialog. See Window display modes and title-callable UI dialogs for additional information on successfully showing TCUI dialogs.
Publishing on Partner Center
This section describes how to package, upload, and publish your game on Partner Center.
In Unity, go to GDK > PC > Build and Run.
Select the Create package to upload to the store check box as shown in the following screenshot.
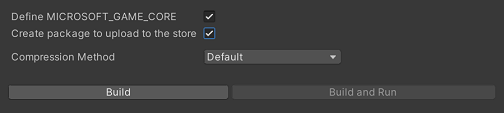
Select Build.
When prompted, choose a folder for the build package files.
When the build finishes, it opens the folder that contains the files you need to upload to Microsoft Store.
Go to Partner Center
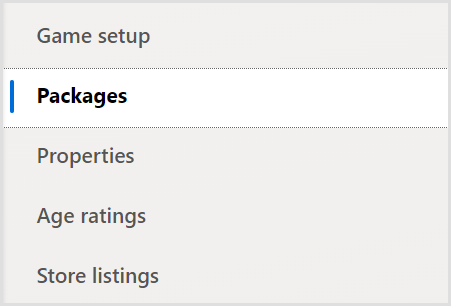
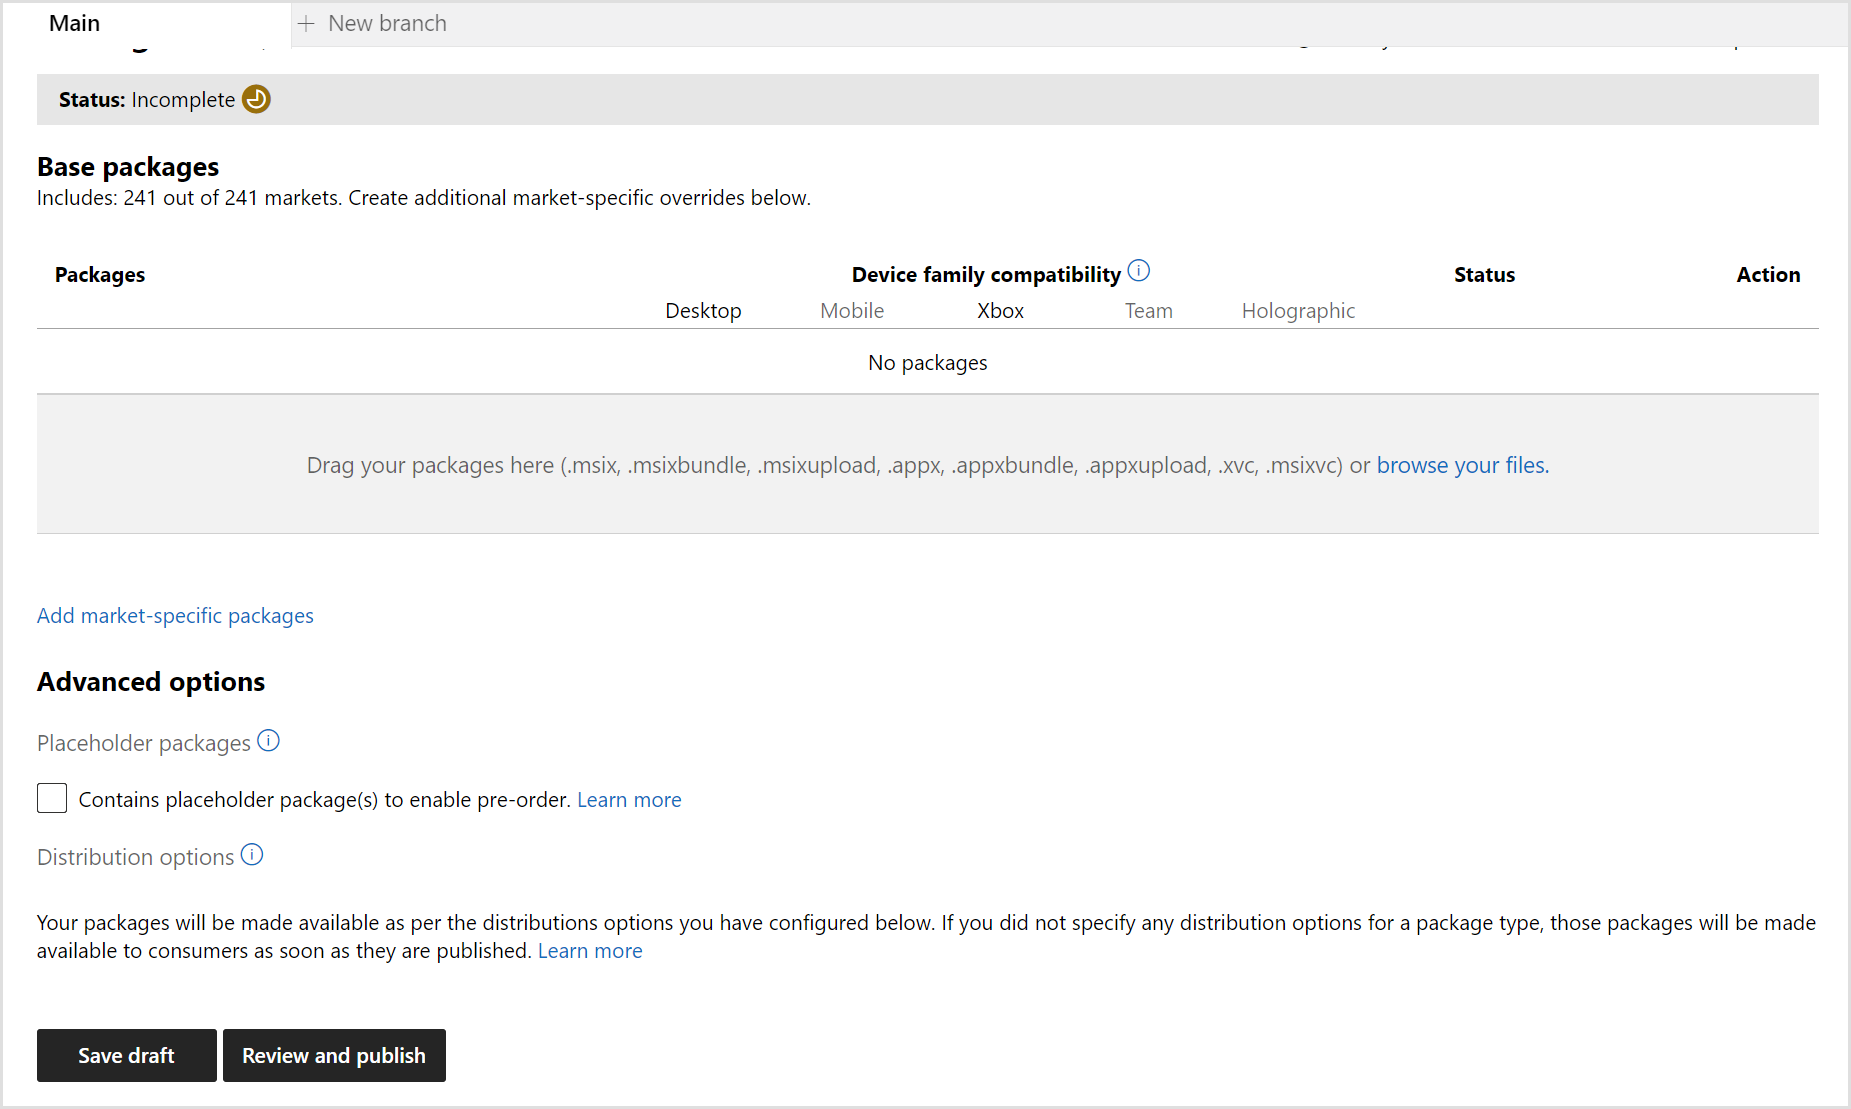
Select Packages on the pane as shown in the following screenshot.
Upload the .msixvc, .ekb, and .xml files from step 5 in this section by dragging the files to the drag area as shown in the following screenshot. If you can't upload an .msixvc file, contact your Microsoft representative for help.
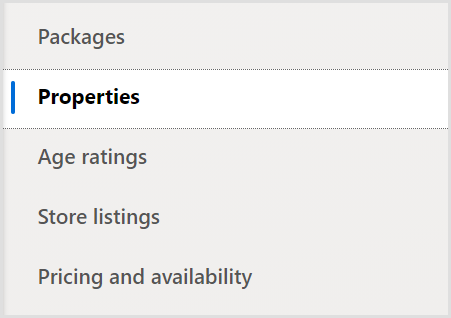
Enter the required information in the Properties, Age ratings, Store listings, and Pricing and availability sections as shown in the following screenshot.
On the Store listings page, ensure that you upload a trailer. Trailers aren't listed as mandatory in the UI but are required for games.
To publish, select Review and publish as shown in the following screenshot.

Select RETAIL. This submits your game to certification.
Note
If you see errors about revenue SKUs, they're created as part of the certification process. To publish your packages to retail, you must go through certification.
After your game passes certification, it can be released to retail. You can see when your game has passed certification on the Game Overview page, under the Publishing Status section.