Create a .NET MAUI project in Visual Studio
After you install and configure the .NET MAUI tools, you can use Visual Studio to build a .NET MAUI app.
In this unit, you'll learn about the structure of the .NET MAUI template in Visual Studio. You'll use this template for creating cross-platform mobile and desktop apps.
How to get started
To create a new .NET MAUI project with Visual Studio, in the Create a new project dialog box, select the .NET MAUI project type, and then choose the .NET MAUI App template:
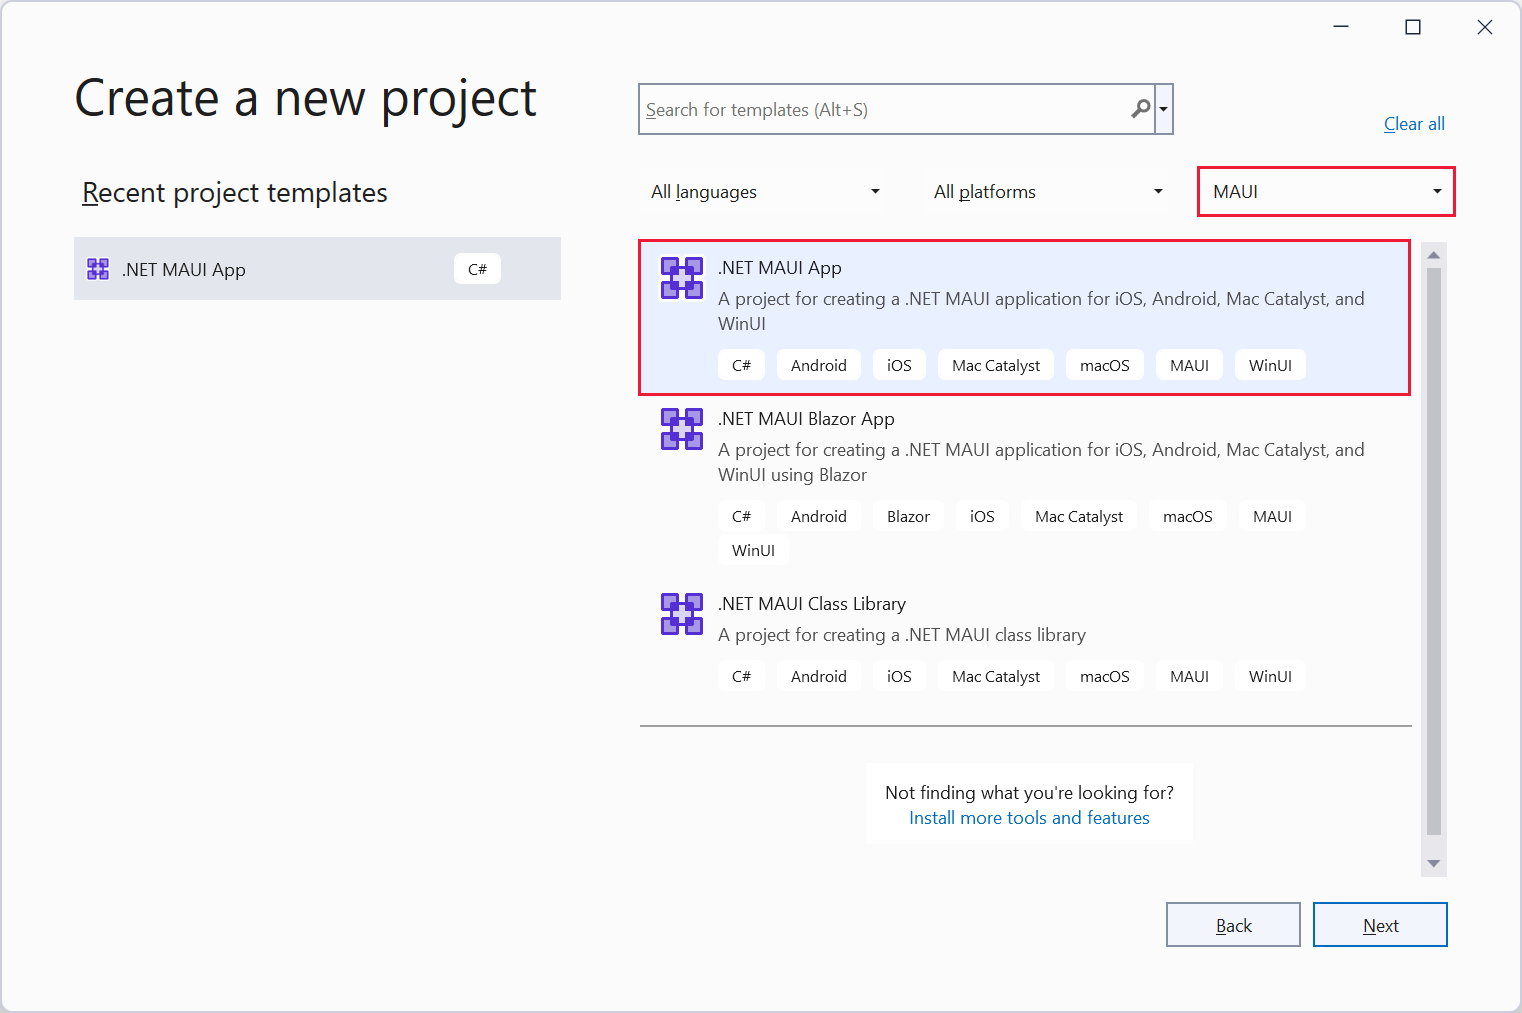
Follow the steps in the wizard to name the project and specify a location.
A newly created .NET MAUI project contains the items as shown:

.NET MAUI project structure and application startup
The project contents include the following items:
App.xaml. This file defines the application resources that the app will use in the XAML layout. The default resources are located in the
Resourcesfolder, and define app-wide colors and default styles for every .NET MAUI built-in control. Here, you'll see the two resource dictionaries being merged together:<?xml version = "1.0" encoding = "UTF-8" ?> <Application xmlns="http://schemas.microsoft.com/dotnet/2021/maui" xmlns:x="http://schemas.microsoft.com/winfx/2009/xaml" xmlns:local="clr-namespace:MyMauiApp" x:Class="MyMauiApp.App"> <Application.Resources> <ResourceDictionary> <ResourceDictionary.MergedDictionaries> <ResourceDictionary Source="Resources/Colors.xaml" /> <ResourceDictionary Source="Resources/Styles.xaml" /> </ResourceDictionary.MergedDictionaries> </ResourceDictionary> </Application.Resources> </Application>App.xaml.cs. This is the code-behind for the App.xaml file. This file defines the App class. This class represents your application at runtime. The constructor in this class creates an initial window and assigns it to the
MainPageproperty; this property determines which page is displayed when the application starts running. Additionally, this class enables you to override common platform-neutral application lifecycle event handlers. Events includeOnStart,OnResume, andOnSleep. These handlers are defined as members of theApplicationbase class. The following code shows examples:Note
You can also override platform-specific lifecycle events when the app first starts running. This is described later.
namespace MyMauiApp; public partial class App : Application { public App() { InitializeComponent(); MainPage = new AppShell(); } protected override void OnStart() { base.OnStart(); } protected override void OnResume() { base.OnResume(); } protected override void OnSleep() { base.OnSleep(); } }AppShell.xaml. This file is a .NET MAUI application's main structure. The .NET MAUI
Shellprovides many features that are beneficial for multiple-platform apps including app styling, URI based navigation, and layout options including flyout navigation and tabs for the application's root. The default template provides a single page (orShellContent) that is inflated when the app starts.<?xml version="1.0" encoding="UTF-8" ?> <Shell x:Class="MyMauiApp.AppShell" xmlns="http://schemas.microsoft.com/dotnet/2021/maui" xmlns:x="http://schemas.microsoft.com/winfx/2009/xaml" xmlns:local="clr-namespace:MyMauiApp" Shell.FlyoutBehavior="Disabled"> <ShellContent Title="Home" ContentTemplate="{DataTemplate local:MainPage}" Route="MainPage" /> </Shell>MainPage.xaml. This file contains the user-interface definition. The sample app that the MAUI App template generates contains two labels, a button, and an image. The controls are arranged using a
VerticalStackLayoutenclosed in aScrollView. TheVerticalStackLayoutcontrol arranges the controls vertically (in a stack), and theScrollViewprovides a scrollbar if the view is too large to be displayed on the device. You're intended to replace the contents of this file with your own UI layout. You can also define more XAML pages if you have a multi-page app.<?xml version="1.0" encoding="utf-8" ?> <ContentPage xmlns="http://schemas.microsoft.com/dotnet/2021/maui" xmlns:x="http://schemas.microsoft.com/winfx/2009/xaml" x:Class="MyMauiApp.MainPage"> <ScrollView> <VerticalStackLayout Spacing="25" Padding="30,0" VerticalOptions="Center"> <Image Source="dotnet_bot.png" SemanticProperties.Description="Cute dot net bot waving hi to you!" HeightRequest="200" HorizontalOptions="Center" /> <Label Text="Hello, World!" SemanticProperties.HeadingLevel="Level1" FontSize="32" HorizontalOptions="Center" /> <Label Text="Welcome to .NET Multi-platform App UI" SemanticProperties.HeadingLevel="Level2" SemanticProperties.Description="Welcome to dot net Multi platform App U I" FontSize="18" HorizontalOptions="Center" /> <Button x:Name="CounterBtn" Text="Click me" SemanticProperties.Hint="Counts the number of times you click" Clicked="OnCounterClicked" HorizontalOptions="Center" /> </VerticalStackLayout> </ScrollView> </ContentPage>MainPage.xaml.cs. This is the code-behind for the page. In this file, you define the logic for the various event handlers and other actions that are triggered by the controls on the page. The example code implements a handler for the
Clickedevent for the button on the page. The code simply increments a counter variable and displays the result in a label on the page. The Semantic service provided as part of the MAUI Essentials library supports accessibility. The staticAnnouncemethod of theSemanticScreenReaderclass specifies the text announced by a screen reader when the user selects the button:namespace MyMauiApp; public partial class MainPage : ContentPage { int count = 0; public MainPage() { InitializeComponent(); } private void OnCounterClicked(object sender, EventArgs e) { count++; if (count == 1) CounterBtn.Text = $"Clicked {count} time"; else CounterBtn.Text = $"Clicked {count} times"; SemanticScreenReader.Announce(CounterBtn.Text); } }MauiProgram.cs. Each native platform has a different starting point that creates and initializes the application. You can find this code in the Platforms folder in the project. This code is platform-specific, but at the end it calls the
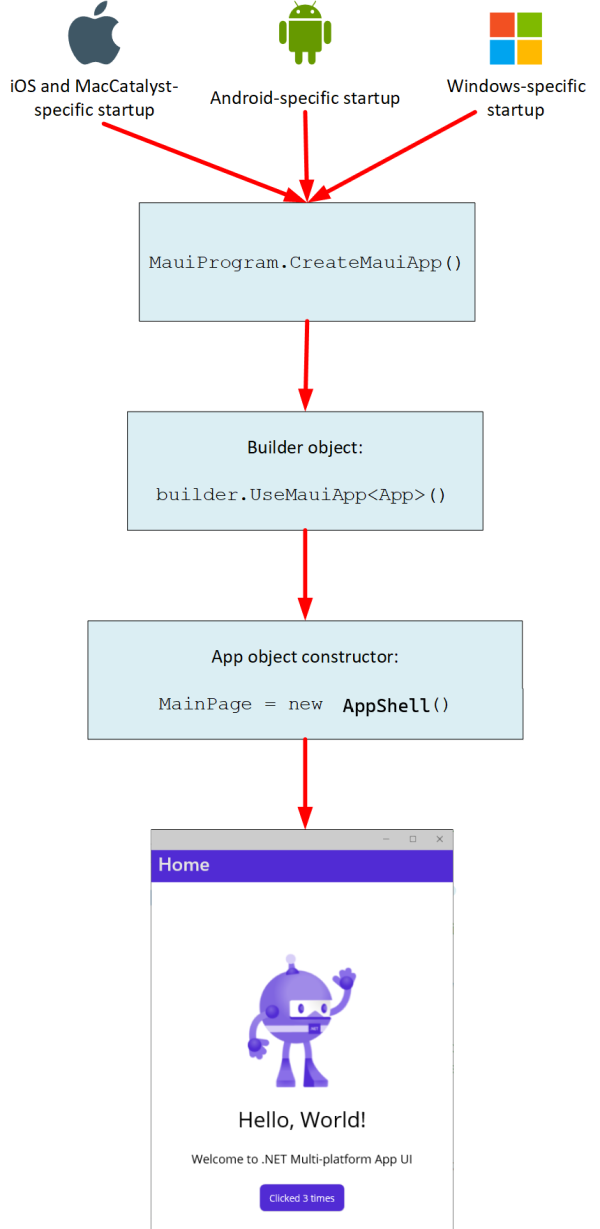
CreateMauiAppmethod of the staticMauiProgramclass. You use theCreateMauiAppmethod to configure the application by creating an app builder object. At a minimum, you need to specify which class describes your application. You do this with theUseMauiAppgeneric method of the app builder object; the type parameter specifies the application class. The app builder also provides methods for tasks such as registering fonts, configuring services for dependency injection, registering custom handlers for controls, and more. The following code shows an example of using the app builder to register a font:namespace MyMauiApp; public static class MauiProgram { public static MauiApp CreateMauiApp() { var builder = MauiApp.CreateBuilder(); builder .UseMauiApp<App>() .ConfigureFonts(fonts => { fonts.AddFont("OpenSans-Regular.ttf", "OpenSansRegular"); fonts.AddFont("OpenSans-Semibold.ttf", "OpenSansSemibold"); }); return builder.Build(); } }Platforms. This folder contains platform-specific initialization code files and resources. There are folders for Android, iOS, MacCatalyst, Tizen, and Windows. At runtime, the app starts up in a platform-specific way. Much of the start-up process is abstracted out by the MAUI libraries' internals, but the code files in these folders provide a mechanism for hooking up your own custom initialization. The important point is that when initialization is complete, the platform-specific code calls the
MauiProgram.CreateMauiAppmethod, which then creates and runs theAppobject as described earlier. For example, the MainApplication.cs file in the Android folder, the AppDelegate.cs file in the iOS and MacCatalyst folder, and the App.xaml.cs file in the Windows folder all contain the overrides:protected override MauiApp CreateMauiApp() => MauiProgram.CreateMauiApp();
The following image illustrates the flow of control when a .NET MAUI app starts up:
Project resources
The .csproj file for the main project includes several noteworthy sections. The initial PropertyGroup specifies the platform frameworks that the project targets, as well as items such as the application title, ID, version, display version, and supported operating systems. You can amend these properties as necessary.
<Project Sdk="Microsoft.NET.Sdk">

    <PropertyGroup>
        <TargetFrameworks>net6.0-android;net6.0-ios;net6.0-maccatalyst</TargetFrameworks>
        <TargetFrameworks Condition="$([MSBuild]::IsOSPlatform('windows'))">$(TargetFrameworks);net6.0-windows10.0.19041.0</TargetFrameworks>
        <!-- Uncomment to also build the tizen app. You will need to install tizen by following this: https://github.com/Samsung/Tizen.NET -->
        <!-- <TargetFrameworks>$(TargetFrameworks);net6.0-tizen</TargetFrameworks> -->
        <OutputType>Exe</OutputType>
        <RootNamespace>MyMauiApp</RootNamespace>
        <UseMaui>true</UseMaui>
        <SingleProject>true</SingleProject>
        <ImplicitUsings>enable</ImplicitUsings>

        <!-- Display name -->
        <ApplicationTitle>MyMauiApp</ApplicationTitle>

        <!-- App Identifier -->
        <ApplicationId>com.companyname.mymauiapp</ApplicationId>
        <ApplicationIdGuid>272B9ECE-E038-4E53-8553-E3C9EA05A5B2</ApplicationIdGuid>

        <!-- Versions -->
        <ApplicationDisplayVersion>1.0</ApplicationDisplayVersion>
        <ApplicationVersion>1</ApplicationVersion>

        <SupportedOSPlatformVersion Condition="$([MSBuild]::GetTargetPlatformIdentifier('$(TargetFramework)')) == 'ios'">14.2</SupportedOSPlatformVersion>
        <SupportedOSPlatformVersion Condition="$([MSBuild]::GetTargetPlatformIdentifier('$(TargetFramework)')) == 'maccatalyst'">14.0</SupportedOSPlatformVersion>
        <SupportedOSPlatformVersion Condition="$([MSBuild]::GetTargetPlatformIdentifier('$(TargetFramework)')) == 'android'">21.0</SupportedOSPlatformVersion>
        <SupportedOSPlatformVersion Condition="$([MSBuild]::GetTargetPlatformIdentifier('$(TargetFramework)')) == 'windows'">10.0.17763.0</SupportedOSPlatformVersion>
        <TargetPlatformMinVersion Condition="$([MSBuild]::GetTargetPlatformIdentifier('$(TargetFramework)')) == 'windows'">10.0.17763.0</TargetPlatformMinVersion>
        <SupportedOSPlatformVersion Condition="$([MSBuild]::GetTargetPlatformIdentifier('$(TargetFramework)')) == 'tizen'">6.5</SupportedOSPlatformVersion>
    </PropertyGroup>
    ...

</Project>
The ItemGroup section underneath the initial property group lets you specify an image and color for the splash screen that appears while the app is loading, prior to the first window appearing. You can also set the default locations for the fonts, images, and assets the app uses.
<Project Sdk="Microsoft.NET.Sdk">

    ...

   <ItemGroup>
        <!-- App Icon -->
        <MauiIcon Include="Resources\appicon.svg"
                  ForegroundFile="Resources\appiconfg.svg"
                  Color="#512BD4" />

        <!-- Splash Screen -->
        <MauiSplashScreen Include="Resources\appiconfg.svg"
                          Color="#512BD4"
                          BaseSize="128,128" />

        <!-- Images -->
        <MauiImage Include="Resources\Images\*" />
        <MauiImage Update="Resources\Images\dotnet_bot.svg"
                   BaseSize="168,208" />

        <!-- Custom Fonts -->
        <MauiFont Include="Resources\Fonts\*" />

        <!-- Raw Assets (also remove the "Resources\Raw" prefix) -->
        <MauiAsset Include="Resources\Raw\**"
                   LogicalName="%(RecursiveDir)%(Filename)%(Extension)" />
    </ItemGroup>

    ...

</Project>
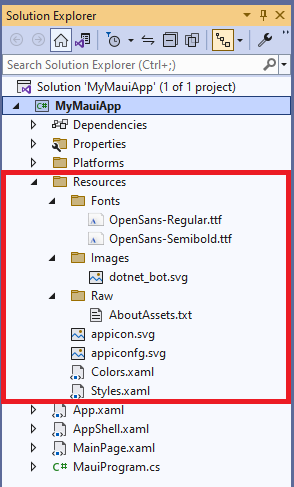
In the Solution Explorer window in Visual Studio, you can expand the Resources folder to see these items. You can add any other fonts, images, and other graphical resources the application requires to this folder and subfolders.
You should register any fonts added to the fonts folder with the app builder object when your app starts running. Recall that the CreateMauiApp method in the MauiProgram class does this with the ConfigureFonts method:
public static class MauiProgram
{
    public static MauiApp CreateMauiApp()
    {
        var builder = MauiApp.CreateBuilder();
        builder
            ...
            .ConfigureFonts(fonts =>
            {
                fonts.AddFont("OpenSans-Regular.ttf", "OpenSansRegular");
            });

        ...
    }
}
In this example, the AddFont method associates the font with the name OpenSansRegular. You can specify this font when you format items in the XAML description of a page or in the application resource dictionary:
<Application ...">
    <Application.Resources>
        <ResourceDictionary>
            ...
            <Style TargetType="Button">
                ...
                <Setter Property="FontFamily" Value="OpenSansRegular" />
                ...
            </Style>

        </ResourceDictionary>
    </Application.Resources>
</Application>
Use the Resources folders in the Android, and iOS folders under the Platforms folder for Android and iOS platform-specific resources.