Create vendor payments
This unit provides an overview of payment proposal options and includes examples that show how payment proposals work. It also covers what happens when you overpay or underpay an amount to a vendor.
Payment proposals
Payment proposals are often used to create vendor payments because the query can be used to quickly select vendor invoices for payment, based on criteria such as the due date and cash discount.
Watch this video to learn how to pay vendor invoices and use payment proposals:
The payment proposal query contains various tabs, each of which has different options for selecting invoices to pay.
Go to Accounts payable > Payments > Vendor payment journal > Lines > Payment proposal.
- The Parameters tab contains options that most of the organization frequently uses.
- On the Records to include tab, you can specify which invoices or vendors to include for payment by defining ranges for various characteristics. If you want to pay only a specific range of vendors, you can define a filter for the vendor range. This functionality is often used to select invoices for a specific method of payment.
- For example, if you define a filter where Method of payment = Check, only invoices that have that payment method are selected for payment, provided that they also meet other criteria specified in the query.
- The Advanced parameters tab contains additional options, some of which might not be relevant to your organization.
- For example, it contains the options for paying invoices for centralized payments.
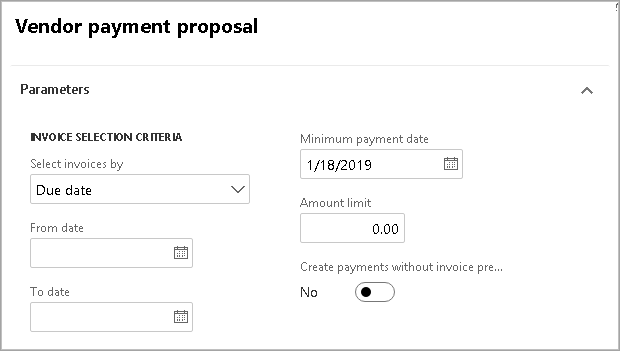
Parameters
The following is an overview of the parameters in the Vendor payment proposal page.
Select invoices by – Invoices within the date range that is specified by the From date and To date fields can be selected by due date, cash discount date, or both.
- If you use the cash discount date, Finance first looks for invoices that have a cash discount date between the From date and To date. Finance then determines whether the invoice is eligible for the cash discount by using the session date to make sure that the cash discount date hasn’t already passed.
From date and To date – Invoices that have a due date or cash discount date within this date range are selected for payment.
Minimum payment date – Enter the minimum payment date.
- For example, the From date and To date fields specify a range from September 1 to September 10, and the minimum payment date is September 5. In this case, all invoices that have a due date from September 1 to September 5 have a payment date of September 5. However, all invoices that have a due date from September 5 to September 10 have a payment date that is equal to the due date of each invoice.
Amount limit – Enter the maximum total amount for all payments.
Create payments without invoice preview – If this option is set to Yes, payments will be created immediately on the Vendor payments page. The Payment proposal page will be skipped; therefore, payments will be created faster. Payments can still be modified from the Vendor payments page, or you can return to the Payment proposal page by using the Edit invoices for select payment button.
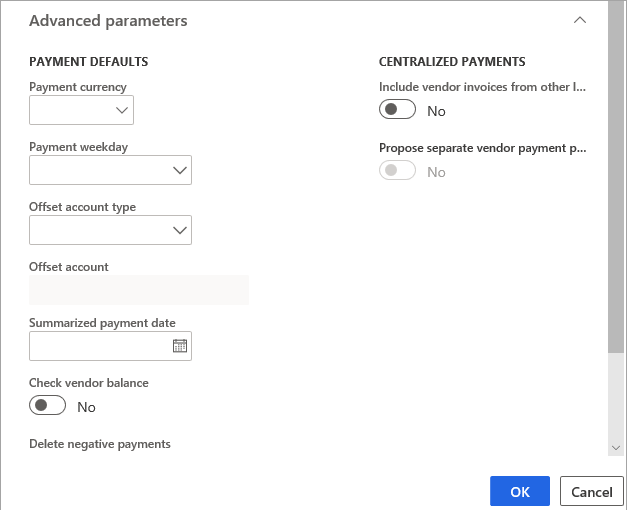
Advanced parameters
The following is an overview of the Advanced parameters of the Vendor payment proposal page.
Check vendor balance – If this option is set to Yes, the system verifies that a vendor doesn’t have a debit balance before any invoice is paid. If a vendor does have a debit balance, no payment is created.
- For example, the vendor might have credit memos or payments that have been posted but haven't been settled yet. In these cases, the vendor should not be paid. Instead, the credit memos or payments should be settled against the outstanding invoices.
Delete negative payments – This option works differently, depending on whether payments are made for individual invoices or for the sum of invoices that meet the payment criteria. This behavior is defined on the method of payment.
- Payment for each invoice – If the Delete negative payments option is set to Yes, and an unsettled invoice and payment exist for a vendor, only the invoice is selected for payment. The existing payment isn't settled against the invoice. If the Delete negative payments option is set to No, and an invoice and a payment aren't settled, both the invoice and the payment are selected for payment.
- Payment for sum of invoices – If the Delete negative payments option is set to Yes, and an unsettled invoice and payment exist for a vendor, both the unsettled invoice and the payment are selected for payment, and the amounts are added together to produce the total payment amount. The only exception occurs if the sum results in a refund. In this case, neither the invoice nor the payment is selected. If the Delete negative payments option is set to No, and an invoice and a payment aren't settled, both the invoice and the payment are selected for payment, and the amounts are added together to produce the total payment amount.
Print report only – Set this option to Yes to view the results of the payment proposal on a report, but without creating any payments.
Include vendor invoices from other legal entities – If your organization has a centralized process for payment, and the payment proposal should include invoices from other legal entities that are included in the search criteria, set this option to Yes.
Propose separate vendor payment per legal entity – If this option is set to Yes, a separate payment is created for each legal entity per vendor. The vendor on the payment is the vendor from the invoice from each legal entity. If this option is set to No, and the same vendor has invoices in multiple legal entities, one payment is created for the total amount of the selected invoices. The vendor on the payment is the vendor in the current legal entity. If the vendor account doesn’t exist in the current legal entity, the vendor account of the first invoice that must be paid is used.
Payment currency – This field specifies the currency that all payments are created in. If a currency isn’t defined, each invoice is paid in the currency of the invoice.
Payment weekday – Enter the day of the week when the payment should be made. This field is used only if the method of payment is set up to total invoices for payment on a specific day of the week.
Offset account type and Offset account – Set these fields to define a specific account type (such as Ledger or Bank) and offset account (such as a specific bank account). The method of payment for the invoice defines the default offset account type and offset account, but you can use these fields to override the default values.
Summarized payment date – This is only used when the Period field on the method of payment is set to Total. If a date is defined, all payments are created on this date. The Minimum payment date field is ignored.
Additional filters – On the Records to include tab, you can define additional ranges of criteria. For example, if you want to pay only a range of vendors, you can define a filter for the vendor range. This functionality is often used to select invoices for a specific method of payment. For example, if you define a filter where Method of payment = Check, only invoices that have that method of payment are selected for payment, provided that they also meet other criteria specified in the query.
After the payment proposal has been created you will notice that the journal lines are automatically filled. Among the fields that are filled out are:
- Main account type - The Main account type for the vendor payment journal is set by default to Vendor and cannot be changed.
- Offset account type - The Offset account type can be changed to another account type. However, it cannot be set to Vendor. You will see an error message: Account type Vendor is not valid for this journal type. This same principle also applies to the Customer payment journal.
Summarize transactions
To summarize transactions in the bank subledger, see Summarize vendor and customer payments in bank transactions.
Partial payment
You might make a partial payment where the amount that still needs to be settled is small. For example, the vendor invoice is for 1,000.00, and you pay 999.90. If the remaining amount is less than the amount that is specified for overpayments or underpayments on the Accounts payable parameters page, the difference is automatically posted to an overpayment/underpayment ledger account.
Printing payment advice
You may want to print your payment in order to send them to your vendors to verify the status of your vendor payments. Previously, you could only do this for vendor payment journals of a Sent status. However, you can now print payment advices for Vendor payment journal that are in the Sent or Approved status.