Exercise - Create a service principal and key
Important
You need your own Azure subscription to run this exercise, and you might incur charges. If you don't already have an Azure subscription, create a free account before you begin.
Before you create the deployment pipeline for your toy company's website, you'll need to create a service principal and grant it access to your Azure environment. In this exercise, you'll create the service principal that you'll use for your deployment pipeline.
During the process, you'll:
- Create an application, service principal, and key, in a single operation.
- Securely handle the key.
- Verify that the service principal works by signing in to Azure by using its credentials.
This exercise requires that you have permission to create applications and service principals in your Microsoft Entra directory. If you can't meet this requirement with your current Azure account, you can get a free trial and create a new Azure subscription and tenant. Alternatively, you can skip this exercise.
Sign in to Azure
To work with service principals in Azure, you need to sign in to your Azure account from the Visual Studio Code terminal.
In the Terminal menu, select New Terminal. The terminal window usually opens in the lower half of your screen.
The default shell is typically pwsh, as shown on the right side of the terminal window.

Select the shell dropdown, and then select Azure Cloud Shell (bash).
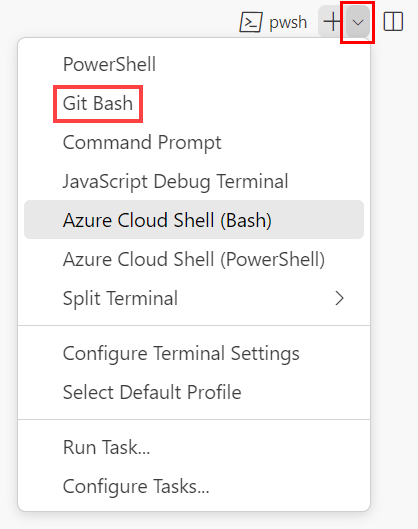
A new shell opens.
Sign in to Azure by using the Azure CLI
In the Visual Studio Code terminal, sign in to Azure by running the following command:
az loginIn the browser that opens, sign in to your Azure account.
To deploy this template to Azure, sign in to your Azure account from the Visual Studio Code terminal.
In the Terminal menu, select New Terminal. The terminal window usually opens in the lower half of your screen.
The default shell is typically pwsh, as shown on the right side of the terminal window.
Select the shell dropdown, and then select Azure Cloud Shell (PowerShell).
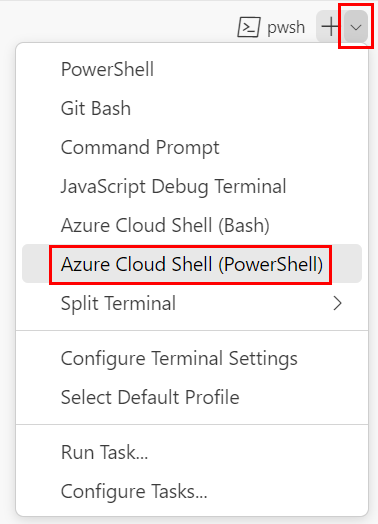
A new shell opens.
Sign in to Azure by using Azure PowerShell
In the Visual Studio Code terminal, sign in to Azure by running the following command:
Connect-AzAccountIn the browser that opens, sign in to your Azure account.
Create a service principal and key
Run this Azure CLI command in the Visual Studio Code terminal to create a service principal:
az ad sp create-for-rbac --name ToyWebsitePipelineIf the Azure CLI shows you an error saying that another application has the same display name, it means someone else who uses your Microsoft Entra tenant has created a service principal with the same name. Change the
--namevalue to something unique. It won't affect how you follow along with the rest of the exercises.Look at the JSON output from the previous command. It includes the following properties:
appId: The service principal's application ID.password: The service principal's key.tenant: Your Microsoft Entra tenant ID.
Copy these values somewhere safe. You'll use them soon.
Run these Azure PowerShell commands in the Visual Studio Code terminal to create a service principal:
$servicePrincipal = New-AzADServicePrincipal `
  -DisplayName ToyWebsitePipeline
Run the following command to get the service principal's key:
$servicePrincipalKey = $servicePrincipal.PasswordCredentials.SecretTextRun the following command to show the service principal's application ID, the key, and your Microsoft Entra tenant ID:
Write-Output "Service principal application ID: $($servicePrincipal.AppId)"
Write-Output "Service principal key: $servicePrincipalKey"
Write-Output "Your Azure AD tenant ID: $((Get-AzContext).Tenant.Id)"
Copy the values somewhere safe. You'll use them soon.
Warning
The outputs from the preceding commands contain the key for your service principal. Be careful about where you run these commands. For example, don't run them in an environment where someone might be able to view them.
Test the service principal
Now that the service principal has been created, you can sign in by using its credentials to verify that it was created successfully.
Run this Azure CLI command in the Visual Studio Code terminal to sign in by using the service principal's credentials. Replace the placeholders with the values that you copied in the previous step.
az login --service-principal \
  --username APPLICATION_ID \
  --password PASSWORD \
  --tenant TENANT_ID \
  --allow-no-subscriptions
Notice that you include the
--allow-no-subscriptionsargument. Normally when you run theaz logincommand, the Azure CLI looks for the Azure subscriptions that you can access. The service principal hasn't been granted access to anything yet, so you use the--allow-no-subscriptionsargument to prevent the Azure CLI from checking the subscription list and showing an error.Check that the output from the previous command is a JSON object, which includes a
userproperty with the service principal's application ID. This information indicates that the service principal signed in successfully.Sign out of the service principal's account by using the following command:
az logout
Run this Azure PowerShell command in the Visual Studio Code terminal to securely prompt you for the service principal's credentials. Use the service principal's application ID and key from the previous step for the username and password, respectively.
$credential = Get-CredentialRun this Azure PowerShell command in the Visual Studio Code terminal to sign in by using the service principal's credentials.
Connect-AzAccount -ServicePrincipal `
  -Credential $credential `
  -Tenant TENANT_ID
Check that the output from the previous command includes an
Accountproperty with the service principal's application ID, and a blankSubscriptionNamevalue. This information indicates that the service principal signed in successfully.Sign out of the service principal's account by using the following command:
Logout-AzAccount
Now that you have a working service principal, you can move on to the next stage: authorizing it to access your Azure environment.