Exercise - Get started with Azure Spatial Anchors
In this unit, you'll explore the steps required to:
- Start and stop an Azure Spatial Anchors session.
- Create, upload, and download spatial anchors on a single device.
As a result of completing the prerequisites for this learn module, you should already have a Unity project that's set up and configured for OpenXR and MRTK3. Open that project, then check to ensure that you have the proper capabilities selected:
- Navigate to Edit > Project Settings > Player > Publishing Settings.
- Scroll down to the Capabilities section and select the following if they're not already selected:
- SpatialPerception
- InternetClient
- PrivateNetworkClientServer
When you're finished, close the Project Settings window and continue on with the next steps.
Install built-in Unity packages and import the tutorial assets
On the menu bar, select Window > Package Manager.
Verify that AR Foundation version 5.0.3 or latest version is installed.

Import the tutorial assets
Add Azure Spatial Anchors SDK V2.12, or the latest version, to your project by following this tutorial.
Download and import the following Unity custom packages in this order:
- MRTK.HoloLens2.Unity.Tutorials.Assets.GettingStarted.3.0.0.unitypackage
- MRTK.HoloLens2.Unity.Tutorials.Assets.AzureSpatialAnchors.3.0.0.unitypackage
Note
Importing both MRTK3 and ASA might cause errors when the ARFoundation package version doesn't match the imported ARSubsystems version. Until this is fixed, you can manually add com.unity.xr.arsubsystems version 5.0.2 to the project's Package Manager as a workaround.
You'll get a warning that ARSubsystems has been deprecated, but you can ignore it. If you see any CS0618 warnings that say "WorldAnchor.SetNativeSpatialAnchorPtr(IntPtr)" is obsolete, you can also ignore these.
Prepare the scene
In this section, you'll prepare the scene by adding some of the tutorial prefabs.
On the Project pane, go to the Assets > MRTK.Tutorials.AzureSpatialAnchors > Prefabs folder, then drag the following prefabs to the Hierarchy pane to add them to your scene:
- ButtonParent prefabs
- Instructions prefabs
- ParentAnchor prefabs
- Change ButtonParent's Tranform/Position values to the following: X = 0.0, Y = 1.6, Z = 0.6
- Change Instructions's Tranform/Position values to the following: X = -0.8, Y = 2.0, Z = 2.0
- Change ParentAnchor's Tranform/Position values to the following: X = -0.3, Y = 1.5, Z = 0.6

Tip
If you find the large icons in your scene (for example, the large framed "T" icons) distracting, you can hide them by opening the Gizmos drop-down and turning off the display of icons for individual objects.
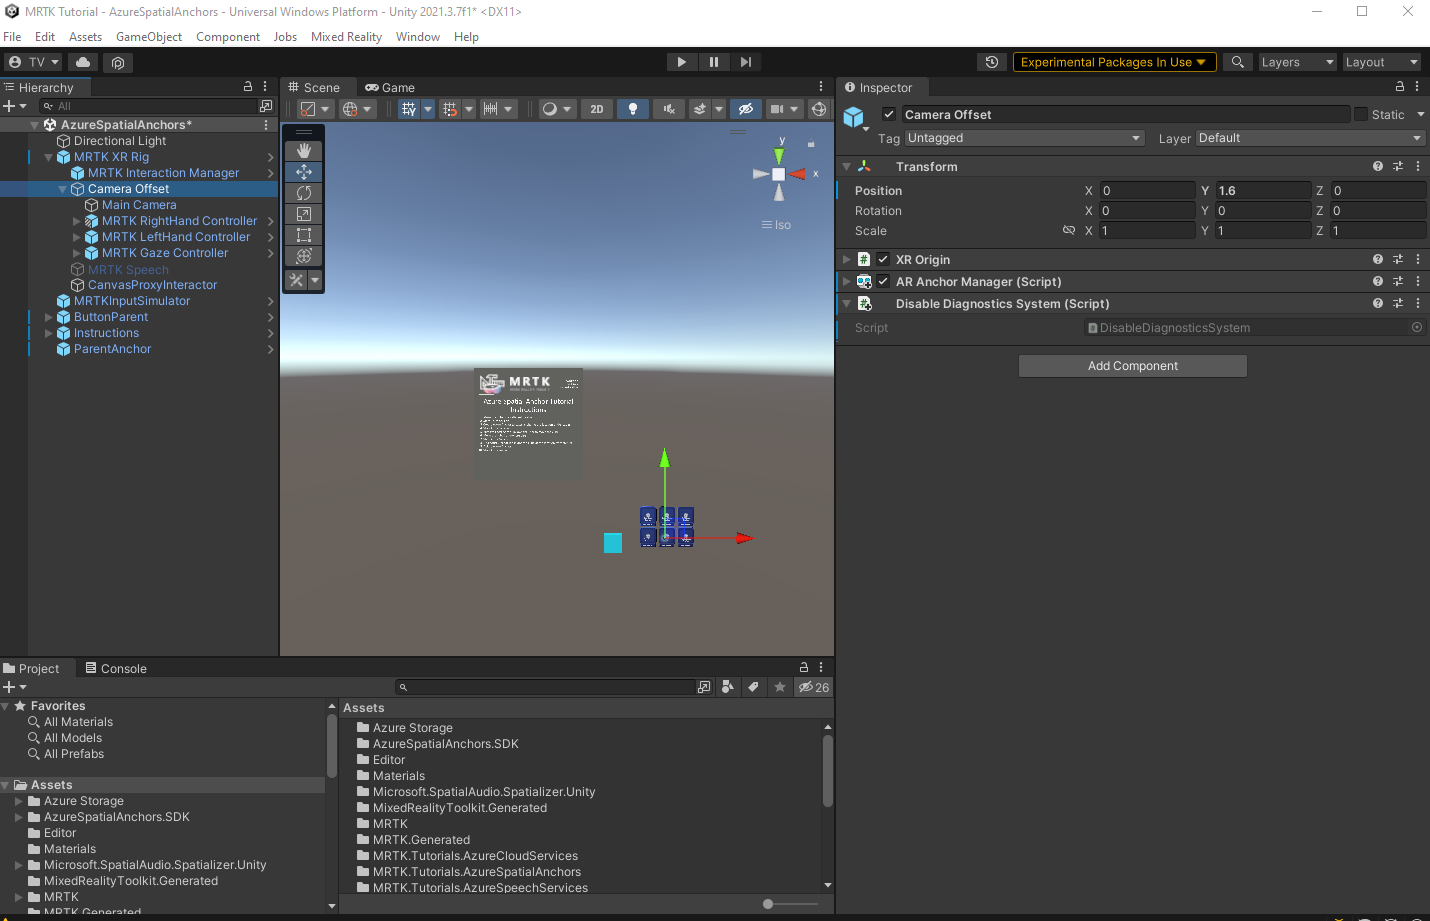
In the Hierarchy window, select MRTK XR Rig > Camera Offset.
In the Inspector pane, use the Add Component button to add the following components:
- AR Anchor Manager (Script)
- DisableDiagnosticsSystem (Script)
Note
When you add the AR Anchor Manager (Script) component, the XR Origin component is automatically added, because the AR Anchor Manager (Script) component requires it.
Configure the buttons to operate the scene
In this section, you'll add scripts to the scene to create a series of button events that demonstrate the fundamentals of how both local anchors and spatial anchors behave in an app.
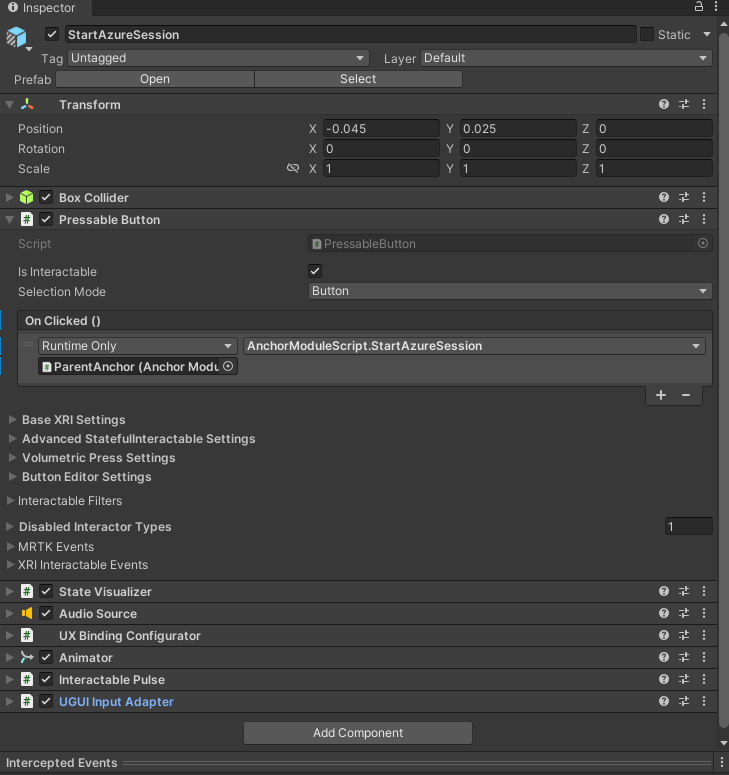
In the Hierarchy pane, expand the ButtonParent object and select the first child object, StartAzureSession.
In the Inspector pane, navigate to the Pressable Button component. It has an On Clicked () event.
In the Hierarchy, select the ParentAnchor object, and then drag it to the Inspector and drop it in the On Clicked() event's None (Object) field.
Select the No Function drop-down and then select AnchorModuleScript > StartAzureSession (). This function will be executed when the event is triggered.
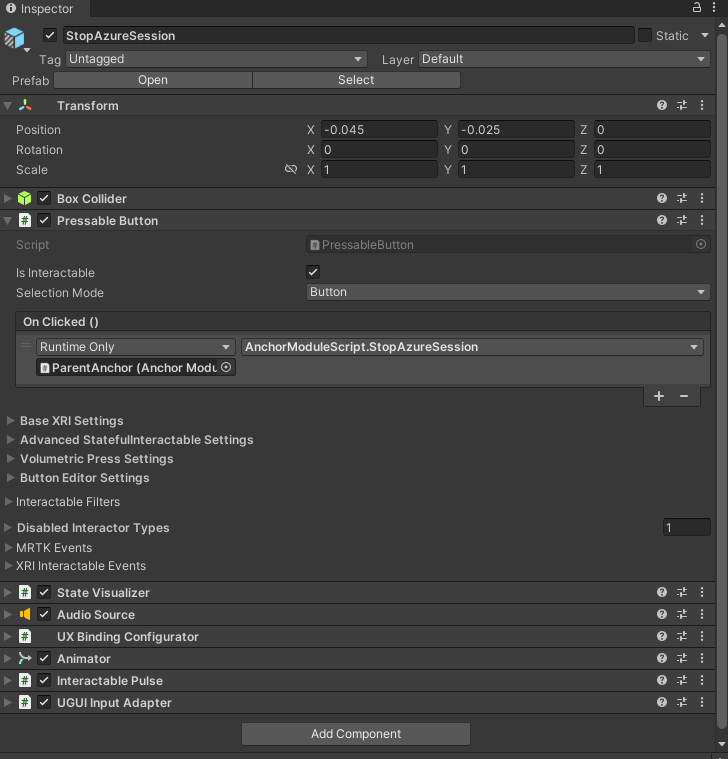
In the Hierarchy pane in the ButtonParent child list, select StopAzureSession
In the Inspector pane, navigate to the Pressable Button component.
In the Hierarchy, select the ParentAnchor object, then drag it to the Inspector and drop it in the On Clicked() event's None (Object) field.
Select the No Function drop-down and then select AnchorModuleScript > StopAzureSession ().
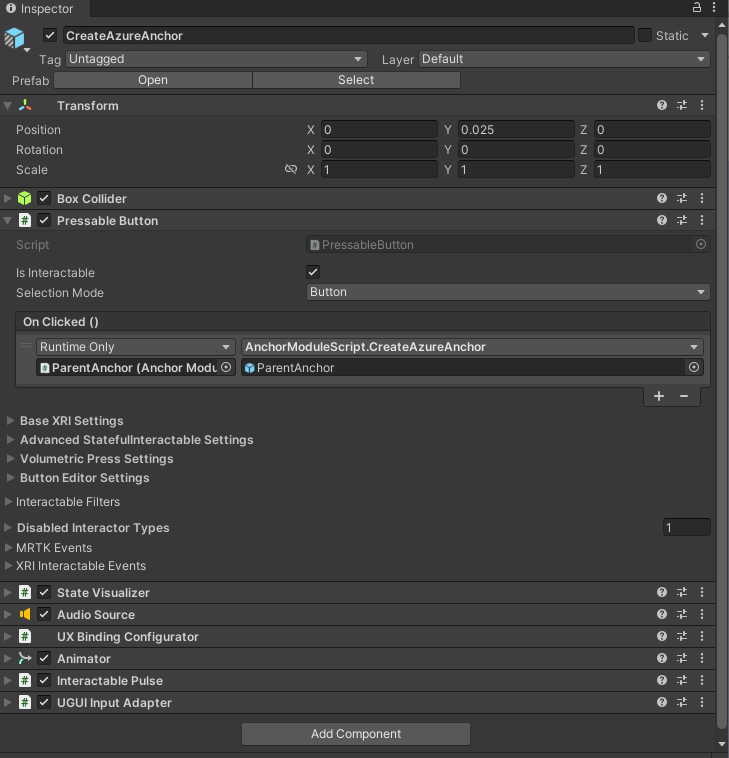
In the Hierarchy pane in the ButtonParent child list, select CreateAzureAnchor.
In the Inspector pane, navigate to the Pressable Button component.
In the Hierarchy, select the ParentAnchor object, then drag it to the Inspector and drop it in the On Clicked() event's None (Object) field.
Select the No Function drop-down and select AnchorModuleScript > CreateAzureAnchor.
Select the ParentAnchor object again, then drag it to the Inspector and drop it in the parameter of AnchorModuleScript.CreateAzureAnchor.
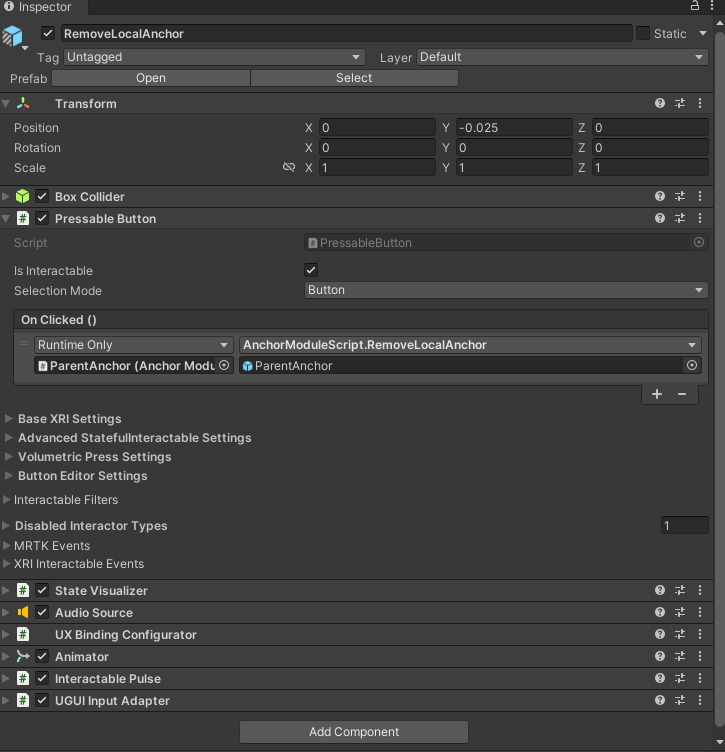
In the Hierarchy pane in the ButtonParent child list, select RemoveLocalAnchor.
In the Inspector pane, navigate to the Pressable Button component.
In the Hierarchy, select the ParentAnchor object, then drag it to the Inspector and drop it in the On Clicked() event's None (Object) field.
Select the No Function drop-down, then select AnchorModuleScript > RemoveLocalAnchor.
Select the ParentAnchor object again, then drag it to the Inspector and drop it in the parameter of AnchorModuleScript.RemoveLocalAnchor.
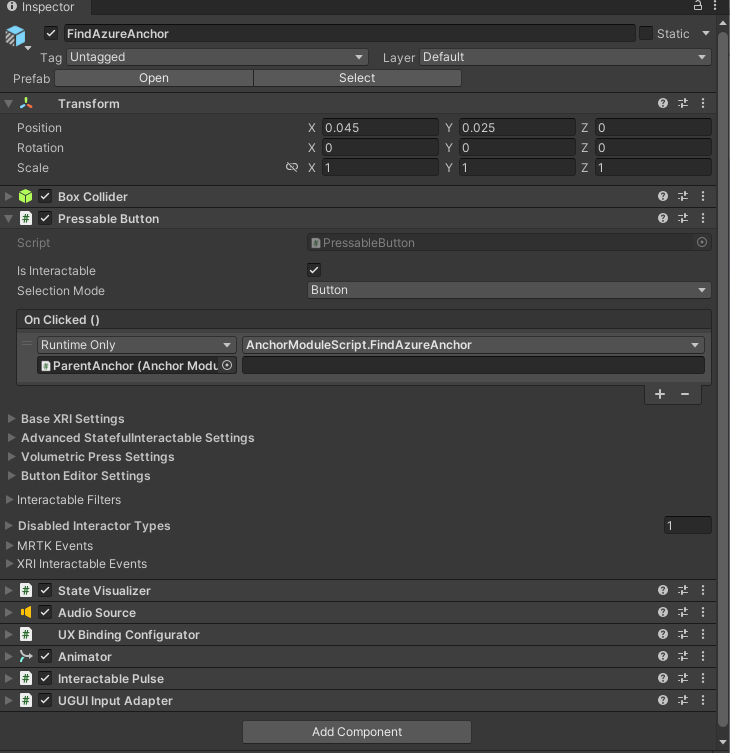
In the Hierarchy pane in the ButtonParent child list, select FindAzureAnchor.
In the Inspector pane, navigate to the Pressable Button component.
In the Hierarchy, select the ParentAnchor object, then drag it to the Inspector and drop it in the On Clicked() event's None (Object) field.
Select the No Function drop-down, then select AnchorModuleScript > FindAzureAnchor.
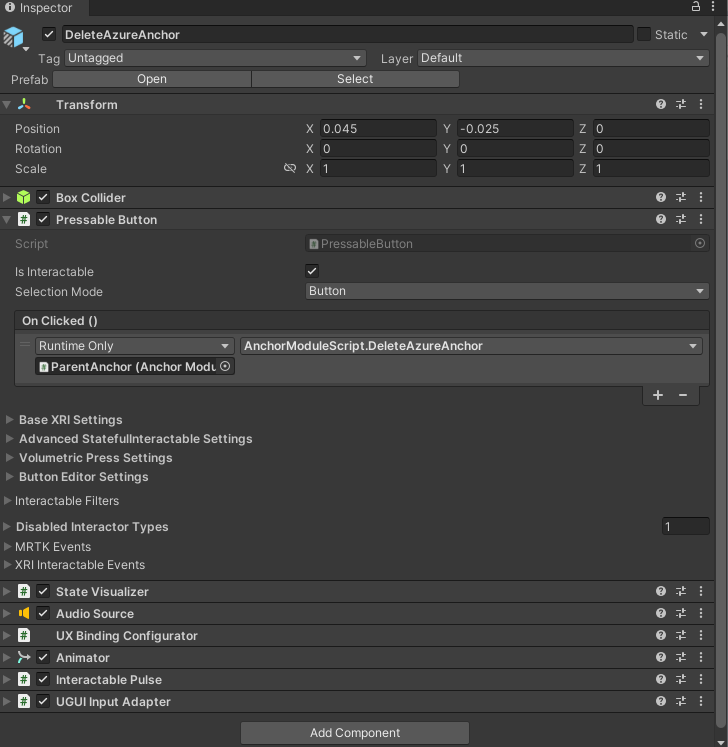
In the Hierarchy pane in the ButtonParent child list, select DeleteAzureAnchor.
In the Inspector pane, navigate to the Pressable Button component.
In the Hierarchy, select the ParentAnchor object, then drag it to the Inspector and drop it in the On Clicked() event's None (Object) field.
Select the No Function drop-down, then select AnchorModuleScript > DeleteAzureAnchor.
Connect the scene to the Azure resource
In the Hierarchy pane, select the ParentAnchor object.
In the Inspector pane, locate the Spatial Anchor Manager (Script) component.
Configure the Credentials section with the credentials from the Azure Spatial Anchors account that you created as part of the prerequisites for this tutorial series:
- In the Spatial Anchors Account ID field, paste the Account ID value from your Azure Spatial Anchors account.
- In the Spatial Anchors Account Key field, paste the primary or secondary Access Key value from your Azure Spatial Anchors account.
- In the Spatial Anchors Account Domain field, paste the Account Domain value from your Azure Spatial Anchors account.

Try the basic behaviors of Azure Spatial Anchors
Azure Spatial Anchors can't run in Unity. To test the Azure Spatial Anchors functionality, you need to build the project and deploy the app to your device.
Tip
For a reminder on how to build and deploy your Unity project to HoloLens 2, see the Building your application to HoloLens 2 article starting at the (Optional) Build and deploy the application section.
When the app runs on your device, follow the on-screen instructions displayed on the Azure Spatial Anchor Tutorial Instructions panel:
- Move the cube to a different location.
- Start an Azure session.
- Create an Azure anchor at the location of the cube.
- Stop the Azure session.
- Remove the local anchor to allow the user to move the cube.
- Move the cube to somewhere else.
- Start an Azure session.
- Find the Azure anchor to position the cube at the location from step 3.
- Delete the Azure anchor.
- Stop the Azure session.
Caution
Azure Spatial Anchors uses the internet to save and load the anchor data. Make sure your device is connected to the internet.