Exercise - Verify Azure SQL Database
Now that you've seen how Azure SQL appears in SQL Server Management Studio (SSMS), you can explore an open-source tool called Azure Data Studio. Azure Data Studio provides a lightweight editor and other tools for interacting with Azure Data Services, such as SQL Server on-premises, Azure SQL, and Azure Database for PostgreSQL. Take a brief tour to get acquainted.
Connect with Azure Data Studio
On your local device, open Azure Data Studio. When opening for the first time, you're prompted to make a connection.
If you're prompted to enable preview features, select Yes.
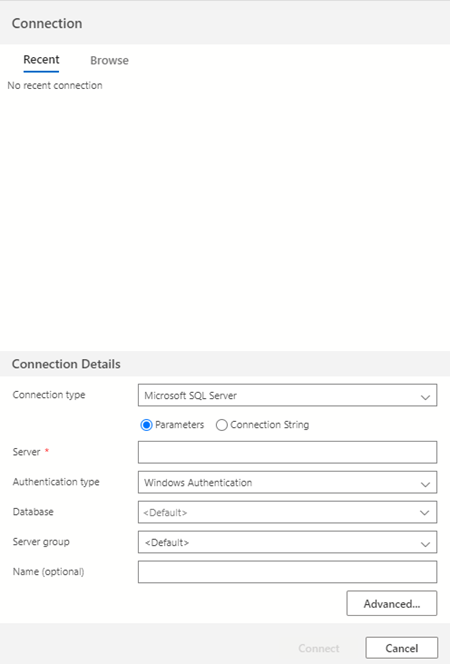
If you don't have this window, or at any time you want to add another connection, you can select the New connection button on the Servers bar. In the following example, you also get a preview of what a SQL Server connection would look like. In this exercise, you don't connect to SQL Server.

Connect to your Azure SQL Database logical server. Complete Connection Details with the following values and select Connect.
Parameter Value Connection type Microsoft SQL Server Server Enter the name of your logical server Authentication type SQL Login User name cloudadmin Password Enter the password for the cloudadmin account Remember password Selected Database AdventureWorks Server group Leave as <Default>Name (optional) Leave blank On the Connections tab, under Servers, you should now see your Azure SQL Database connection. The SQL Server connection shown in the following image is for comparison only.
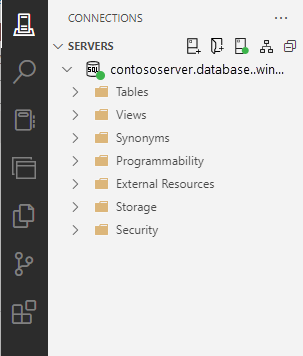
Running queries in Azure Data Studio is similar to SSMS. Right-click a database or server name and select New query.
For Azure SQL Database, because you're not getting a full server, USE [DatabaseName] isn't supported to change the database context. You must either change the connection to specifically connect to the database on which you want to run a query or use the dropdown. Change to the context of your
AdventureWorksdatabase by selecting the option next tomasterand runSELECT @@VERSION.
Later in this exercise, you dive in to why that result is different from what you see in SQL Server.
Set up easy file access with Azure Data Studio
Now that you're connected, you might want an easy way to access scripts and Jupyter notebooks. A Jupyter notebook is a way of integrating runnable code with text. If you aren't familiar with Jupyter notebooks, you will be soon.
In Azure Data Studio, select File > Open Folder.
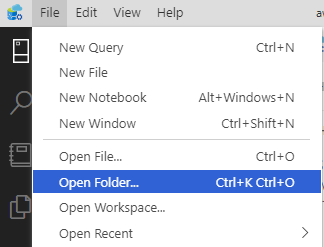
Browse to where you extracted the zip file of the resources for this exercise. If you followed the prerequisites, the path should be similar to C:\Users\<machine-username>\mslearn-azure-sql-fundamentals. When you're there, select Select Folder. If prompted, select Yes, I trust the authors.
Next, select the Explorer icon from the left taskbar to browse through the files in the module. This folder contains all of the necessary resources for the learning path about Azure SQL fundamentals, so you only need to download and configure this information once!
Throughout the module and learning path exercises, you're instructed at various points to open a notebook file that has the following file name extension: .ipynb. You can access the notebook from here directly. Alternatively, you can access it from the Notebook icon tab.
Verify deployment
After you deploy an instance of SQL, you typically run queries to verify your deployment. In Azure SQL, some of these queries vary from SQL Server. In this step, you see what and how things change from SQL Server, and what's new.
There are two options for completing this exercise:
- T-SQL in SSMS
- SQL Notebooks in Azure Data Studio
Both exercises contain the same commands and content, so you can choose the option that you prefer.
Option 1: T-SQL in SSMS
In this option, walk through some common queries against system functions, dynamic management views (DMVs), and catalog views that you can use after deployment in SSMS. See which ones work the same as SQL Server, which ones don't, and which ones are new to Azure SQL.
Connect to your Azure SQL Database logical server in SSMS if you haven't already.
Right-click the
AdventureWorksdatabase, and select New Query.Check the version that you deployed by executing the well-known system function
@@VERSION.SELECT @@VERSION
The result looks a bit different from SQL Server. You can tell that this server is Azure SQL, which doesn't have versions. Azure SQL Database includes the most up-to-date changes in line with the latest release of SQL Server. However, using the system function
@@VERSIONis a common method to verify that you can "query" SQL Server.Determine the specific type of Azure SQL deployment, based on the number returned:
- 1 = Personal or Desktop Engine
- 2 = Standard
- 3 = Enterprise
- 4 = Express
- 5 = SQL Database
- 6 = SQL Data Warehouse
- 8 = SQL Managed Instance
Run the following T-SQL command to see if you get the expected result.
SELECT SERVERPROPERTY('EngineEdition');
The result is 5, which makes sense because you deployed Azure SQL Database, not SQL Managed Instance or SQL Server Enterprise. There's no special number for SQL Server in Azure Virtual Machines. The number would correspond to the edition that you installed in the virtual machine. Personal or Desktop Engine is an earlier edition that's no longer used with SQL Server.
Examine the catalog views
sys.databasesandsys.objects. Typically, you look at these views to verify the installation and the status of system databases and to check system objects in your database.SELECT * FROM sys.databases; SELECT * FROM sys.objects;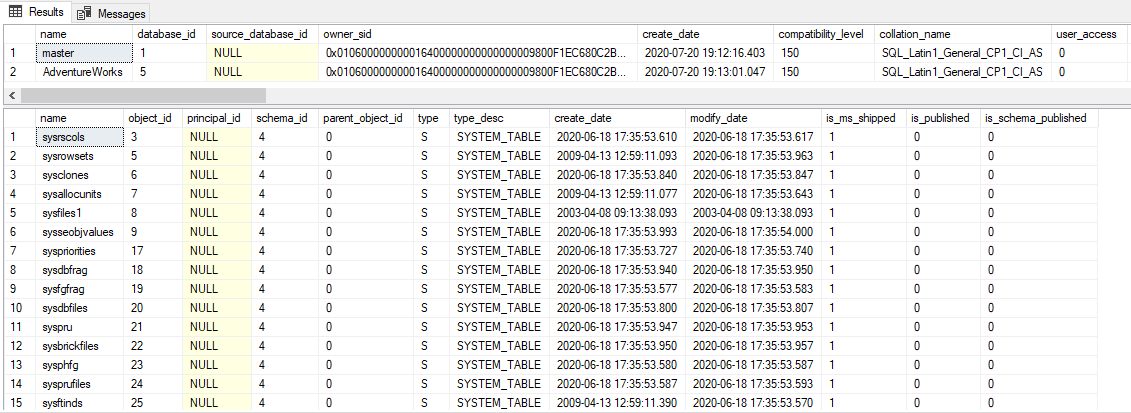
In the first result set, the system databases
msdb,tempdb, andmodelaren't listed. Only master and your user database are listed. The master database for a database server for Azure SQL Database isn't the same as the physical master database installed with SQL Server. In Azure SQL Managed Instance, you see the normal set of system databases, as with any SQL Server instance.However,
sys.objectslooks similar to a normal SQL Server instance. That fact is true for system tables, internal tables, and user objects for the sampleAdventureWorksLTdatabase.Verify that all schedulers are online and that you're detecting the expected available CPUs, considering that you deployed with a two-vCore model.
SELECT * FROM sys.dm_os_schedulers where STATUS = 'VISIBLE ONLINE';
Two
VISIBLE ONLINEschedulers are what you would expect when two vCores are available for the SQL Server instance where your SQL database is deployed.For a SQL Server deployment, you might normally look at DMVs like
sys.dm_process_memoryto see limits for CPU, memory, and workers. This DMV isn't supported with Azure SQL Database, because the user doesn't expose or control the details of the host that supports the database. You can use the DMVsys.dm_user_db_resource_governanceto review capacities and limits for your deployed SQL database. You can also usesys.dm_instance_resource_governancein Azure SQL Managed Instance.Run and review the following query results. Compare the results to your pricing tier and the limits documented for your deployed tier. The
slo_nameis the Service Level Objective (SLO) which states the deployment option, service tier, hardware, and compute amount. In addition, because Azure SQL Database uses Windows Job Objects for other resource limits, such as memory, you can use thesys.dm_os_job_objectDMV to see what resources are available for the deployment.SELECT * FROM sys.dm_user_db_resource_governance;
A common technique to look at a SQL Server deployment is to examine a list of active requests. Just like SQL Server, you can use
sys.dm_exec_requeststo view currently running SQL requests.SELECT * FROM sys.dm_exec_requests;
Using
sys.dm_exec_requestsfor Azure SQL Database is different from using it for SQL Server or SQL Managed Instance. This DMV shows only active requests related to your database, including background tasks or background tasks that don't have a database context that shows up as master. This behavior is because of the nature of an Azure SQL Database deployment where each database is deployed on its own SQL Server instance.
Option 2: SQL Notebooks in Azure Data Studio
For this option, use the notebook VerifyDeployment.ipynb. It's under 02-DeployAndConfigure\verifydeployment\VerifyDeployment.ipynb in the GitHub repository or the zip file you downloaded earlier. Browse to that file in Azure Data Studio to complete this part of the exercise, then return here. In the same folder, you also find extra notebooks that contain the results of the same queries on Azure SQL Managed Instance and SQL Server 2019.
If you can't complete the exercise for any reason, you can review the results in the corresponding notebook file on GitHub.