Exercise - Manage security and Microsoft Defender for Cloud
In this exercise, you'll confirm that Microsoft Defender for Cloud is enabled, and you'll explore some of the features within each of the capabilities mentioned in the previous unit.
Configure Microsoft Defender for Cloud
In the Azure portal, go to your Azure SQL Database logical server.
On the left pane, under Security, select Microsoft Defender for Cloud. Select the Configure link near the Enablement Status.
Review the selections you've made for your Azure SQL Database logical server. On the same pane is information about Vulnerability Assessment and Advanced Threat Protection.
This storage account was deployed as part of the deployment script for your Azure SQL Database. Review the options and add your email address if you want to receive the results of the weekly recurring scan. Uncheck Also send email notification to admins and subscription owners.
Just as you can configure who receives Vulnerability Assessment scans, you can configure who receives Advanced Threat Protection alerts. In your sandbox subscription, you don't have access to set the subscription-level email settings, so you won't be able to Add your contact details to the subscription's email settings in Azure Security Center.
After you've updated all your settings, select Save.
By configuring these settings, you'll be able to complete some of the other steps in this activity. You'll see more of Vulnerability Assessment and Advanced Threat Protection later.
Data Discovery & Classification
Go back to the
AdventureWorksdatabase in the Azure portal. On the left pane, under Security, select Data Discovery & Classification.Review Data Discovery & Classification, which provides advanced capabilities for discovering, classifying, labeling, and reporting the sensitive data in your database.
This wizard type of view is similar (but not identical to) the Data Discovery & Classification tool in SQL Server today through SQL Server Management Studio (SSMS). Using the SSMS wizard is not supported for Azure SQL Database. You can achieve similar functionality by using the Azure portal, which is supported for Azure SQL Database.
You can use Transact-SQL across all deployment options to add or drop column classifications and to retrieve classifications.
Select the Classification tab.
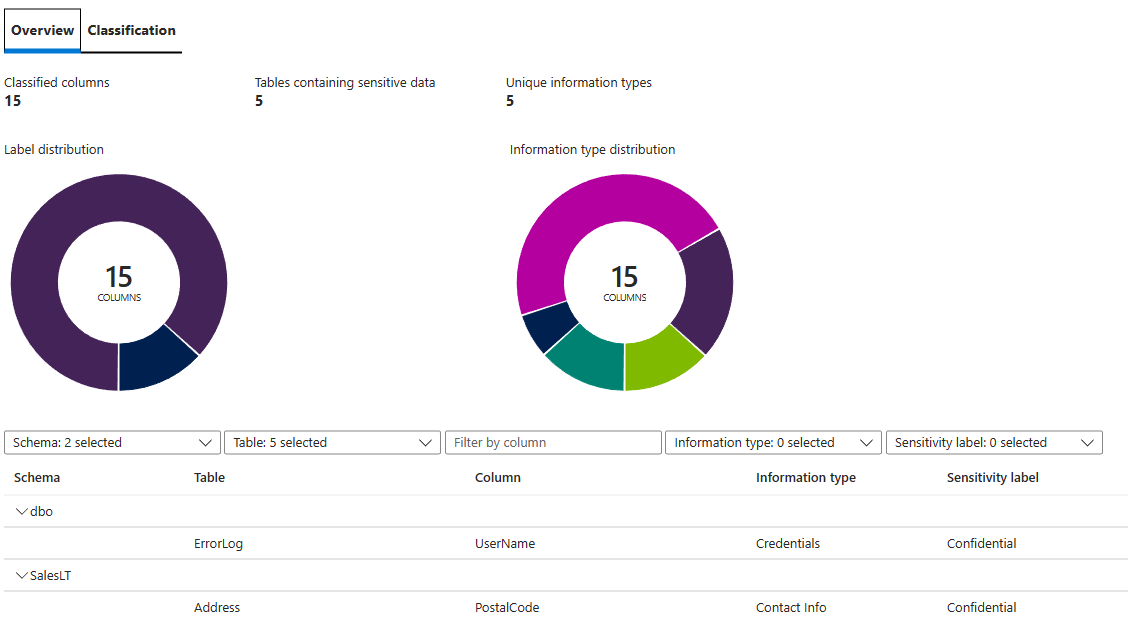
Data Discovery & Classification tries to identify potential sensitive data based on the column names in your tables. Review some of the suggested labels, and then select Select all > Accept selected recommendations.
Select Save near the upper left of the menu.
Finally, select the Overview tab to view the overview dashboard and review the classifications you've added.
Vulnerability Assessment
Select the Microsoft Defender for Cloud setting under Security to view the Microsoft Defender for Cloud dashboard for your
AdventureWorksdatabase.To begin reviewing the Vulnerability Assessment capabilities, under Vulnerability assessment findings, select View additional findings in Vulnerability Assessment.
Select Scan to get the most current Vulnerability Assessment results. This process takes a few moments while Vulnerability Assessment scans all the databases in your Azure SQL Database logical server.

Your resulting view will not be exact, but should be similar to what's shown here:

Every security risk has a risk level (high, medium, or low) and additional information. The rules in place are based on benchmarks that are provided by the Center for Internet Security. In the Findings tab, select a vulnerability. In our example, we select the security check ID VA2065 to get a detailed view that's similar to that shown in the following image. Review the status and other available information.
Note
If VA2065 doesn't fail, you can perform a similar exercise later, depending on any failed security checks that occur.

In this image, Vulnerability Assessment is suggesting that you configure a baseline of what firewall rules have been set. After you have a baseline, you can monitor and assess any changes.
Depending on the security check, there will be alternate views and recommendations. Review the information that's provided. For this security check, you can select the Add all results as baseline button and then select Yes to set the baseline. Now that a baseline is in place, this security check will fail in any future scans where the results are different from the baseline. Select the X at the top-right to close the pane for the specific rule.
In our example, we completed another scan by selecting Scan and can confirm that VA2065 is now showing up as a Passed security check.
If you select the preceding passed security check, you should be able to see the baseline you configured. If anything changes in the future, Vulnerability Assessment scans will pick it up and the security check will fail.

Advanced Threat Protection
Select the X at the upper right to close the Vulnerability Assessment pane and return to the Microsoft Defender for Cloud dashboard for your database. Under Security incidents and alerts, you shouldn't see any items. This means Advanced Threat Protection hasn't detected any issues. Advanced Threat Protection detects anomalous activities that indicate unusual and potentially harmful attempts to access or exploit databases.
You aren't expected to see any security alerts at this stage. In the next step, you'll run a test that will trigger an alert so that you can review the results in Advanced Threat Protection.
You can use Advanced Threat Protection to identify threats and alert you when it suspects that any of the following events are occurring:
- SQL injection
- SQL injection vulnerability
- Data exfiltration
- Unsafe action
- Brute force
- Anomalous client login
In this section, you'll learn how a SQL Injection alert can be triggered through SSMS. SQL Injection alerts are intended for custom-written applications, not for standard tools such as SSMS. Therefore, to trigger an alert through SSMS as a test for a SQL Injection, you need to "set" the Application Name, which is a connection property for clients that connect to SQL Server or Azure SQL.
To get the full experience of this section, you need access to the email address you provided for Advanced Threat Protection alerts in the first part of this exercise (which you can't do in this sandbox). If you need to update it, do so before proceeding.
In SSMS, select File > New > Database Engine Query to create a query by using a new connection.
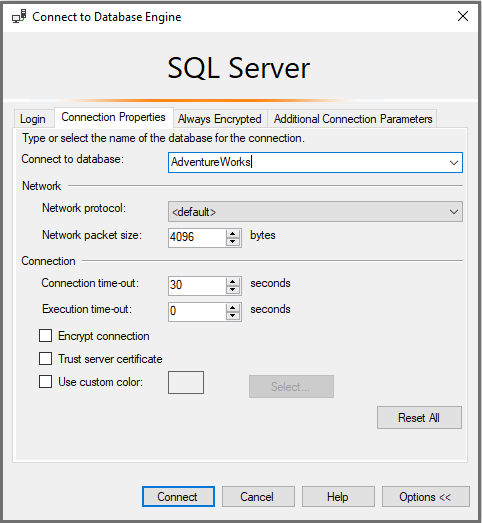
In the main login window, log in to AdventureWorks as you usually would, with SQL authentication. Before you connect, select Options >> > Connection Properties. Type in AdventureWorks for the option Connect to database.
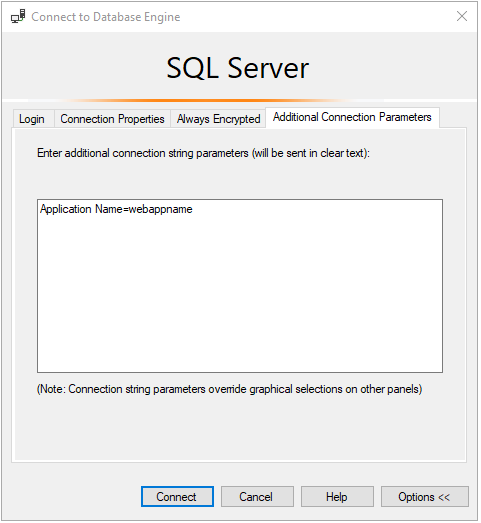
Select the Additional Connection Parameters tab, and then insert the following connection string in the text box:
Application Name=webappnameSelect Connect.
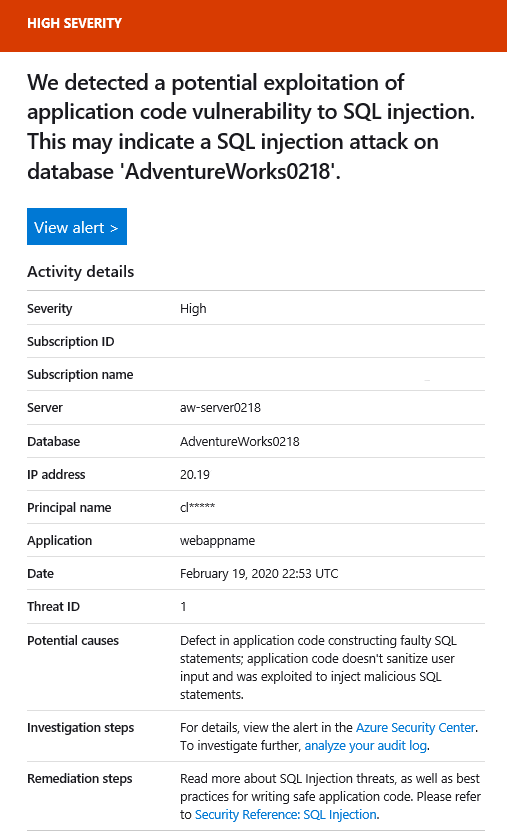
In the new query window, paste the following query, then select Execute:
SELECT * FROM sys.databases WHERE database_id like '' or 1 = 1 --' and family = 'test1';Within a few minutes, if you were able to configure the email settings (which you can't do in the sandbox), you would receive an email message that's similar to the following:
In the Azure portal, go to your AdventureWorks database. On the left pane, under Security, select Microsoft Defender for Cloud.
Under Security incidents and alerts, select View additional alerts on other resources in Defender for Cloud.
You can now see the overall security alerts.

Select Potential SQL injection to display more specific alerts and receive investigation steps.
As a clean-up step, consider closing all your query editors in SSMS and removing all connections so that you don't accidentally trigger additional alerts in the next exercise.

In this unit, you learned how to configure and apply some of the security features for Azure SQL Database. In the next unit, you'll expand on what you've learned by combining various security features in an end-to-end scenario.