Exercise - Configure backups for Azure SQL Database
Although the default Azure SQL Database configuration includes automated backups, most organizations modify the default setup to tailor it to their needs.
Now that you've planned a comprehensive backup strategy for Azure SQL Database and your company's ERP system, it's time to implement it.
Let's create a database in Azure and then configure backups. Set the retention to 28 days to ensure that you have four weeks of backups retained in accordance with your policy. Then, add some content to the database.
Create an Azure SQL Database logical server and database
Let's use the Azure CLI to create a SQL Database logical server and a database.
A logical server for Azure SQL Database is distinct from a SQL Server instance that you might be familiar with in the on-premises world. In Azure SQL Database, server is a logical construct that acts as a central administrative point for a collection of databases. Azure SQL databases exist in and are managed by a single logical server within the same Azure region. For example, you use the logical Azure SQL server to configure some settings for each database, including firewall and backup retention.
Run the following commands in Azure Cloud Shell to set up some variables for creation of the SQL Database logical server:
$serverName = "erpserver-$(Get-Random)"
$location = $(Get-AzResourceGroup -ResourceGroupName <rgn>[sandbox resource group name]</rgn>).location
$sqlAdmin = Get-Credential -credential dbadmin
This step creates a server name with a random number at the end to ensure that it's globally unique. The server name is referred to as
erpserver-NNNNthrough the exercises, but replace this name with the name of the server that you generate here.This step also sets the location for your server to the location of the resource group. Finally, it sets the credentials used to access the Azure SQL database logical server. When the command prompts you, enter a complex password of your choice.
Run the
New-AzSqlServercommand to create an Azure SQL Database logical server to store the database:New-AzSqlServer ` -ResourceGroupName <rgn>[sandbox resource group name]</rgn> ` -Location $location ` -ServerName $serverName ` -SqlAdministratorCredentials $sqlAdminRun the
New-AzSqlDatabasecommand to create a database:New-AzSqlDatabase ` -ResourceGroupName <rgn>[sandbox resource group name]</rgn> ` -ServerName $serverName ` -DatabaseName sql-erp-dbBy default,
New-AzSqlDatabasecreates a general-purpose, vCore provisioned database with Standard-series hardware and 2 vCores.
Configure the database backup retention policy
In the Azure portal, you can examine the default backup retention policy and adapt it to your needs.
On the Azure portal menu or from the Home page, select All resources, and then select the erpserver-NNNN database logical server that you created. Your database (SQL) server pane appears.
On the left navigation pane, under Data management, select Backups. The Backups pane for your database logical server appears.
On the Retention policies tab, select the sql-erp-db database, and in the top menu bar, select Configure policies. The Configure policies pane appears.
Move the Point-in-time-restore slider bar to 28.
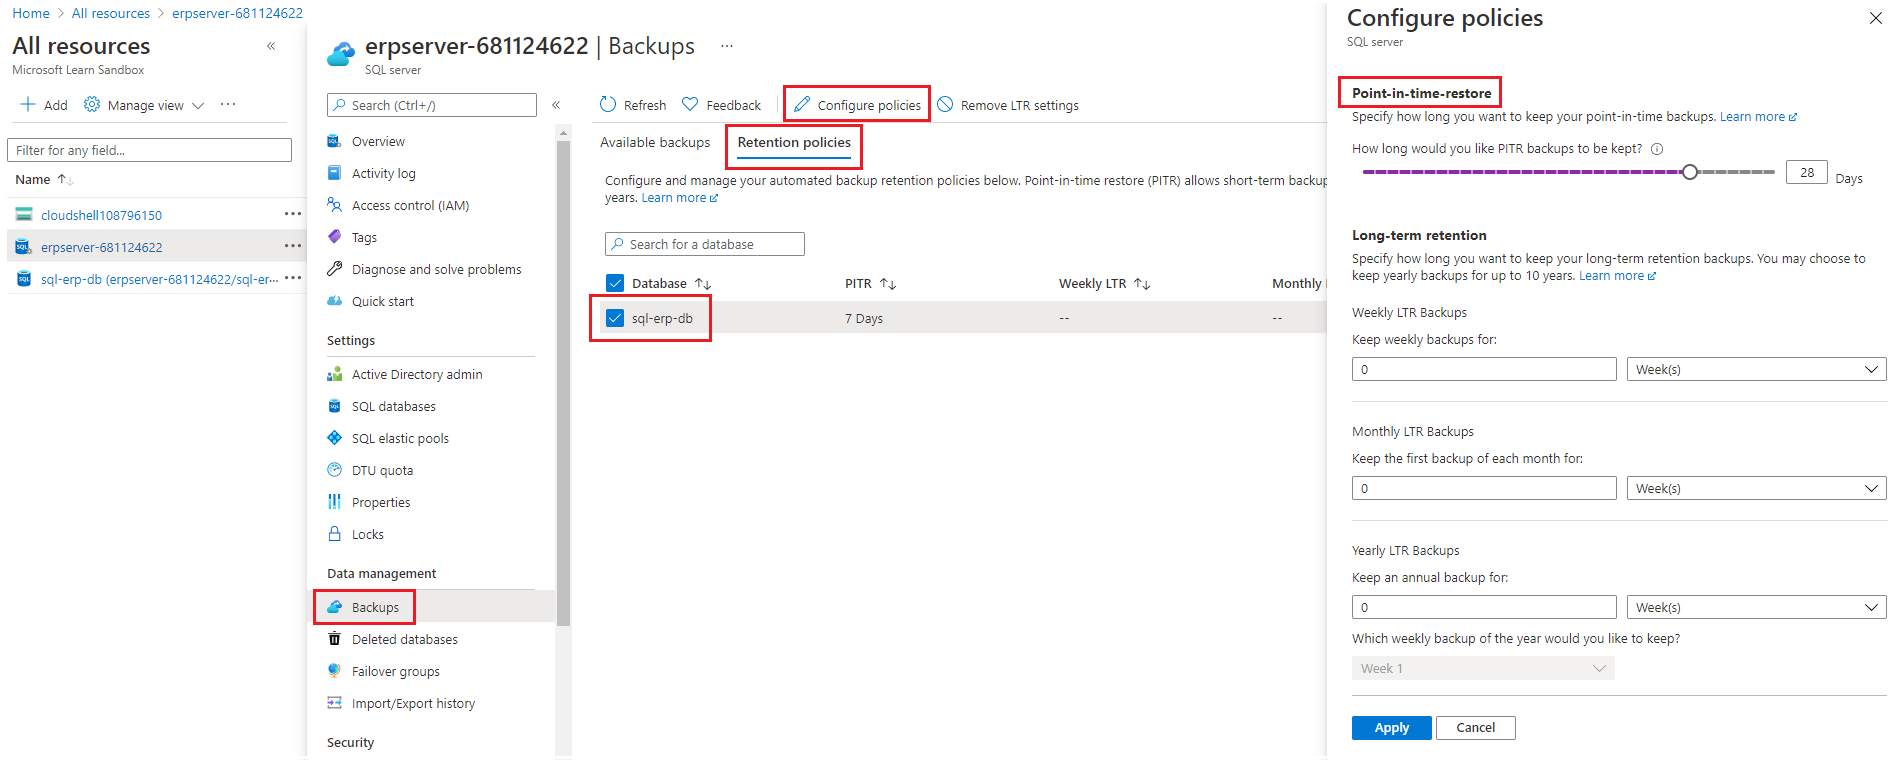
Select Apply, and then select Yes to confirm your selection.

Allow network access to the database logical server
By default, Azure SQL Database blocks network access to the logical server. Let's enable both your IP address and Azure services to access the server so that we can run queries from Cloud Shell and the Azure portal. By adding your IP address, you can also connect directly from your local device.
Navigate back to the erpserver-NNNN database logical server that you created.
On the left navigation pane, under Security, select Networking.
In the Firewall rules section, select Add your client IPv4 address. If necessary, identify and provide your current IPv4 IP address as the start and end addresses.
In the Exceptions section, check the box next to Allow Azure services and resources to access this server. Outside of this exercise, enabling this option might not be appropriate. In that case, access must be granted through other means not covered in this exercise, likely via private endpoints by using Azure Private Link.

Select Save.

Add data to the database
Now, let's add a table and a sample record to the database. It's helpful to have some data in the database to validate that our backups and restores work later in the module.
On the left navigation pane, under Settings, select SQL databases, then select sql-erp-db. Your database server pane reappears.
In the left menu pane, select Query editor (preview), and then sign in with the dbadmin credentials and the password that you specified for this account.
To create a table, in the Query 1 window, enter the following SQL command, then select Run.
CREATE TABLE Person
(
    PersonId INT IDENTITY PRIMARY KEY,
    FirstName NVARCHAR(50) NOT NULL,
    LastName NVARCHAR(50) NOT NULL,
    DateOfBirth DATE NOT NULL
)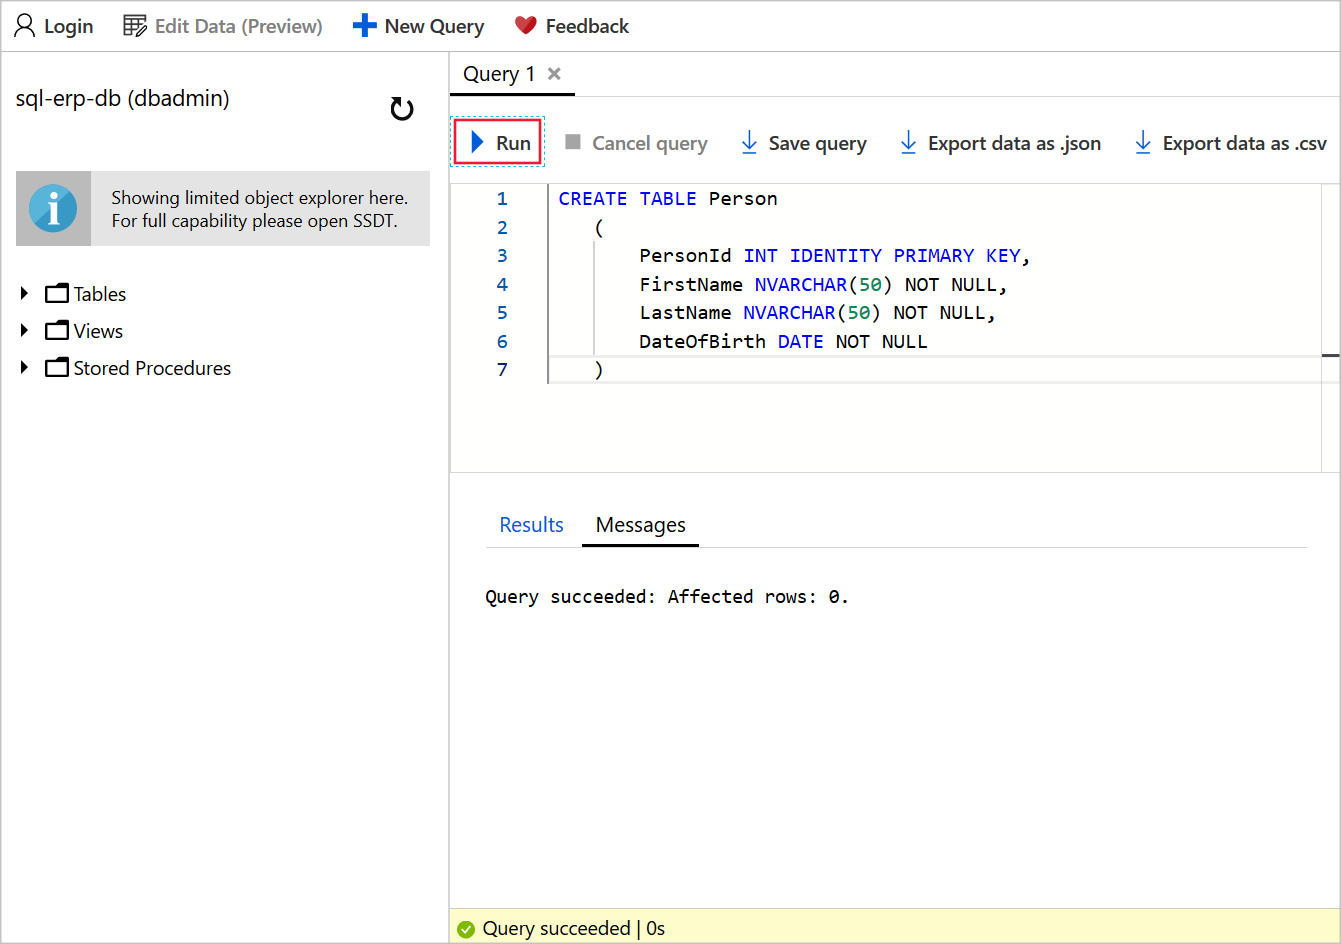
To add a record, in the top menu bar, select New Query. In the Query 2 window, enter the following SQL command, and select Run.
INSERT INTO PERSON (FirstName, LastName, DateOfBirth)
VALUES ('Lucas', 'Ball', '1987-11-03');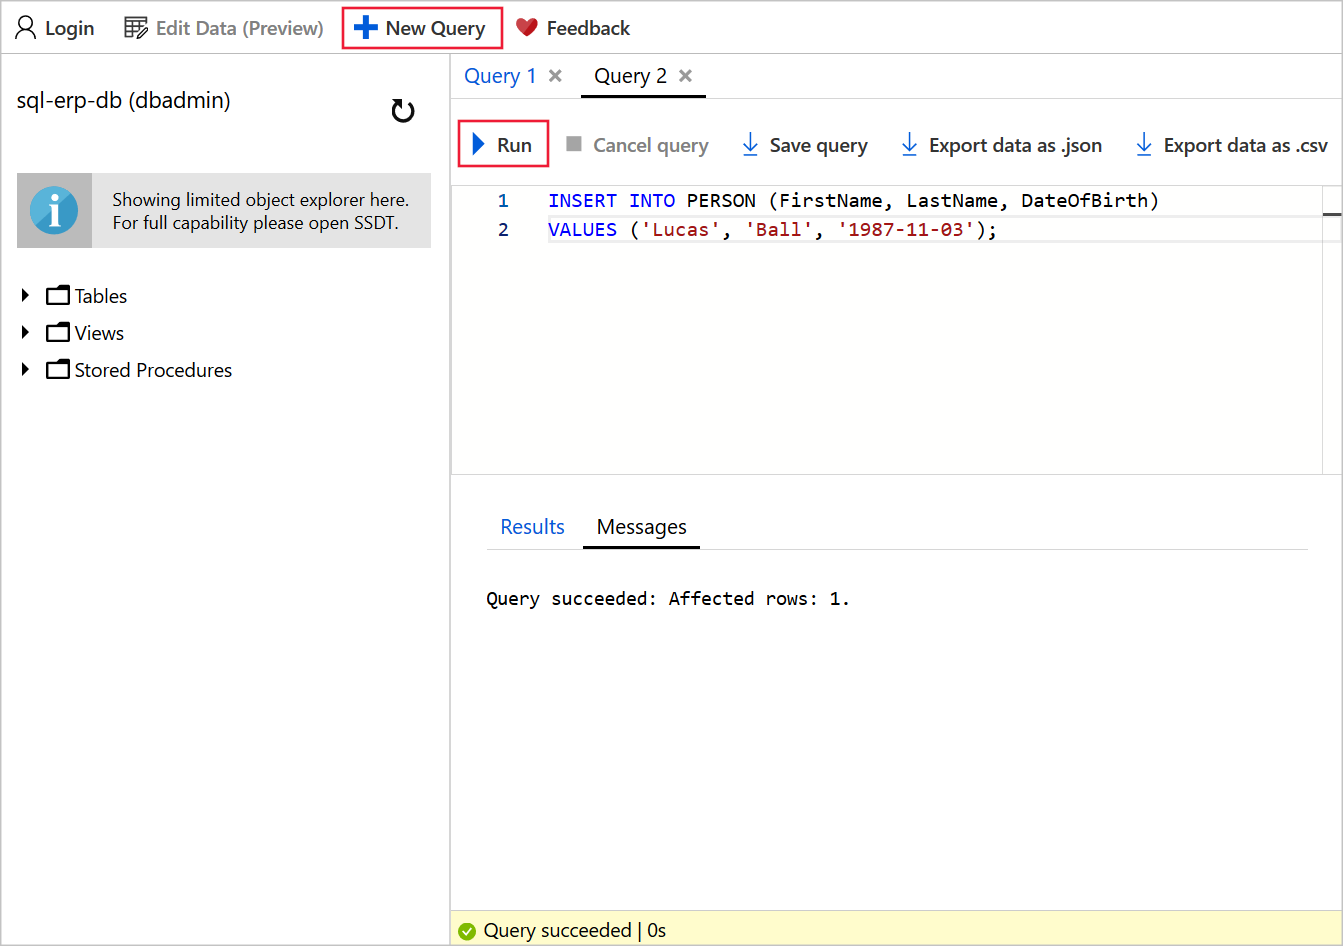
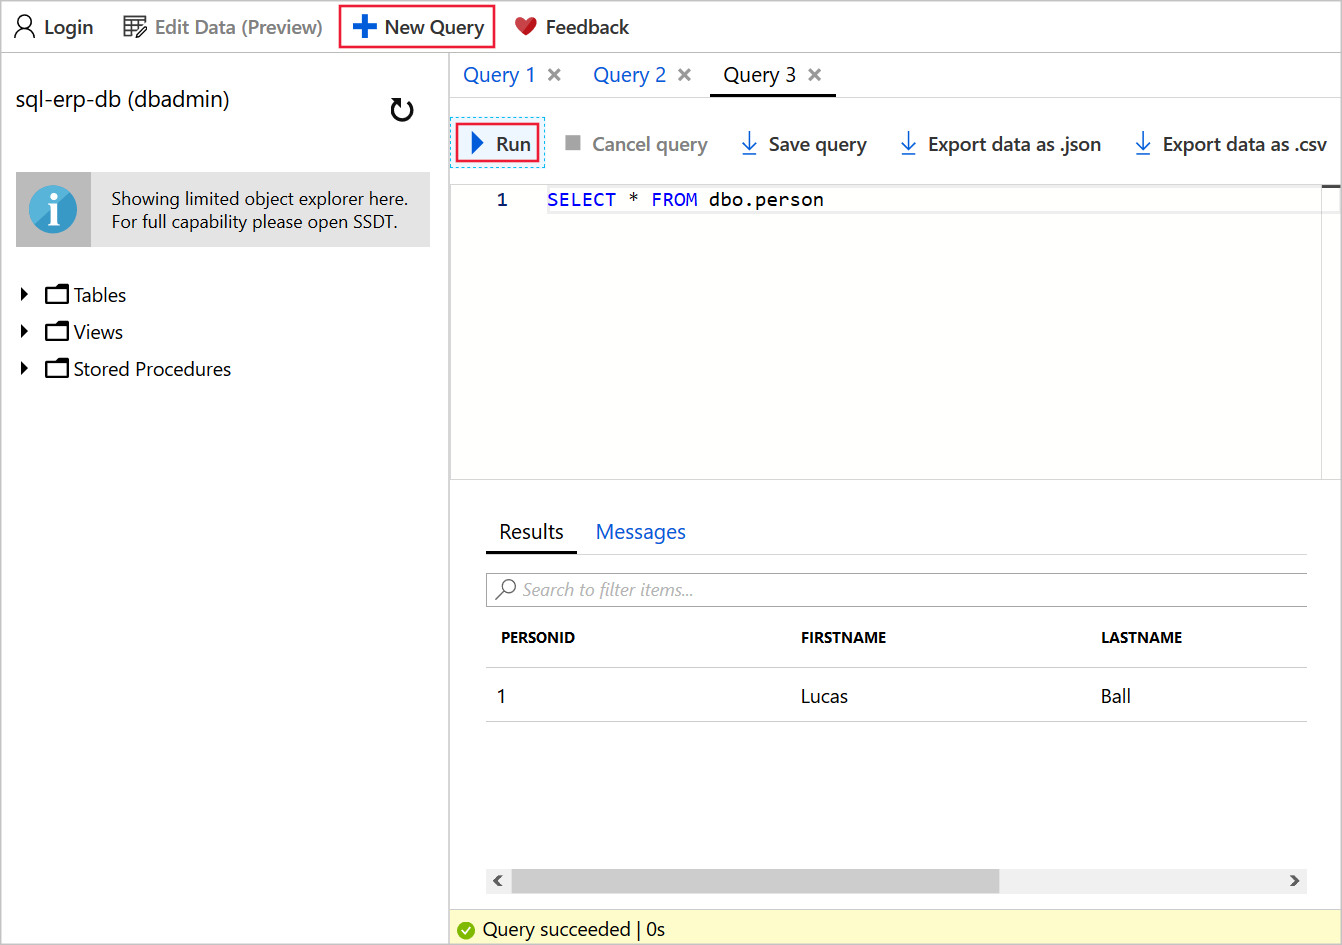
To query the database, select New Query. In the Query 3 window, enter the following SQL command, and select Run.
SELECT * FROM dbo.PersonThe Results window displays the record for Lucas Ball.
You now have an Azure SQL database populated with data, and you've set up a retention policy to ensure that you have four weeks of backups immediately available for restore.