Exercise - Create a to-do list
In this exercise, you use everything you learned so far to add a basic to-do list page to your Blazor app.
Create the to-do list page
Create a new Blazor Web App project.
Add a Todo.razor file to the Components/Pages folder
In Visual Studio and Visual Studio Code you can add the Razor file by right-clicking the Components/Pages folder in the Solution Explorer and selecting the appropriate option to add a new file.
You can also create the Razor file using the .NET CLI with this command:
dotnet new razorcomponent -n Todo -o Components/PagesThe
-n|--nameoption in the preceding command specifies the name of the new Razor component. The new component is created in the project'sComponents/Pagesfolder with the-o|--outputoption.Important
Razor component file names should have a capitalized first letter so they can easily be distinguished from other HTML elements.
Open the
Todocomponent and add an@pageRazor directive to the top of the file with a relative URL of/todo, and set the render mode toInteractiveServerso the component can handle UI events.@page "/todo" @rendermode InteractiveServer <h3>Todo</h3> @code { }Apply the changes to the app and try browsing to "/todo" to see your new page.
Add the to-do page to the nav menu
The new to-do list page doesn't yet appear in the nav menu with the other existing pages. The nav menu is defined in the NavMenu component, which is part of the app's layout. Let's update the NavMenu component to add a link to the to-do list page.
Open Components/Layout/NavMenu.razor.
Find the
navelement in theNavMenucomponent and add the followingdivelement below the existing nav item for the weather page.<div class="nav-item px-3"> <NavLink class="nav-link" href="todo"> <span class="bi bi-list-nested-nav-menu" aria-hidden="true"></span> Todo </NavLink> </div>The
NavLinkcomponent is a built-in Blazor component that renders an anchor tag. If the current browser address matches thehreffor theNavLink, it also renders anactiveCSS class that you can use for styling the link.After applying this change, you should now see the Todo page show up in the nav menu.
Build a list of to-do items
Create a new
TodoItem.csfile at the root of the project (the same level asProgram.cs) and add the following C# class to it.public class TodoItem { public string? Title { get; set; } public bool IsDone { get; set; } = false; }In Todo.razor add a field for the list of to-do items in the
@codeblock.@code { private List<TodoItem> todos = new(); }Render an unordered list of all the to-dos using a
foreachloop.<ul> @foreach (var todo in todos) { <li>@todo.Title</li> } </ul>You don't see anything rendered for the to-do list yet, because the list is empty. You need a way to add some to-do items.
Add to-do items
Let's add some UI elements for adding to-do items to our list.
In Todo.razor add an
inputtag and abuttonbelow the unordered list.<input /> <button>Add todo</button>Create a
newTodostring field and bind it to theinputusing the@binddirective attribute.<input @bind="newTodo" /> <button>Add todo</button> @code { private List<TodoItem> todos = new(); string newTodo = ""; }Add a
@onclickhandler to thebuttonthat adds a newTodoItemto thetodoslist based on the value ofnewTodoand then resets the value ofnewTodoto an empty string.<input @bind="newTodo" /> <button @onclick="AddTodo">Add todo</button> @code { private List<TodoItem> todos = new(); string newTodo = ""; void AddTodo() { if (!string.IsNullOrWhiteSpace(newTodo)) { todos.Add(new TodoItem { Title = newTodo }); newTodo = string.Empty; } } }Check that you can now add to-do items and they show up in the list. The
inputvalue should also reset after adding each to-do item.
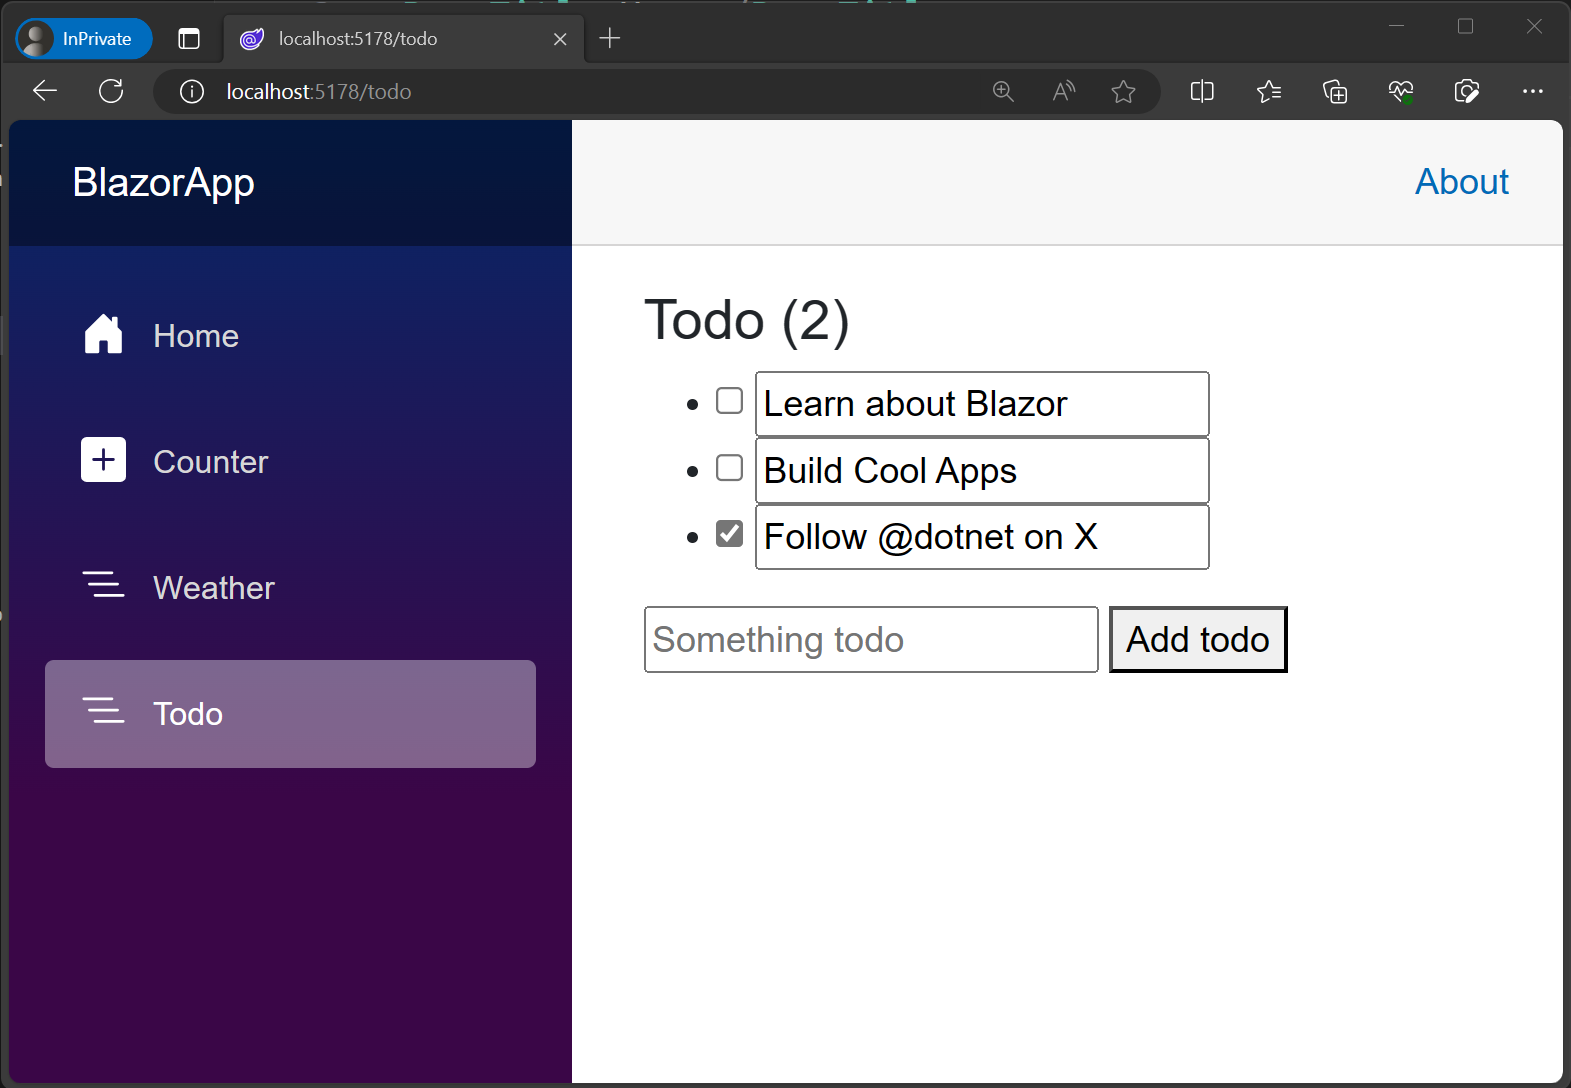
Add checkboxes and count incomplete to-do items
You need a way to mark to-do items as completed, to edit existing to-do items, and to count how many to-do items are yet to be done.
Update the contents of the
lielement to render aninputof typecheckboxthat is bound totodo.IsDoneand a textinputthat is bound totodo.Title.<ul> @foreach (var todo in todos) { <li> <input type="checkbox" @bind="todo.IsDone" /> <input @bind="todo.Title" /> </li> } </ul>Update the
<h3>header to show a count of the number of todo items that aren't complete (IsDoneisfalse).<h3>Todo (@todos.Count(todo => !todo.IsDone))</h3>After applying the changes to the app, try adding items, editing items, and marking todo items done to test the component.
Your Blazor to-do list is now done ✅.