Exercise - Add a Bicep deployment action to the workflow
You've created a basic workflow, and you've configured your Azure and GitHub environments to connect. Now, you're ready to deploy your website's Bicep file to Azure from your workflow.
In this exercise, you'll:
- Add a Bicep file to your repository.
- Add a workflow step to download your repository source code to the runner's file system.
- Add a workflow step to sign in to Azure.
- Add a workflow step to deploy your Bicep file.
- Run your workflow again and verify that it successfully deployed your website.
Add your website's Bicep file to the GitHub repository
You've already prepared your website's Bicep file, which you can use to deploy different configurations of the website resources depending on the environment and configuration. Here, you'll add your Bicep file to your repository.
Open the Visual Studio Code Explorer.
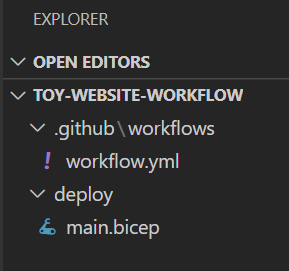
At the root of your repository, create a deploy folder.
In the deploy folder, create a new file named main.bicep. Make sure you create the file inside the deploy folder:
Copy the following code into the main.bicep file:
@description('The Azure region into which the resources should be deployed.')
param location string = resourceGroup().location

@description('The type of environment. This must be nonprod or prod.')
@allowed([
  'nonprod'
  'prod'
])
param environmentType string

@description('A unique suffix to add to resource names that need to be globally unique.')
@maxLength(13)
param resourceNameSuffix string = uniqueString(resourceGroup().id)

var appServiceAppName = 'toy-website-${resourceNameSuffix}'
var appServicePlanName = 'toy-website-plan'
var toyManualsStorageAccountName = 'toyweb${resourceNameSuffix}'

// Define the SKUs for each component based on the environment type.
var environmentConfigurationMap = {
  nonprod: {
    appServicePlan: {
      sku: {
        name: 'F1'
        capacity: 1
      }
    }
    toyManualsStorageAccount: {
      sku: {
        name: 'Standard_LRS'
      }
    }
  }
  prod: {
    appServicePlan: {
      sku: {
        name: 'S1'
        capacity: 2
      }
    }
    toyManualsStorageAccount: {
      sku: {
        name: 'Standard_ZRS'
      }
    }
  }
}

var toyManualsStorageAccountConnectionString = 'DefaultEndpointsProtocol=https;AccountName=${toyManualsStorageAccount.name};EndpointSuffix=${environment().suffixes.storage};AccountKey=${toyManualsStorageAccount.listKeys().keys[0].value}'

resource appServicePlan 'Microsoft.Web/serverfarms@2022-03-01' = {
  name: appServicePlanName
  location: location
  sku: environmentConfigurationMap[environmentType].appServicePlan.sku
}

resource appServiceApp 'Microsoft.Web/sites@2022-03-01' = {
  name: appServiceAppName
  location: location
  properties: {
    serverFarmId: appServicePlan.id
    httpsOnly: true
    siteConfig: {
      appSettings: [
        {
          name: 'ToyManualsStorageAccountConnectionString'
          value: toyManualsStorageAccountConnectionString
        }
      ]
    }
  }
}

resource toyManualsStorageAccount 'Microsoft.Storage/storageAccounts@2022-09-01' = {
  name: toyManualsStorageAccountName
  location: location
  kind: 'StorageV2'
  sku: environmentConfigurationMap[environmentType].toyManualsStorageAccount.sku
}
Save your changes to the file.
In the Visual Studio Code terminal, run this code to stage the changes, commit the changes, and push the changes to your repository:
git add deploy/main.bicep
git commit -m 'Add Bicep file'
git push
Replace the workflow steps
Next, update your workflow definition to deploy your Bicep file to Azure.
In Visual Studio Code, open the .github/workflows/workflow.yml file.
At the top of the file, between
on:andjobs:, add apermissions:section.name: deploy-toy-website on: [workflow_dispatch] permissions: id-token: write contents: read jobs:This change allows the workflow to use a workload identity.
Rename the
say-hellojob todeploy:jobs: deploy: runs-on: ubuntu-latest steps:To remove the
placeholderstep from the workflow definition, delete the bottom two lines of the file.As a first step you'll add a task to check out the code to the runner's file system. Add a new step at the bottom of the file:
jobs: deploy: runs-on: ubuntu-latest steps: - uses: actions/checkout@v3Note
It's a good idea to type this code yourself instead of copying and pasting it from this module. Pay attention to the file's indentation. If your indentation isn't correct, your YAML file won't be valid. Visual Studio Code indicates errors by displaying squiggly lines.
Below the step that you just added, add a task to sign in to your Azure environment. This task uses the secrets you defined earlier to sign in by using a workload identity:
jobs: deploy: runs-on: ubuntu-latest steps: - uses: actions/checkout@v3 - uses: azure/login@v1 with: client-id: ${{ secrets.AZURE_CLIENT_ID }} tenant-id: ${{ secrets.AZURE_TENANT_ID }} subscription-id: ${{ secrets.AZURE_SUBSCRIPTION_ID }}Below the step that you just added, add another step to perform the Bicep deployment:
jobs: deploy: runs-on: ubuntu-latest steps: - uses: actions/checkout@v3 - uses: azure/login@v1 with: client-id: ${{ secrets.AZURE_CLIENT_ID }} tenant-id: ${{ secrets.AZURE_TENANT_ID }} subscription-id: ${{ secrets.AZURE_SUBSCRIPTION_ID }} - uses: azure/arm-deploy@v1 with: deploymentName: ${{ github.run_number }} resourceGroupName: ${{ env.AZURE_RESOURCEGROUP_NAME }} template: ./deploy/main.bicep parameters: environmentType=${{ env.ENVIRONMENT }}Notice that this task uses the
github.run_numberdefault environment variable to name the deployment in Azure. It also uses environment variables for the resource group name and for theenvironmentTypeparameter in the Bicep file.Add these variables and their values at the top of your workflow file, between
permissions:andjobs:name: deploy-toy-website on: [workflow_dispatch] permissions: id-token: write contents: read env: AZURE_RESOURCEGROUP_NAME: ToyWebsite ENVIRONMENT: nonprod jobs:Save your changes to the file. Your file should look like this example:
name: deploy-toy-website on: [workflow_dispatch] permissions: id-token: write contents: read env: AZURE_RESOURCEGROUP_NAME: ToyWebsite ENVIRONMENT: nonprod jobs: deploy: runs-on: ubuntu-latest steps: - uses: actions/checkout@v3 - uses: azure/login@v1 with: client-id: ${{ secrets.AZURE_CLIENT_ID }} tenant-id: ${{ secrets.AZURE_TENANT_ID }} subscription-id: ${{ secrets.AZURE_SUBSCRIPTION_ID }} - uses: azure/arm-deploy@v1 with: deploymentName: ${{ github.run_number }} resourceGroupName: ${{ env.AZURE_RESOURCEGROUP_NAME }} template: ./deploy/main.bicep parameters: environmentType=${{ env.ENVIRONMENT }}In the Visual Studio Code terminal, stage your changes, commit them to your repository, and push them to Azure Repos:
git add .
git commit -m 'Add Azure CLI tasks to workflow'
git push
Run your workflow
Now, you're ready to run your workflow!
In your browser, open the workflow by selecting Actions > deploy-toy-website.
Select Run workflow > Run workflow.
A new run of your workflow will appear in the runs list. If it doesn't appear, refresh your browser page.
Select the running workflow to view the details of the run.
Wait for the run to finish.
Select the deploy job.
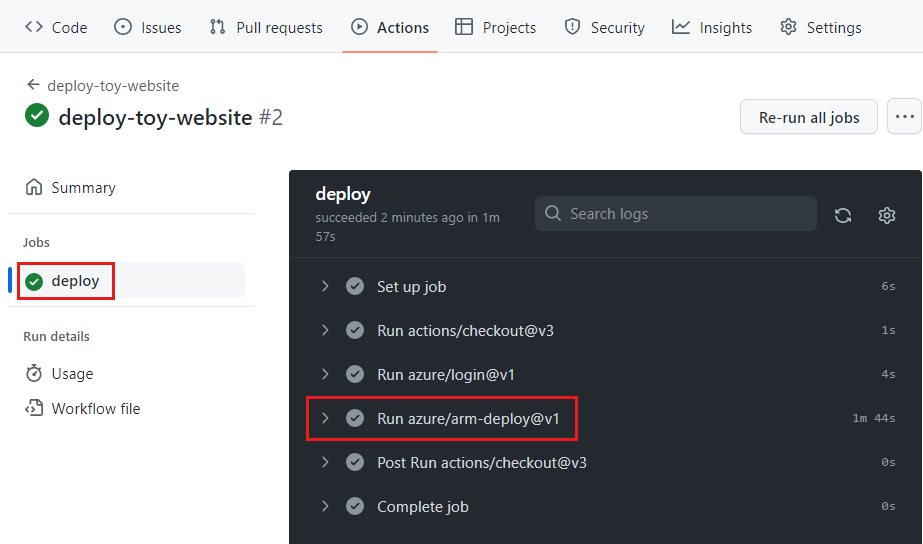
Select Run azure/arm-deploy@v1. This displays the task details.
Select Run azure/arm-deploy@v1 in the task details.
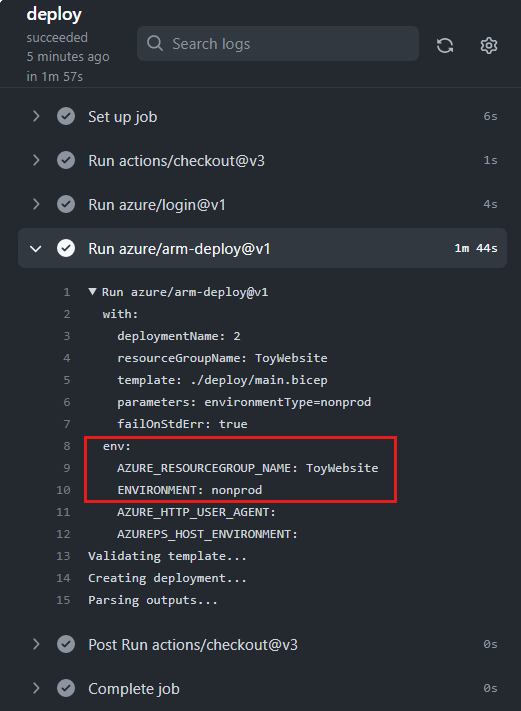
Notice that this step uses the environment variables you added to the workflow file.
Inspect the rest of your workflow output.
The workflow shows a successful deployment.
Verify the deployment
Go to the Azure portal.
In the left menu, select Resource groups.
Select ToyWebsite.
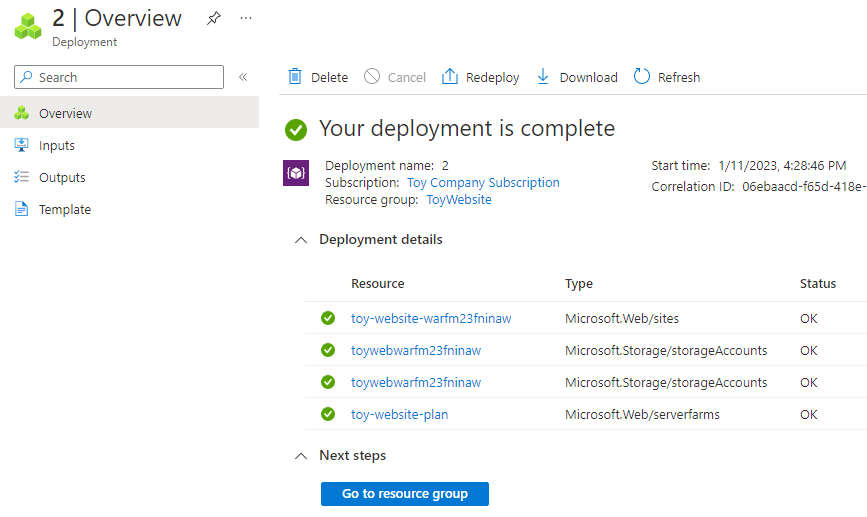
In Overview, view the deployment status. You can see that one deployment succeeded.
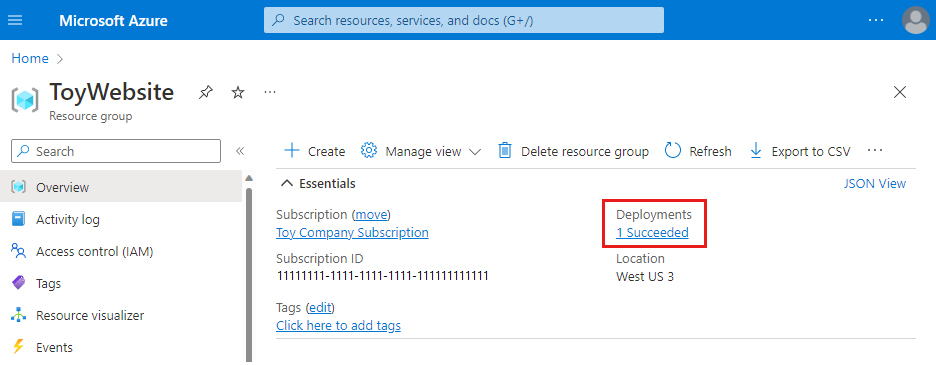
Select the 1 Succeeded link to see the details of the deployment.
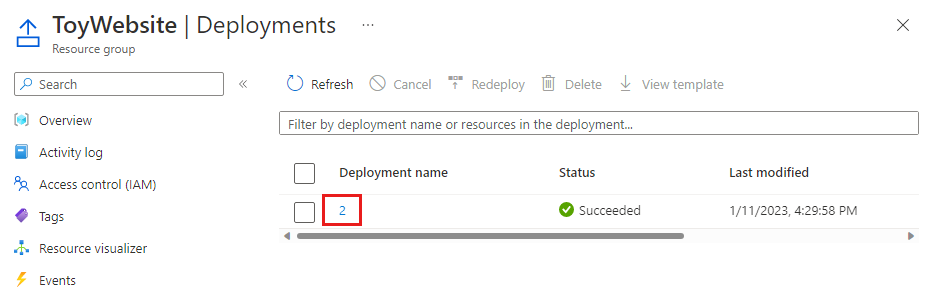
Notice that the name of the deployment matches the workflow's run number in GitHub Actions, because you used the
github.run_numberenvironment variable to name your deployment.To see which resources were deployed, select the deployment. To expand the deployment and see more details, select Deployment details. In this case, there's a storage account, an Azure App Service plan, and an app.