Exercise - Add parameters and variables to your Bicep template
In this exercise, you'll update the Bicep template you previously created so it:
- Accepts parameters for the resource locations and names.
- Uses your business rules to select the right SKUs for the resources being deployed.
During the process, you'll:
- Update the template to include a
locationparameter. - Update the template to include parameters and variables for the resource names.
- Use expressions to set default values for the parameters.
- Update the template to include variables for the SKU of each resource.
- Test the deployment to ensure that the template is valid.
Add the location and resource name parameters
In the main.bicep file in Visual Studio Code, add the following code to the top of the file:
param location string = 'eastus'
param storageAccountName string = 'toylaunch${uniqueString(resourceGroup().id)}'
param appServiceAppName string = 'toylaunch${uniqueString(resourceGroup().id)}'

var appServicePlanName = 'toy-product-launch-plan'
The Bicep linter adds yellow squiggly lines underneath each parameter and variable name to indicate they're not used in the template. You'll fix this issue soon.
Notice that you're using expressions that include string interpolation and the
uniqueString()function to define default parameter values. Someone deploying this template can override the default parameter values by specifying the values at deployment time, but they can't override the variable values.Also notice that you're using a variable for the Azure App Service plan name, but you're using parameters for the other names. Storage accounts and App Service apps need globally unique names, but App Service plan names need to be unique only within their resource group. This difference means it's not a concern to use the same App Service plan name across different deployments, as long as the deployments are all going into different resource groups.
Tip
You're specifying that the
locationparameter should be set towestus3. Normally, you would create resources in the same location as the resource group by using theresourceGroup().locationproperty. But when you work with the Microsoft Learn sandbox, you need to use certain Azure regions that don't match the resource group's location.Find the places within the resource definitions where the
locationandnameproperties are set, and update them to use the parameter values. After you're finished, the resource definitions within your Bicep file should look like this:resource storageAccount 'Microsoft.Storage/storageAccounts@2022-09-01' = { name: storageAccountName location: location sku: { name: 'Standard_LRS' } kind: 'StorageV2' properties: { accessTier: 'Hot' } } resource appServicePlan 'Microsoft.Web/serverFarms@2022-03-01' = { name: appServicePlanName location: location sku: { name: 'F1' } } resource appServiceApp 'Microsoft.Web/sites@2022-03-01' = { name: appServiceAppName location: location properties: { serverFarmId: appServicePlan.id httpsOnly: true } }Save the changes to the file.
Automatically set the SKUs for each environment type
In the main.bicep file in Visual Studio Code, add the following Bicep parameter below the parameters that you created in the previous task:
@allowed([
  'nonprod'
  'prod'
])
param environmentType string
Notice that you're defining a parameter with a set of allowed values, but you're not specifying a default value for this parameter.
Below the line that declares the
appServicePlanNamevariable, add the following variable definitions:var storageAccountSkuName = (environmentType == 'prod') ? 'Standard_GRS' : 'Standard_LRS' var appServicePlanSkuName = (environmentType == 'prod') ? 'P2v3' : 'F1'Notice that you're setting these variables values by using the ternary operator to express some
if/then/elselogic.Find the places within the resource definitions where the
skuproperties are set and update them to use the parameter values. After you're finished, the resource definitions in your Bicep file should look like this:resource storageAccount 'Microsoft.Storage/storageAccounts@2022-09-01' = { name: storageAccountName location: location sku: { name: storageAccountSkuName } kind: 'StorageV2' properties: { accessTier: 'Hot' } } resource appServicePlan 'Microsoft.Web/serverFarms@2022-03-01' = { name: appServicePlanName location: location sku: { name: appServicePlanSkuName } } resource appServiceApp 'Microsoft.Web/sites@2022-03-01' = { name: appServiceAppName location: location properties: { serverFarmId: appServicePlan.id httpsOnly: true } }Notice that you haven't parameterized everything. You've set some properties right in the resource definitions, where you know these values aren't going to change between deployments.
Save the changes to the file.
Verify your Bicep file
After you've completed all of the preceding changes, your main.bicep file should look like this example:
param location string = 'eastus'
param storageAccountName string = 'toylaunch${uniqueString(resourceGroup().id)}'
param appServiceAppName string = 'toylaunch${uniqueString(resourceGroup().id)}'
@allowed([
'nonprod'
'prod'
])
param environmentType string
var appServicePlanName = 'toy-product-launch-plan'
var storageAccountSkuName = (environmentType == 'prod') ? 'Standard_GRS' : 'Standard_LRS'
var appServicePlanSkuName = (environmentType == 'prod') ? 'P2v3' : 'F1'
resource storageAccount 'Microsoft.Storage/storageAccounts@2022-09-01' = {
  name: storageAccountName
  location: location
  sku: {
    name: storageAccountSkuName
  }
  kind: 'StorageV2'
  properties: {
    accessTier: 'Hot'
  }
}

resource appServicePlan 'Microsoft.Web/serverFarms@2022-03-01' = {
  name: appServicePlanName
  location: location
  sku: {
    name: appServicePlanSkuName
  }
}

resource appServiceApp 'Microsoft.Web/sites@2022-03-01' = {
  name: appServiceAppName
  location: location
  properties: {
    serverFarmId: appServicePlan.id
    httpsOnly: true
  }
}
If your file doesn't match, copy the example or adjust your file to match the example.
Deploy the updated Bicep template
Run the following Azure CLI command in the terminal.
az deployment group create \
  --template-file main.bicep \
  --parameters environmentType=nonprod
Run the following Azure PowerShell command in the terminal.
New-AzResourceGroupDeployment `
  -TemplateFile main.bicep `
  -environmentType nonprod
Notice that you're explicitly specifying the value for the environmentType parameter when you execute the deployment. You don't need to specify the other parameter values, because they have valid default values.
Check your deployment
In your browser, go back to the Azure portal and go to your resource group. You'll still see one successful deployment, because the deployment used the same name as the first deployment.
Select the 1 Succeeded link.
Select the deployment called main, and then select Deployment details to expand the list of deployed resources.
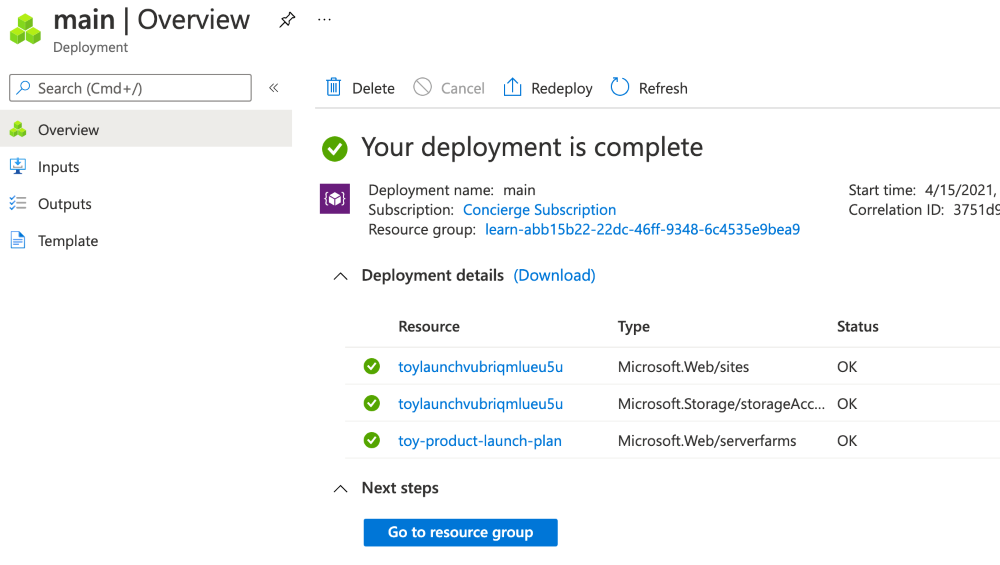
Notice that a new App Service app and storage account have been deployed with randomly generated names.