Control loop execution and nest loops
By using the powerful copy loops feature, you can create dynamic and flexible templates. It's important to understand how to control the way that loops execute when they create resources and how to use loops to set resource properties and nest loops.
In this unit, you'll learn how to control the execution of copy loops and how to use resource property loops and nested loops in Bicep.
Note
The commands in this unit are shown to illustrate concepts. Don't run the commands yet. You'll practice what you learn here soon.
Control loop execution
By default, Azure Resource Manager creates resources from loops in parallel and in a non-deterministic order. When you created loops in the previous exercises, both of the Azure SQL logical servers were created at the same time. This helps to reduce the overall deployment time, because all of the resources within the loop are deployed at once.
In some cases, however, you might need to deploy resources in loops sequentially instead of in parallel, or deploy small batches of changes together in parallel. For example, if you have lots of Azure App Service apps in your production environment, you might want to deploy changes to only a small number at a time to prevent the updates from restarting all of them at the same time.
You can control the way your copy loops run in Bicep by using the @batchSize decorator. Put the decorator on the resource or module declaration with the for keyword.
Let's look at an example Bicep definition for a set of App Service applications without the @batchSize decorator:
resource appServiceApp 'Microsoft.Web/sites@2021-03-01' = [for i in range(1,3): {
  name: 'app${i}'
  // ...
}]
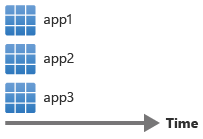
All the resources in this loop will be deployed at the same time, in parallel:
Now let's apply the @batchSize decorator with a value of 2:
@batchSize(2)
resource appServiceApp 'Microsoft.Web/sites@2021-03-01' = [for i in range(1,3): {
  name: 'app${i}'
  // ...
}]
When you deploy the template, Bicep will deploy in batches of two:
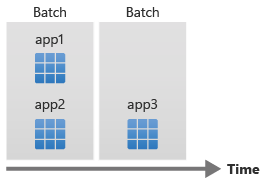
Note
Bicep waits for each complete batch to finish before it moves on to the next. In the preceding example, if app2 finishes its deployment before app1, Bicep waits until app1 finishes before it starts to deploy app3.
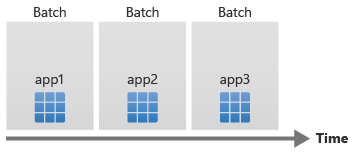
You can also tell Bicep to run the loop sequentially by setting the @batchSize to 1:
@batchSize(1)
resource appServiceApp 'Microsoft.Web/sites@2021-03-01' = [for i in range(1,3): {
  name: 'app${i}'
  // ...
}]
When you deploy the template, Bicep waits for each resource deployment to finish before it starts the next one:
Use loops with resource properties
You can use loops to help set resource properties. For example, when you deploy a virtual network, you need to specify its subnets. A subnet has to have two pieces of important information: a name and an address prefix. You can use a parameter with an array of objects so that you can specify different subnets for each environment:
param subnetNames array = [
  'api'
  'worker'
]

resource virtualNetwork 'Microsoft.Network/virtualNetworks@2021-08-01' = {
  name: 'teddybear'
  location: resourceGroup().location
  properties: {
    addressSpace: {
      addressPrefixes: [
        '10.0.0.0/16'
      ]
    }
    subnets: [for (subnetName, i) in subnetNames: {
      name: subnetName
      properties: {
        addressPrefix: '10.0.${i}.0/24'
      }
    }]
  }
}
In this example, notice that the for loop appears within the resource definition, around the subnets property value.
Nested loops
Some scenarios require you to use a loop inside another loop, or a nested loop. You can create nested loops by using Bicep.
For your teddy bear toy company, you need to deploy virtual networks in every country/region where the toy will be launched. Every virtual network needs a different address space and two subnets. Let's start by deploying the virtual networks in a loop:
param locations array = [
  'westeurope'
  'eastus2'
  'eastasia'
]

var subnetCount = 2

resource virtualNetworks 'Microsoft.Network/virtualNetworks@2021-08-01' = [for (location, i) in locations : {
  name: 'vnet-${location}'
  location: location
  properties: {
    addressSpace:{
      addressPrefixes:[
        '10.${i}.0.0/16'
      ]
    }
  }
}]
This loop deploys the virtual networks for each location, and it sets the addressPrefix for the virtual network by using the loop index to ensure each virtual network gets a different address prefix.
You can use a nested loop to deploy the subnets within each virtual network:
resource virtualNetworks 'Microsoft.Network/virtualNetworks@2021-08-01' = [for (location, i) in locations : {
  name: 'vnet-${location}'
  location: location
  properties: {
    addressSpace:{
      addressPrefixes:[
        '10.${i}.0.0/16'
      ]
    }
    subnets: [for j in range(1, subnetCount): {
      name: 'subnet-${j}'
      properties: {
        addressPrefix: '10.${i}.${j}.0/24'
      }
    }]
  }
}]
The nested loop uses the range() function to create two subnets.
When you deploy the template, you get the following virtual networks and subnets:
| Virtual network name | Location | Address prefix | Subnets |
|---|---|---|---|
vnet-westeurope |
westeurope |
10.0.0.0/16 |
10.0.1.0/24, 10.0.2.0/24 |
vnet-eastus2 |
eastus2 |
10.1.0.0/16 |
10.1.1.0/24, 10.1.2.0/24 |
vnet-eastasia |
eastasia |
10.2.0.0/16 |
10.2.1.0/24, 10.2.2.0/24 |