Exercise - Customize your cloud adoption plan
In this exercise, you'll pull in data from the prior assessment step to populate the templated cloud-adoption plan. That data-driven plan will help manage the work related to migration and deployment of new, innovative workloads.
Customize your cloud adoption plan
It's tempting to build a plan that accounts for all workloads and every asset needed in the cloud. If your team doesn't have well-established processes for cloud adoption and extensive experience with your chosen cloud provider, such a plan might create false perceptions and inject unnecessary risk.
Instead, customize and test your plan by using a small set of well-defined workloads to create your first wave of cloud adoption. In this unit, we'll walk through how Tailwind Traders builds out its first adoption plan. The company uses the following steps:
- Add the first wave of workloads
- Associate dependent assets with each workload
- Prioritize workloads
- Evaluate migration tasks as a team
- Estimate tasks and attempt to complete them in the estimated time
- Test the deployed workloads
- Refine processes and estimates
- Apply the initial learning to a more comprehensive adoption plan
Open your cloud adoption plan template
In the first unit of this module, you created a backlog in Azure DevOps by using the cloud-adoption plan template. The last step of that unit suggested saving the URL to that project plan's Epic hierarchy view. Use that link (or the steps from the first unit) to open your backlog or project plan that template created.
Add workloads
Now, we'll add some workloads to the project plan. At the end of the last unit, we identified a series of workloads from the Tailwind Traders' digital estate. When you're building actual plans, you might target ten workloads for your first migration, but for brevity, you'll only target the six workloads we identified in the last unit.
Note
The virtual-desktop and backup-solution workloads might be considered technology platforms rather than workloads. However, during migration, that distinction has little bearing on how the collection of assets is deployed to the cloud.
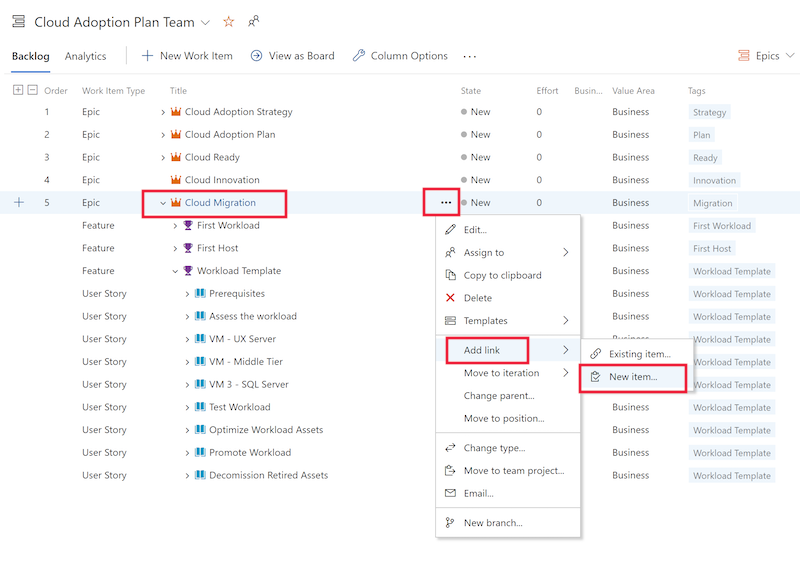
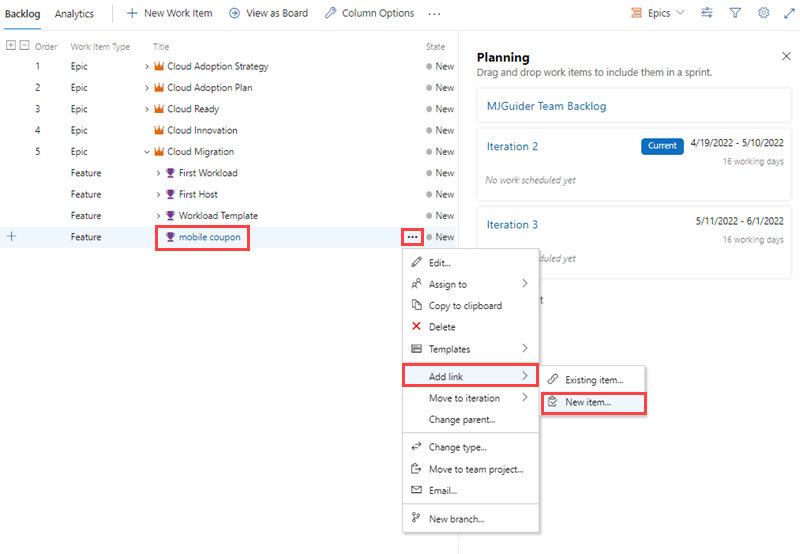
Open the form to add a workload: Expand the Cloud Migration epic in your backlog to see all workloads slated for migration. Select the ellipsis to the right of the Cloud Migration epic to see the menu. In the pop-up menu, hover over Add link, and then select New item.
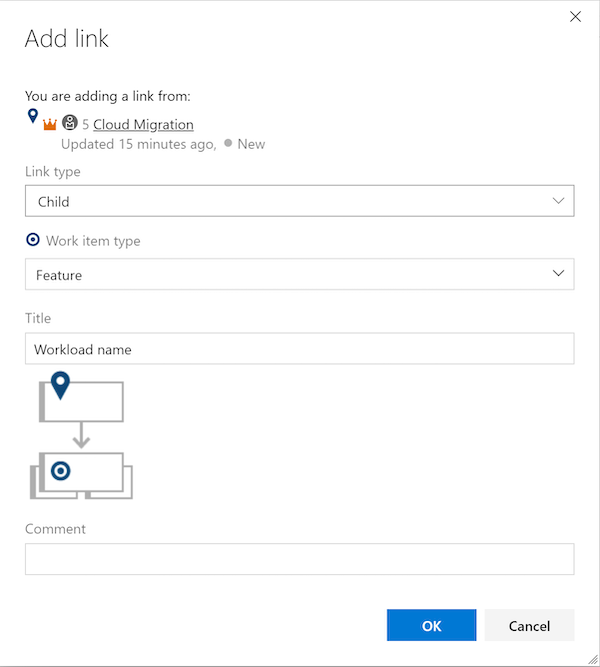
Add a new workload in the plan: The first form asks for some basic data to add this workload to your plan. The questions are in Azure DevOps terms, not workload terms. Add all workloads to be migrated to the backlog as child elements of the cloud migration Epic. All workloads are entered as features, given the amount of work required to migrate all of the dependent assets supporting a workload. Enter the workload name to complete this form. For this exercise, select Child as the Link type, select Feature as the Work item type, enter mobile coupon as the title of your first workload, then select OK at the bottom of the form.
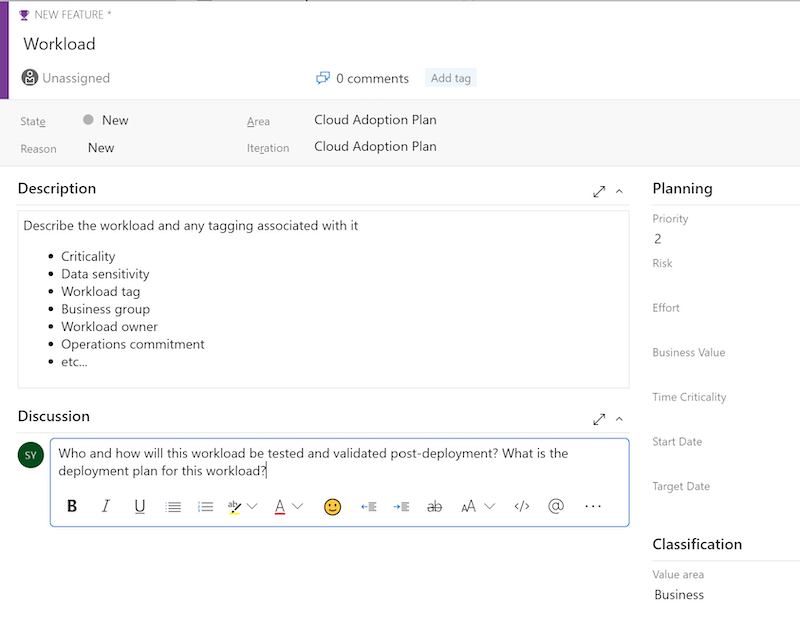
Enter workload data: For these first few workloads, focus on the minimum amount of data that you believe the migration team will need to complete a migration through to production. The workload name should carry over from the prior form. Fill in the Description box with critical information that should be tagged for all assets associated with this workload, such as criticality, data sensitivity, workload tag, business group, workload owner, operations commitment, or other information that should persist throughout the workload's lifecycle. To establish best practices from the beginning, start your first discussion in this form by outlining the testing requirements that would validate this workload's successful migration. Select Save and close to save the workload information.
Repeat these steps for each of the workloads in your first migration wave. For this exercise, create features in the plan to represent each of the six Tailwind Traders workloads: mobile coupon, video shelf, remote store POS, employee scheduling, virtual desktop, and backup solution.
Add assets
Each of the inventoried assets required to support a workload needs to be added to the plan to manage the actual work. The following process shows how to add each asset under the corresponding workload.
Note
For simplicity, we'll number each asset instead of providing names for each. In real-world projects, you'd record the name and other metadata aspects to guide the technical efforts.
Open the form to add a new asset: Expand the Mobile Coupon feature in your backlog. Select the ellipsis to the right of Mobile Coupon to see the menu. In the pop-up menu, hover on Add link and select New item.
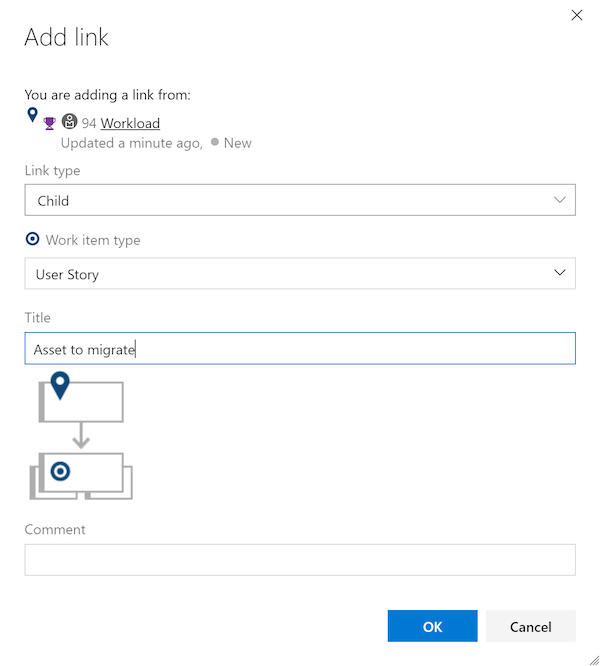
Add a new asset in the plan: Similar to the process for adding a new workload, the first form asks for some basic data to add this asset to your plan. You should add all assets to be migrated to the backlog as child elements of the relevant workload feature. All assets are entered as user stories, because the migration of that asset is a discrete and measurable outcome based on a series of tasks. Enter the asset name to complete this form. For this exercise, select Child for the Link type, select User story for the Work item type, and enter Asset #1 as the title of your first asset. Select OK at the bottom of the form.
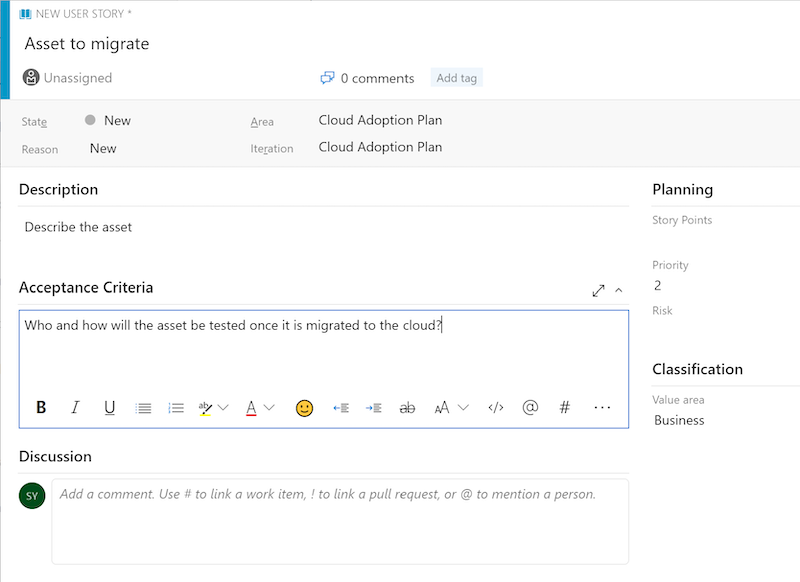
Enter asset data: The asset name should carry over from the prior form. Fill in the Description box with critical information about this asset, such as asset type (VM, data, or application), current network segmentation, known dependencies, asset specific tags, or other information that can help with migration of the asset. To establish best practices from the beginning, start thinking about acceptance criteria. Use the Acceptance criteria box to fill in details about how and by whom this asset will be tested after it's deployed to the cloud. Select Save & Close to save the asset information.
Prioritize workloads
In your backlog's Epic hierarchy view, you can drag workloads up and down on the list to reflect linear priority and start to establish a sequence of workloads to migrate.
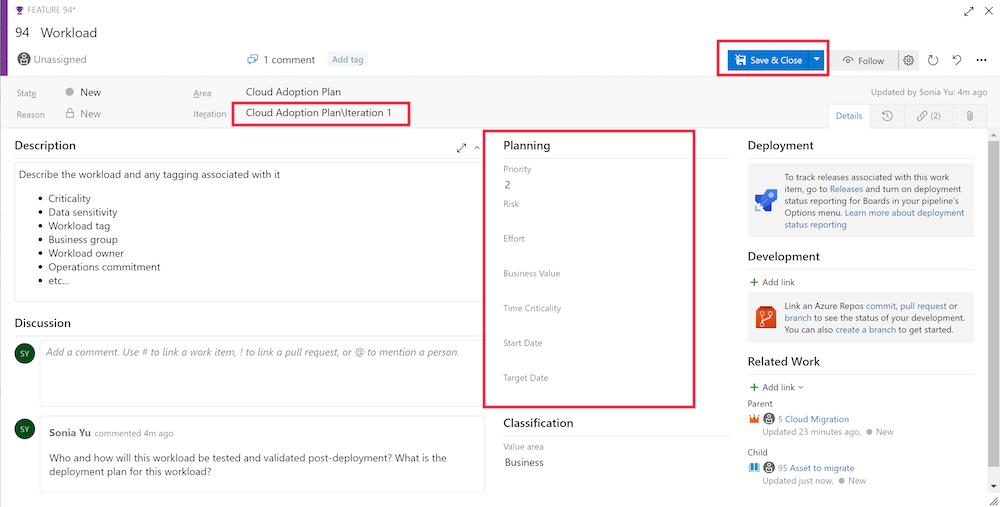
As the number of workloads in your plan grows, this approach might not be robust enough to provide necessary clarity. Select any workload to open the work-item editing form you used to add this initial workload. In the form's Planning section, you can use the fields for priority, risk, business value, or time criticality to denote a more lasting value for prioritization.
Most importantly, defining waves of workloads to migrate establishes priority for the work to be completed. On the same form, you can set an iteration for each workload by using the Iteration drop-down list.
If you use the form to set priority values, remember to select Save & Close when you're finished.
Evaluate migration tasks as a team
The cloud-adoption plan template deploys a sample workload template to show the various different efforts that a migration might require. Depending on the approach you choose to migrate, the tasks needed might vary.
Asset migration: At the core of any migration approach is a simple, two-step process that must be completed for each asset: assess compatibility and migrate the asset. Most teams also add basic processes to optimize sizing, configure security and management settings, and document that asset's configuration. You can repeat these tasks for all assets in the digital estate. The template includes links to instructions for completing each task.
Asset migration is fine for small-scale, tactical efforts, but that approach doesn't scale to meet the needs of sophisticated migrations or adoption efforts like the one Tailwind Traders needs to complete.
Workload migration: To scale these processes, a workload migration can be much more useful. In this approach, you can ignore the tasks associated with each asset in the template. Assets are migrated in bulk by using tools like Azure Migrate. You complete assessment, sizing, dependency, testing, and documentation once for each workload to reduce redundant tasks. As workloads are migrated, existing assets are also decommissioned to retire unused assets and reduce ongoing costs.
Workload migration is much more efficient, but might also hit scale points when the effort begins to focus on thousands of VMs.
Migration factory: For the highest scale and most repeatable option, you can build a migration factory as you and your team gain additional experience. The Cloud Adoption Framework's process improvements section provides a number of processes to consider.
Add tasks
After the team aligns on the tasks required to support your processes, you can begin adding those tasks to each workload and/or asset.
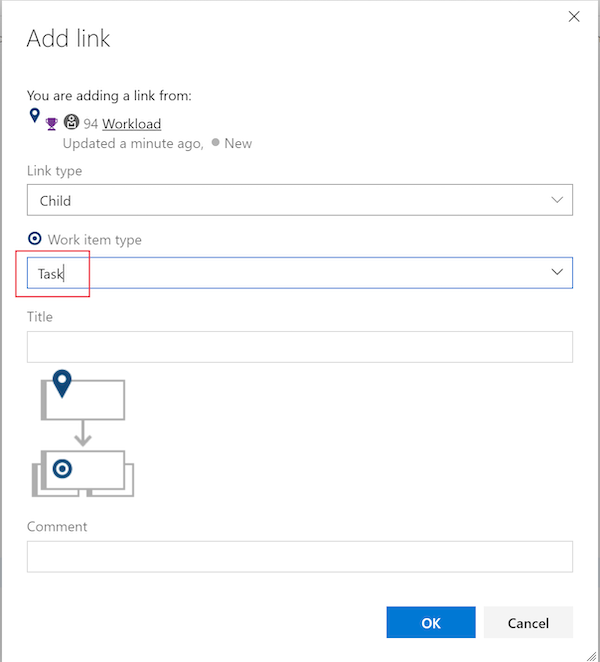
Similar to the preceding steps, here you'll select the ellipsis next to any workload or asset to add tasks. The only difference is that you choose Task from the Work item type drop-down list to track the assignments and work associated with this task.
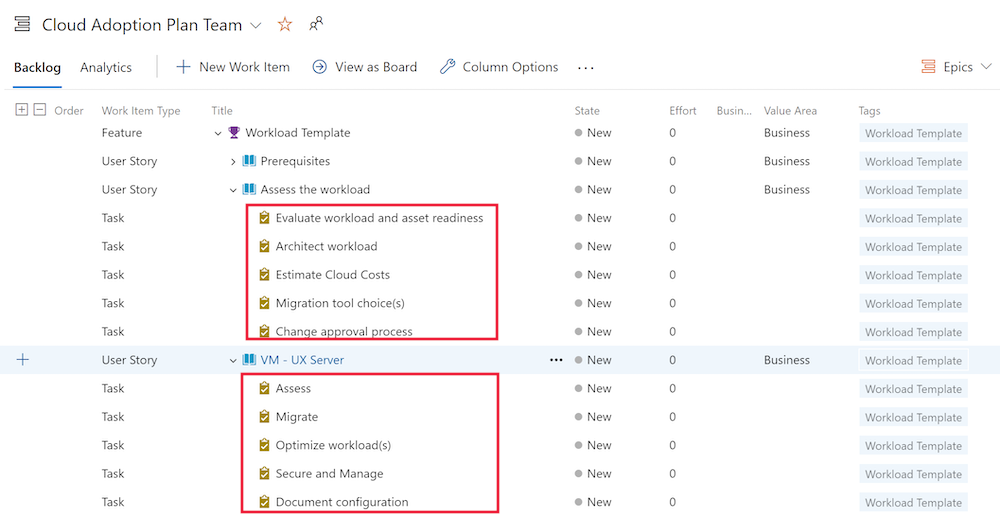
If you add tasks directly to a workload, you can also add user stories to group the work and help with assignments. The template provides examples of user stories to group work, as shown in the following image:
Estimate tasks and try to complete them in the estimated time
For each task the team agrees to include, come up with a time estimate required to complete the work. Enter the estimated time in the Original Estimate text box and select Save & Close.
Each day, meet with the team during the first iteration to capture work progress. Update the Remaining time and Completed time values in the meeting each day. This helps the team pay close attention to the difficulty of completing each task, and helps to refine estimates for the future. For the first few iterations, practice recording observations about the work being completed in the Discussion box to help retain any lessons learned.
Note
As the team progresses, some of the work they agreed to might appear unnecessary. For the sake of continued learning, try to ensure all tasks are completed during the iteration to validate those appearances, then adjust them in future iterations. Don't let an unnecessary task become a blocker to delivering on the user story or migration effort.
Test the deployment
As each asset is deployed, run a test to validate completion and adherence to initial design.
When the final asset for each workload is deployed, validate the architecture, performance, and sizing. Most importantly, perform a test of the workload with actual business users whenever possible.
Retrospective to refine processes and estimates
At the end of your first iteration, come together as a team to discuss what worked and what didn't. Also look at things the team wants to stop doing, keep doing, or do more.
Apply these simple considerations to the list of tasks to include in your next iteration. You can also use the time spent on tasks to inform new estimates from the team.
Apply your initial learning to a more comprehensive adoption plan
Repeat the steps in this article for your first three iterations to continue learning and refining processes. After a few iterations, the team should have an understanding of the tasks required, the time to require those tasks, and the overall processes that will lead to success across your digital transformation program.
In parallel to completing each iteration, the project manager should use assessment data from the prior unit to populate the richer plan, including the larger number of workloads and assets required.
As a general rule, project managers should try to load 10 workloads per iteration for the first few iterations. As you complete more retrospectives, it will become clearer how many workloads the team can complete in a two-week iteration. Some mature teams can migrate hundreds or even thousands of assets in a two-week sprint. However, testing and production release of the workloads those assets support will take more time.
During the first few weeks of initial iteration execution, the majority of your migration project should be able to be loaded, prioritized, assigned to iterations, and estimated. Usually, the accuracy of project duration and timelines stabilizes by the time the third iteration is complete.
Integrate your digital estate at scale
You can more quickly add workloads, assets, and tasks by using the Teams add-in for Microsoft Excel. The Next steps section in the next unit provides links to an article series that teaches you how to load a large number of workloads and assets by using the workload template provided in the initial cloud-adoption plan.
Partner engagement
Microsoft partners who provide the Cloud Adoption Framework approved offers can accelerate migration planning and execution, significantly reducing the amount of recurring work required by the organization. See the Cloud Adoption Framework partner offer site for offers from experienced partners.