Exercise - Collaborate by using a shared repo
Pulling directly from someone else's repository works, provided you're both on the same network. But, it's a clumsy process, and most collaborators aren't on the same network. It's better to set up a central repository that all collaborators can push to and pull from.
When you tell your developer friend Bob about your project and Bob asks to participate, that's exactly what you decide to do—set up a central repository, which is also called a bare repository.
Create a bare repository
What you need is a repository that doesn't have a working tree. A bare repository has several advantages over a working tree:
- Without a working tree, everybody can push changes without worrying about which branch is checked out.
- It's easy for Git to detect when another user has pushed changes that might conflict with yours.
- A shared repo scales to any number of developers. With a bare repo, you have to know only about the shared repo, and not about all the other collaborators from whom you might need to pull.
- By putting the shared repo on a server that you all can access, you don't have to worry about firewalls and permissions.
- You don't need separate accounts on the server because Git keeps track of who made each commit. (GitHub has millions of users who all share the
gitaccount. Everyone uses the Secure Shell (SSH) cryptographic network protocol, and users are distinguished by their public keys.)
Creating a bare repo for sharing is easy:
Create a new directory named Shared.git at the same level as the Alice and Cats directories to hold the bare repo:
cd ..
mkdir Shared.git
cd Shared.git
The directory name isn't important, but we'll refer to it as the Shared.git directory, or just the shared directory, in these exercises.
Naming the directory Shared.git follows the longstanding tradition of assigning bare repositories a name that ends in
.gitto distinguish them from working trees. It is a convention, but not a requirement.Now, use the following command to create a bare repo in the shared directory:
git init --bareWhen a repo is still bare, the
git checkoutcommand can't be used to set the name of the default branch. To accomplish this task, you can change theHEADbranch to point at a different branch; in this case, it's themainbranch:git symbolic-ref HEAD refs/heads/mainThe next step is to get the contents of your repo into the shared repo. Use these commands to return to the project directory where your repo is stored, set up an
originremote, and perform an initial push:cd ../Cats git remote add origin ../Shared.git git push origin mainCheck the output. The output should indicate success:
Counting objects: 12, done.
Delta compression using up to 2 threads.
Compressing objects: 100% (8/8), done.
Writing objects: 100% (12/12), 1.07 KiB | 0 bytes/s, done.
Total 12 (delta 1), reused 0 (delta 0)
To ../Shared.git
 * [new branch]      main -> main
You want
pushandpullto use themainbranch oforiginby default, as if you had made your repo by cloning it in the first place. But first, you need to tell Git which branch to track.git branch --set-upstream-to origin/mainCheck for this output:
Branch main set up to track remote branch main from origin.Git would complain if you try to run this command before the initial push, because the new repository had no branches. Git can't track a branch that doesn't exist. All Git is doing under the hood is looking in
.git/refs/remotes/originfor a file named trunk.
Set up for collaborators
The next step is for Bob to clone the bare repository, and then for Alice to set the origin in their repo to target the shared repo for pushes and pulls.
Create a directory named Bob that's a sibling of the project directory, and then change to the Bob directory:
cd ..
mkdir Bob
cd Bob
Now, clone the shared repo (be sure to include the period at the end of the command):
git clone ../Shared.git .Currently, Alice's repo is configured to push to and pull from their own repo. Use the following commands to change to the Alice directory and change
originto point to the shared repo:cd ../Alice git remote set-url origin ../Shared.git
Begin collaborating
Now that Bob is set up to work on the website, Bob decides to add a footer to the bottom of the page. Let's take on Bob and Alice's persona for a few moments and learn the basics of collaboration.
Begin by going to the Bob directory and working as Bob:
cd ../Bob
git config user.name Bob
git config user.email bob@contoso.com
Open index.html and replace the
<hr>element with this line (found at the end of the<body>element):<footer><hr>Copyright (c) 2021 Contoso Cats</footer>Then, save the file and close the editor.
Commit the changes and push to the remote origin:
git commit -a -m "Put a footer at the bottom of the page"
git push
Check the output. If you see a warning like the following example, don't worry. This warning just lets users know about a change to Git's default behaviors. If you'd like to make sure that you don't see this warning again, you can run
git config --global push.default simple.warning: push.default is unset; its implicit value has changed in Git 2.0 from 'matching' to 'simple'. To squelch this message and maintain the traditional behavior, use: git config --global push.default matching To squelch this message and adopt the new behavior now, use: git config --global push.default simple When push.default is set to 'matching', git will push local branches to the remote branches that already exist with the same name. Since Git 2.0, Git defaults to the more conservative 'simple' behavior, which only pushes the current branch to the corresponding remote branch that 'git pull' uses to update the current branch. See 'git help config' and search for 'push.default' for further information. (the 'simple' mode was introduced in Git 1.7.11. Use the similar mode 'current' instead of 'simple' if you sometimes use older versions of Git)While Bob is editing the site, Alice is, too. Alice decides to add a nav bar to the page. This addition requires Alice to modify two files: index.html and site.css. Begin by returning to the Alice directory:
cd ../AliceNow, open index.html and insert the following line right after the
<body>tag on line 8:<nav><a href="./index.html">home</a></nav>Then, save the file and close the editor.
Then, open site.css in the CSS folder and add the following line at the bottom:
nav { background-color: #C0D8DF; }Save the file and close the editor.
Now, let's assume that Alice receives an e-mail from Bob saying that Bob made changes to the site. Alice decides to pull Bob's changes before committing their own. (If Alice had already committed their changes, they would have a different problem, which is discussed in another module.) Alice runs this command:
git pullCheck the output. From the output, it looks as if Git has prevented a problem:
remote: Counting objects: 3, done.
remote: Compressing objects: 100% (3/3), done.
remote: Total 3 (delta 2), reused 0 (delta 0)
Unpacking objects: 100% (3/3), done.
From ../Shared
   843d142..2cf6cbf  main     -> origin/main
Updating 843d142..2cf6cbf
error: Your local changes to the following files would be overwritten by merge:
        index.html
Please commit your changes or stash them before you can merge.
Aborting
Git warns that the pull would overwrite Alice's version of index.html and lose their changes. That's because Bob modified index.html, too. If Alice hadn't changed index.html, Git would have committed the merge.
Use a
git diffcommand to see what changes Bob made to index.html:git diff origin -- index.htmlCheck the output. From the output, it's evident that Alice's changes and Bob's changes don't overlap. Now, Alice can stash their changes.
git stashsaves the state of the working tree and index by making a couple temporary commits. Think of the stash as a way to save your current work while you do something else, without making a "real" commit or affecting your repository history.In reality, Alice should have stashed or committed their changes before they tried to pull. Pulling to a "dirty" working tree is risky, because it can do things from which you can't easily recover.
Use the following command to stash Alice's changes:
git stashCheck the output. It should look like this example:
Saved working directory and index state WIP on main: 95bbc3b Change background color to light blue
HEAD is now at 95bbc3b Change background color to light blue
Now, it's safe for Alice to pull, after which they can "pop" the stash, which is organized as a stack. (In fact,
git stashis shorthand forgit stash push. It's a lot like the stack where you put bills that you haven't gotten around to paying yet.) Run these commands:git pull git stash popPopping the stash merges the changes. If changes overlap, there might be a conflict. You can learn how to resolve those situations in a more advanced Git module from Microsoft Learn.
Check the output. Alice should see this output, which lets them know that the merge was successful and that their changes are back, but not yet staged for commit:
Auto-merging index.html
On branch main
Your branch is up-to-date with 'origin/main'.
Changes not staged for commit:
  (use "git add <file>..." to update what will be committed)
  (use "git checkout -- <file>..." to discard changes in working directory)

        modified:   CSS/site.css
        modified:   index.html

no changes added to commit (use "git add" and/or "git commit -a")
Dropped refs/stash@{0} (0cfb7b75d56611d9fc6a6ab660a51f5582b8d9c5)
At this point, Alice can continue working or just commit and push their changes. Let's make another change as Alice by assigning footers the same style as nav bars.
Open site.css in the CSS folder and replace the third line—the one that styles
<nav>elements—with this shared CSS rule. Then, as usual, save your changes and close the editor.nav, footer { background-color: #C0D8DF; }Now, commit the changes and push them to the shared repo:
git commit -a -m "Stylize the nav bar"
git push
The updated site is now in the shared repo.
Finish up returning to the project directory and doing a pull:
cd ../Cats
git pull
Open index.html (the one in the project directory) to confirm that the changes made by both Bob and Alice are present in your local repo by. Verify that index.html has the most up-to-date code:
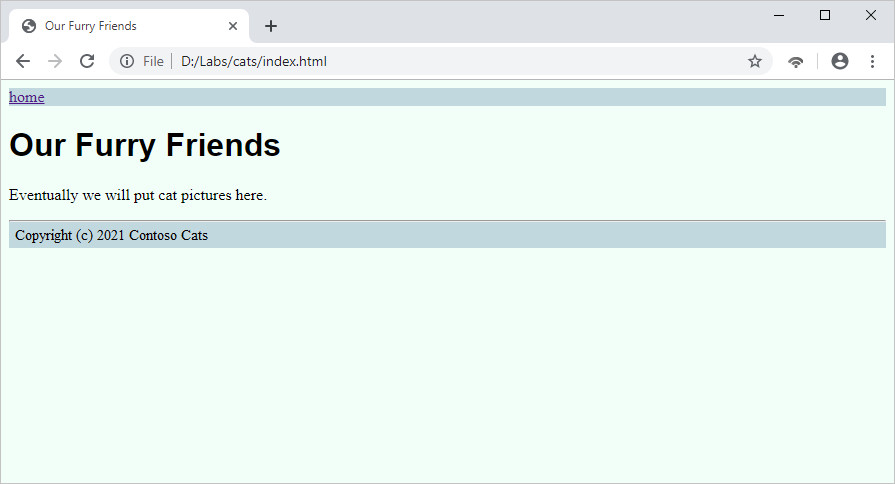
<!DOCTYPE html>
<html>
  <head>
    <meta charset='UTF-8'>
    <title>Our Feline Friends</title>
    <link rel="stylesheet" href="CSS/site.css">
  </head>
  <body>
    <nav><a href="./index.html">home</a></nav>
    <h1>Our Feline Friends</h1>
    <p>Eventually we will put cat pictures here.</p>
    <footer><hr>Copyright (c) 2021 Contoso Cats</footer>
  </body>
</html>
At the moment, your repo and Alice's repo are synced, but Bob's repo is not. Finish up by getting Bob up to date, too:
cd ../Bob
git pull
All three repos are now in alignment. The shared repo is the single source of truth for all users, and all pushes and pulls are directed to the shared repo.
If you're curious what the website looks like, here's a preview:
If you'd like, you can download your files to preview them locally:
Zip the Cats folder:
cd ..
zip -r Cats.zip Cats
Download the zipped file:
download Cats.zipNow, unzip the file on your local computer and open index.hml to see for yourself!