Configure vendor collaboration
The vendor collaboration interface exposes a limited set of information about purchase orders, invoices, and consignment stock to external vendor users. From this interface, a vendor can also reply to requests for quotation (RFQs) and view and edit basic company information. A vendor can also set up their own bank information to streamline the payment process.
Vendor responses
The following are the four types of responses that vendors can provide when you send a purchase order for confirmation.
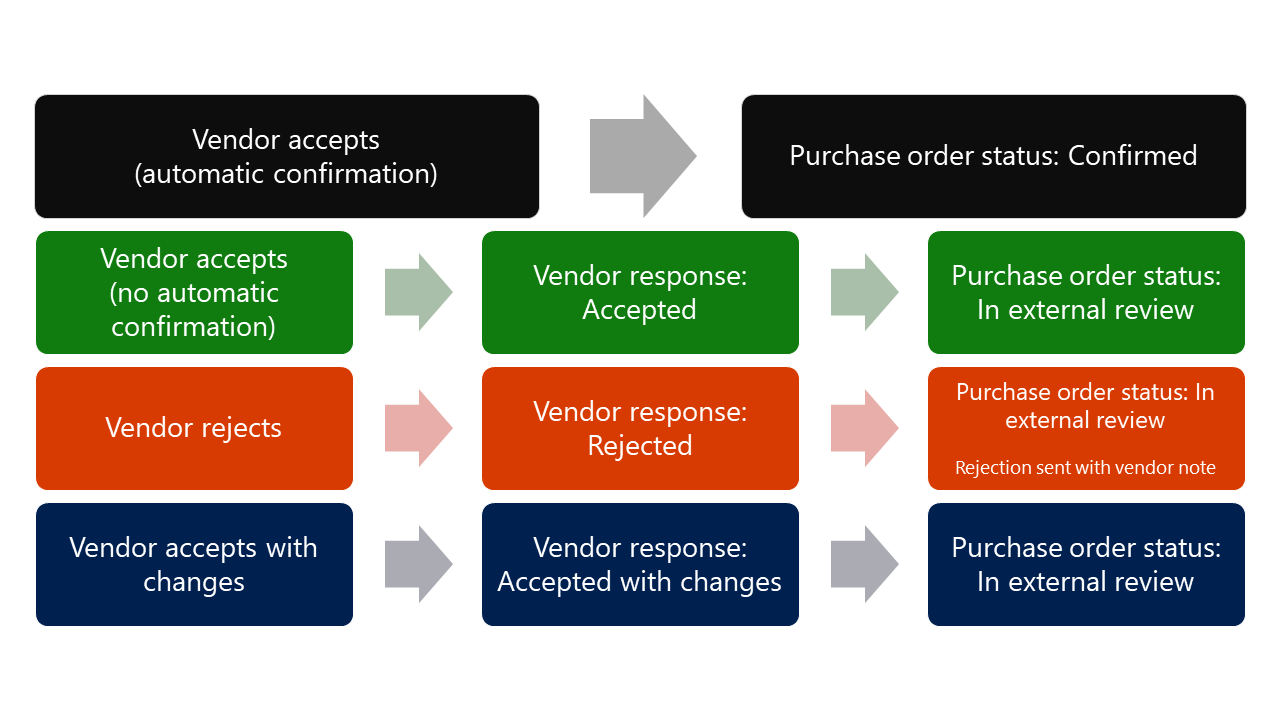
- Vendor accepts the order and their profile is configured to automatically confirm purchase orders when they accept - The status of the order is updated to Confirmed. If something prevents the order from being updated, the vendor response is still recorded as Accepted, but the status of the purchase order remains as In external review.
- Vendor accepts the order, and their profile is not configured to automatically confirm purchase orders when they accept - The vendor response is recorded as Accepted, but the status of the purchase order remains as In external review.
- Vendor rejects the order - The vendor response is recorded as Rejected, and the status of the purchase order remains as In external review. The rejection is received together with the vendor's note.
- Vendor accepts the order with changes - Changes are suggested at the line level. It's possible to accept or reject individual lines. Other possible changes include changing dates or quantities, splitting lines for different delivery dates or quantities, or substituting an item. Price information and charges cannot be changed by the vendor. Suggestions for changes to these can be made by using notes. The vendor response is recorded as Accepted with changes and the status of the purchase order remains as In external review.
You can use the Purchase order preparation workspace to monitor which purchase orders that the vendor has responded to.
The Purchase order preparation workspace contains two lists that contain purchase orders with the In external review status: In external review requires action and In external review awaiting vendor response.
When the vendor responds to a purchase order, they are shown a screen that gives them the opportunity to provide notes about their response. In addition to the Notes field is the option to provide the vendor with information messages that are specific to their response types.
The information messages are free text entries that are based around the three types of responses: accept, accept with changes, and reject. You can set up specific text for each type of response and for specific languages. Common types of information to include would be terms and conditions, instructions to the vendor, disclaimers and contact information, and URLs.
For example, if you have vendors who need information in French or Spanish, you can add versions of the text to cover that need. The language that is listed on the vendor's page will determine the language option that appears in their purchase order response forms.
Vendor setup options
Before you create a user account for someone who will use vendor collaboration, you must set up the vendor to allow them to use vendor collaboration on the vendor's profile page. You can access that by opening Accounts payable > Vendors > All vendors and then selecting the vendor from the list.
You can set the Collaboration activation field to Active on the General FastTab.
The two options that you can select are:
- Active (PO is auto-confirmed) - Purchase orders are automatically confirmed when the vendor accepts them without changes.
- Active (PO is not auto-confirmed) - Purchase orders need to be manually confirmed by your organization after the vendor has accepted them.
Also, on the Vendor page, if you want to share price information with the vendor, such as unit price, discounts, and charges through the vendor collaboration interface, you can set the Purchase order prices/Amount option to Yes on the Purchase order defaults FastTab.
When a vendor is enabled for vendor collaboration, you can add users and authorize them for vendor collaboration access.
Vendor collaboration bank information
After the vendor collaboration has been set up for a vendor, they can access their banking information. The vendor can edit, add or remove their banking information within the interface, to streamline the payment process. When the vendor information has been added, an accounts payable user can review and approve the proposed changes.
The vendor bank account approval workflow in Dynamics 365 Supply Chain Management is a tool that enhances the security of vendor bank account information. It is a valuable resource for businesses seeking to improve their payment processes and ensure compliance with financial regulations that guard against fraud.
When specifying the fields that require approval and the actions that initiate the workflow, you can customize the vendor bank account workflow’s approval process and tailor the workflow to your specific needs and ensure that all necessary approvals are obtained before payments are processed.
The workflow for approving vendor bank accounts also helps businesses stay in compliance with financial laws. Businesses can make sure that they are only paying to authorized suppliers and that their payment procedures comply with industry standards by requiring approval for bank account information. This workflow is essential for any business trying to maximize its financial operations as it can decrease errors, provide more control over payment procedures, enhance security for vendor bank account information, and save time from problems resulting from non-compliance.
Set up vendor bank account workflow
To set up the vendor bank approval workflow, follow these steps:
Go to Accounts payable > Setup > Accounts payable parameters.
On the General tab, on the Vendor bank account approval FastTab, set the following fields:
You can configure the Bank account approval (create) option to require approval for all new bank account records, regardless of whether they are created through the web client or imported via the data entity. If this option is set to Yes, all new bank account records will require approval. Conversely, if this option is set to No, users can create or import new bank account records without needing approval.
You can configure the option for Bank account approval (update) to require approval when existing bank account records are updated by users using the web client. If IsEnabled is selected in the grid, approval would be required. If this option is set to No updates on all fields on existing bank account records are allowed without requiring approval.
The Data entity behavior (update) field allows you to select the behavior that occurs on existing records when there's an updated import through the data entity. Selections in this field will not affect updates made using the web client.
Allow changes without approval – All fields in the data entity will update without processing the changes through the workflow.
Reject changes – Protected fields in the data entity will never update. Imports containing updates for protected fields will fail when this option is selected.
Create change proposals – Non-protected fields will be updated in the data entity, and proposed changes can be added to protected fields. The data entity will not automatically start the workflow, so you will need to submit the proposed changes as required.
In the list of vendor bank account approval fields, select the IsEnabled checkbox for each field that requires approval.
On the Action Pane, select Save.
Go to Accounts payable > Setup > Accounts payable workflows.
On the Action Pane, select New.
In the Create workflow dialog box, select Workflow approval for proposed vendor change.
Use the workflow editor to structure your workflow as you desire.