Use secret scanning
Secret scanning is now enabled and configured on your private repositories, and you were just notified of an alert. Your response to the alert mainly depends on the type of secret that was committed into the repository.
This unit walks you through the different ways to respond to a secret-scanning alert. It also explores how you can create your own patterns to scan for the secrets that GitHub doesn't automatically detect.
Review secret scanning alerts
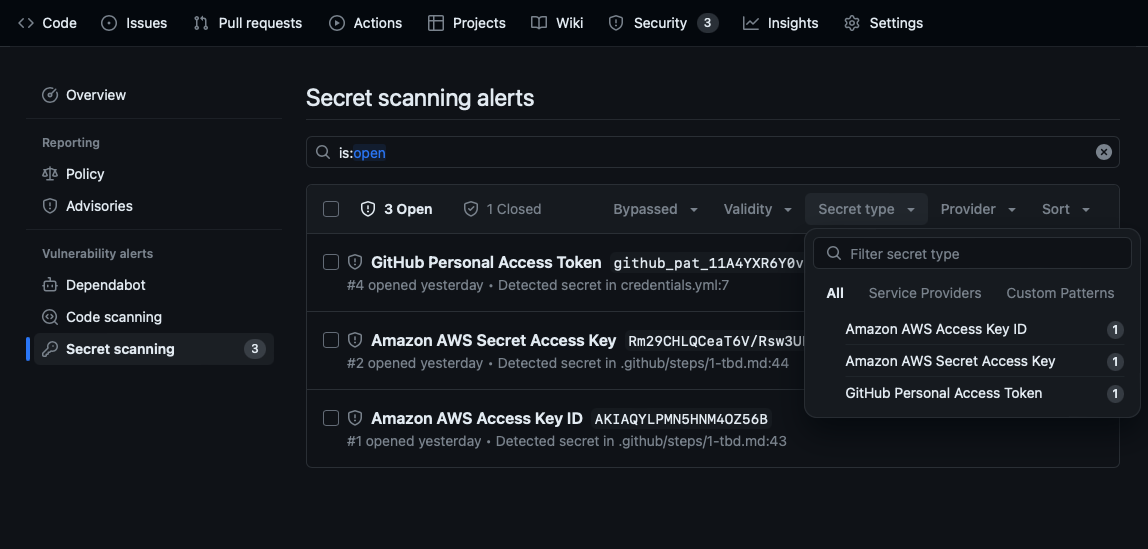
You can review and sort the alerts in Security > Secret scanning to determine source, provider, type, and more. You can filter the alerts with the following to determine specific attributes:
- Bypassed
- Validity
- Secret type
- Provider
Respond to an alert
Once a secret has been committed into a repository, you should consider the secret compromised. GitHub recommends the following actions for compromised secrets:
- For a compromised GitHub personal access token, delete the compromised token, create a new token, and update any services that use the old token.
- For all other secrets, first verify that the secret committed to GitHub is valid. If so, create a new secret, update any services that use the old secret, and delete the old secret.
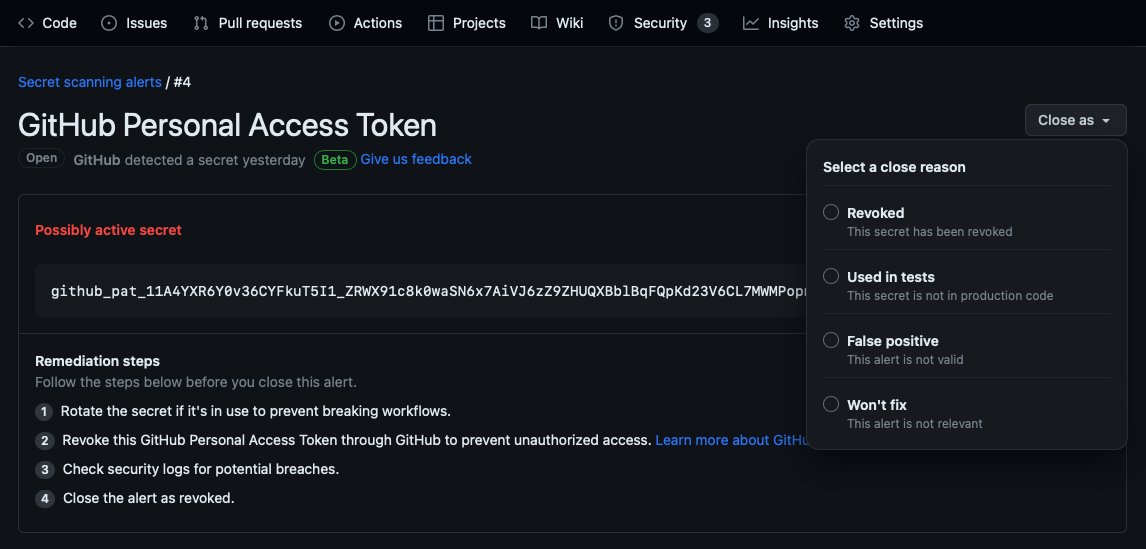
Once you've taken the appropriate actions for the secret, you can resolve the alert by selecting it in the Secret scanning alerts list and choosing a reason for resolving it in the Close as drop-down:
Create a custom pattern
As mentioned previously in this module's What is secret scanning? unit, GitHub automatically scans public and private repositories for secret patterns provided by GitHub and GitHub partners. However, for private repositories with GitHub Advanced Security, you can also scan for other secret patterns, such as those that are internal to your organization.
For these situations, you can define custom secret scanning patterns in your enterprise, organization, or private repository. Secret scanning supports up to 500 custom patterns for each organization or enterprise account, and up to 100 custom patterns per private repository.
After you create a custom pattern, secret scanning scans for the custom secret in private repositories in your organization. This scan includes the repository's entire Git history on all branches, and alerts repository administrators the same way as for any other secret.
The following sections cover how to create custom patterns for organizations and private repositories.
For a private repository
Follow these steps to create a custom pattern for a private repository:
In your repository, navigate to Settings > Code security and analysis.
Under Secret scanning > Custom patterns, select New pattern.
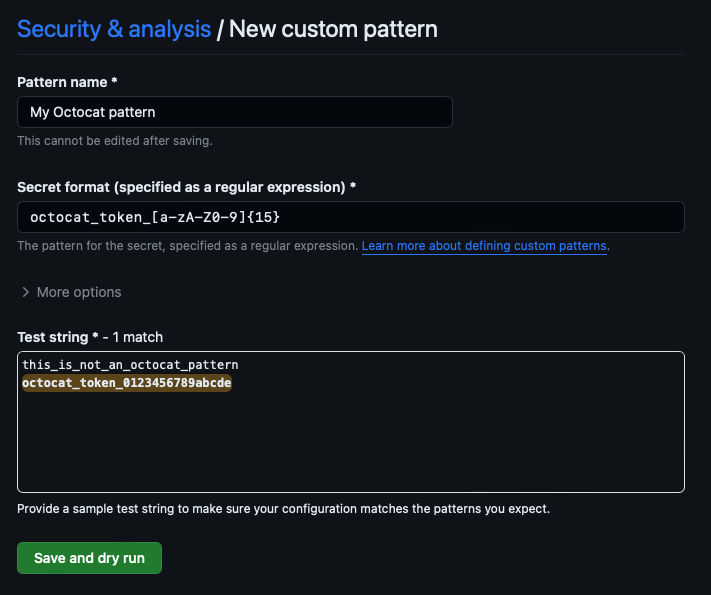
Provide the following details for your custom pattern:
- The name of the pattern
- The pattern of the secret specified as Hyperscan regex
- (Optional) More options provide other surrounding content or additional match requirements for the secret format
- A sample test string to make sure your configuration is matching the patterns you expect
When you're ready to test your new custom pattern, to identify matches in the repository without creating alerts, select Save and dry run.
When the dry run finishes, you'll see a sample of results (up to 1000). Review the results and identify any false positive results.
Edit the new custom pattern to fix any problems with the results. Then, to test your changes, select Save and dry run.
When you're satisfied with your new custom pattern, select Publish pattern.
For an organization
Follow the steps below to create a custom pattern for an organization:
In your organization, navigate to Settings > Code security and analysis.
Under Secret scanning > Custom patterns, select New pattern.
Provide the following details for your custom pattern:
- The name of the pattern
- The pattern of the secret specified as Hyperscan regex
- (Optional) More options provide other surrounding content or additional match requirements for the secret format
- A sample test string to make sure your configuration is matching the patterns you expect
When you're ready to test your new custom pattern, to identify matches in the repository without creating alerts, select Save and dry run.
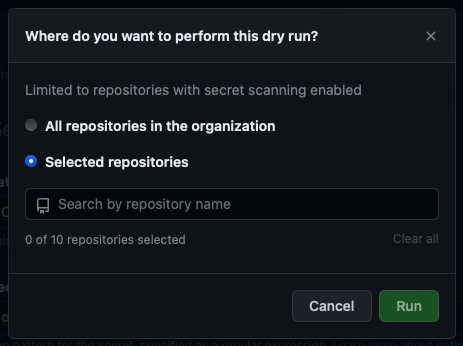
Select the repositories where you want to perform the dry run.
- To perform the dry run across the entire organization, select All repositories in the organization.
- To specify the repositories where you want to perform the dry run, select Selected repositories, then search for and select up to 10 repositories.
When you're ready to test your new custom pattern, select Run.
When the dry run finishes, you'll see a sample of results (up to 1000). Review the results and identify any false positive results.
Edit the new custom pattern to fix any problems with the results. Then, to test your changes, select Save and dry run.
When you're satisfied with your new custom pattern, select Publish pattern.