Lab - Insert records by using a runnable class
Read this first - before you start the lab!
Important
For this lab, you CANNOT sign in with your own credentials. Use the following steps to sign in to your lab environment with the correct credentials.
Ensure that you are signed in to Microsoft Learn.
Select Launch VM mode or Sign in to launch VM mode in this unit.
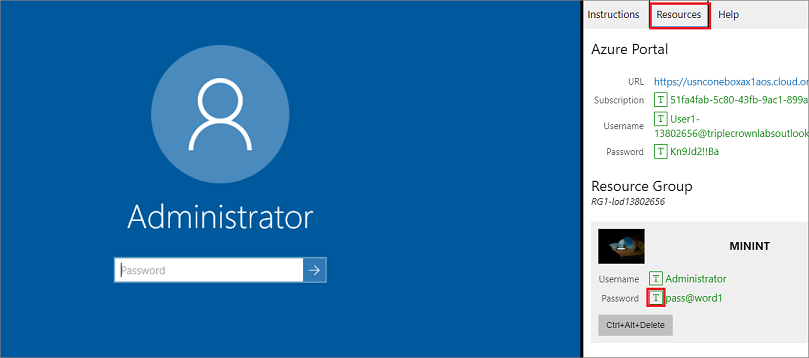
In the Resources tab on the lab side bar, select the T icon next to Password in the MININT box, to have the administrator password for the Virtual Machine entered for you.

Select Enter.
Microsoft Edge will open. Wait for it to navigate to the Sign in page for finance and operations.
On the Microsoft Sign in page in finance and operations, place your mouse cursor into the Username field.
On the Resources tab of the lab side bar, below the Azure portal heading, select the T icon next to Username, then press Enter.

Your mouse cursor will now be in the Password page.
On the Resources tab of the lab side bar, below the Azure portal heading, select the T icon next to select Password, then press Enter.

Don't stay signed in or store the password on the virtual machine.
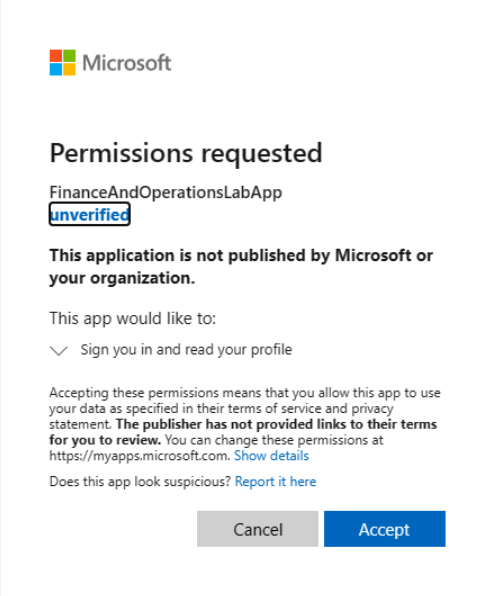
Select Accept in the Permissions requested page.

To see the lab instructions, select the Instructions tab on the lab side bar.
You can now begin your work on this lab.
Scenario
As the finance and operations apps developer, you have been tasked with
inserting customer records into a table for your Fleet Management
company. You need to create a runnable class and add code that will
insert two records into the FMCustomer table.
Create a runnable class
- Minimize the Microsoft Edge window.
- Open Visual Studio, and select Run as administrator.
- Select Continue without code.
- Start creating a new project by opening the File menu and selecting New > Project.
- Search for Finance Operations, select the Finance and Operations project, and then select Next.
- In the Configure your new project dialog box, enter FleetManagementClassProject in the Project name field.
- Select Create.
- To ensure that the proper settings are in place, select Dynamics 365 in the Extensions menu.
- Select Options.
- Under the Dynamics 365 node on the left pane, select Projects.
- Ensure the check boxes are selected for Organize projects by element type and Synchronize database on build for newly created project.
- Select OK.
- In the Solution Explorer, right-click the project FleetManagementClassProject.
- Select Add > New Item.
- On the left pane, select Dynamics 365 Items and then select Code.
- On the middle pane, select Runnable Class (Job).
- Enter FMInsertCustomers in the Name field.
- Select Add. The FMInsertCustomers class opens in the Code designer window.
Add code to insert customer records
In the Code designer window, insert a blank line between lines 6 and 7 by using the Enter key and remove the slashes (///).
First, you must declare your variables. You insert records into the FMCustomer table, so you enter the following code on line 7:
FMCustomer FMCustomer;In the Code designer window, insert a blank line between the curly braces for the main method by using the Enter key.
Now, you create a class object named FMInsertCustomers and instantiate a new instance of the object. Then you call the run() method on the new object.
   FMInsertCustomers FMInsertCustomers = new  FMInsertCustomers();
   FMInsertCustomers.run();
Now, you create the methods needed to insert records into the FMCustomer table and use
ttsbeginandttscommit to insert the data. This code should go before the main method.public void run() { this.insertRecords(); } private void insertRecords() { ttsBegin; FMCustomer.FirstName = "John"; FMCustomer.LastName = "Smith"; FMCustomer.Email = "johnsmith@contoso.com"; FMCustomer.insert(); FMCustomer.clear(); FMCustomer.FirstName = "Sally"; FMCustomer.LastName = "Smith"; FMCustomer.Email = "sallysmith@contoso.com"; FMCustomer.insert(); ttsCommit; }In this code sample, you are inserting John Smith’s record, then clearing the table buffer with clear() method. Then the code inserts another record for Sally.
In the Solution Explorer, right-click the
FMInsertCustomersclass.Select Set as Startup Object.
Perform a build by right-clicking the project FleetManagementClassProject in the Solution Explorer and then selecting Build.
Run the class without debugging by selecting the Debug menu. Select Start Without Debugging. You can also use the keyboard shortcut Ctrl + F5.
Close the lab environment
- Select Done in the Instructions pane in the lab side bar.
- In the Lab is complete window, select Continue, and then select Leave to return to the next unit in the module.