Create an Identity & Access Management baseline
Identity and access management (IAM) is key to granting access and to the security enhancement of corporate assets. To secure and control your cloud-based assets, you must manage identity and access for your Azure administrators, application developers, and application users.
IAM security recommendations
The following sections describe the IAM recommendations that are in CIS Microsoft Azure Foundations Security Benchmark v. 1.3.0. Included with each recommendation are the basic steps to complete in the Azure portal. You should complete these steps for your own subscription and by using your own resources to validate each security recommendation. Keep in mind that Level 2 options might restrict some features or activities, so carefully consider which security options you decide to enforce.
Important
You must be an administrator for the Microsoft Entra instance to complete some of these steps.
Restrict access to the Microsoft Entra administration portal - Level 1
Users who aren't administrators shouldn't have access to the Microsoft Entra administration portal because the data is sensitive and under the rules of least privilege.
Sign in to the Azure portal. Search for and select Microsoft Entra ID.
In the left menu under Manage, select Users.
In the left menu, select User settings.
In User settings, under Administration portal, ensure that Restrict access to Microsoft Entra administration portal is set to Yes. Setting this value to Yes prevents all non-administrators from accessing any data in the Microsoft Entra administration portal. The setting doesn't restrict access to using PowerShell or another client, such as Visual Studio.
If you change any settings, in the menu bar, select Save.

Enable multifactor authentication for Microsoft Entra users
- Enable multifactor authentication for Microsoft Entra ID privileged users - Level 1
- Enable multifactor authentication for Microsoft Entra non-privileged users - Level 2
Enable multifactor authentication for all Microsoft Entra users.
Sign in to the Azure portal. Search for and select Microsoft Entra ID.
In the left menu under Manage, select Users.
In the All users menu bar, select Per-user MFA.

In the multifactor authentication window, ensure that multifactor authentication Status is set to Enabled for all users. To enable multifactor authentication, select a user. Under quick steps, select Enable > enable multifactor authentication.

Don't remember multifactor authentication on trusted devices - Level 2
Remembering the multifactor authentication feature for devices and browsers that are trusted by the user is a free feature for all multifactor authentication users. Users can bypass subsequent verifications for a specified number of days after they've successfully signed in to a device by using multifactor authentication.
If an account or device is compromised, remembering multifactor authentication for trusted devices can negatively affect security. A security recommendation is to turn off remembering multifactor authentication for trusted devices.
Sign in to the Azure portal. Search for and select Microsoft Entra ID.
In the left menu under Manage, select Users.
In the All users menu bar, select Per-user MFA.
In the multifactor authentication window, select a user. Under quick steps, select Manage user settings.

Select the Restore multifactor authentication on all remembered devices checkbox, and then select Save.

No or limited-access guest users - Level 1
Ensure that no guest users exist, or alternatively, if the business requires guest users, ensure that guest permissions are limited.
Sign in to the Azure portal. Search for and select Microsoft Entra ID.
In the left menu under Manage, select Users.
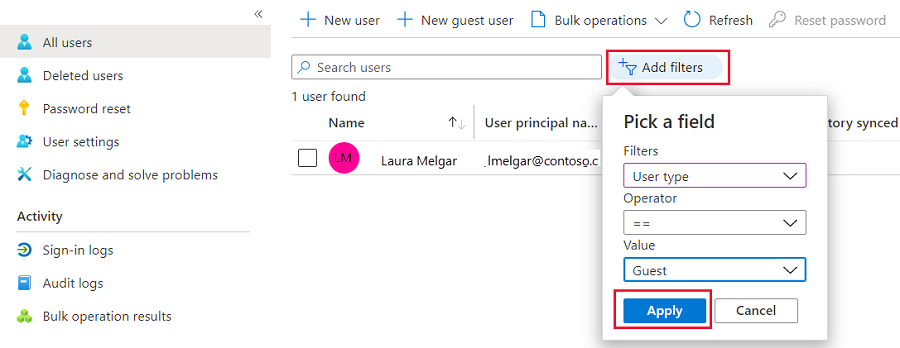
Select the Add filters button.
For Filters, select User type. For Value, select Guest. Select Apply to verify that no guest users exist.
If you change any settings, in the menu bar, select Save.
Password options
- Notify users on password resets - Level 1
- Notify all admins when other admins reset passwords - Level 2
- Require two methods to reset passwords - Level 1
With multifactor authentication set, an attacker would have to compromise both identity authentication forms before they could maliciously reset a user's password. Ensure that password reset requires two forms of identity authentication.
Sign in to the Azure portal. Search for and select Microsoft Entra ID.
In the left menu under Manage, select Users.
In the left menu, select Password reset.
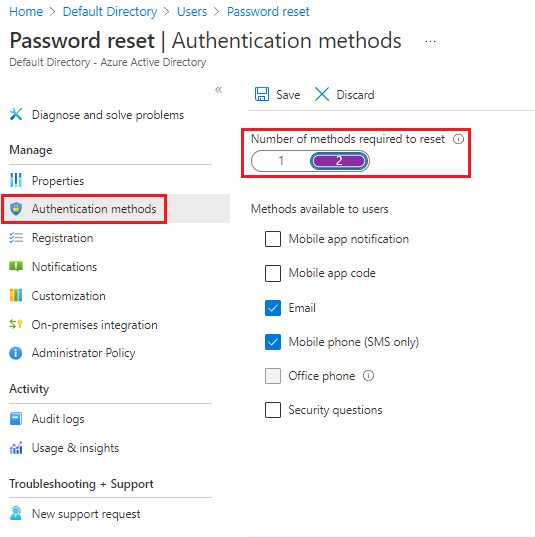
In the left menu under Manage, select Authentication methods.
Set the Number of methods required to reset to 2.
If you change any settings, In the menu bar, select Save.
Establish an interval for reconfirming user authentication methods - Level 1
If authentication reconfirmation is turned off, registered users aren't prompted to reconfirm their authentication information. The more secure option is to turn on authentication reconfirmation for a set interval.
Sign in to the Azure portal. Search for and select Microsoft Entra ID.
In the left menu under Manage, select Users.
In the left menu pane, select Password reset.
In the left menu under Manage, select Registration.
Ensure that Number of days before users are asked to re-confirm their authentication information is not set to 0. The default is 180 days.
If you change any settings, in the menu bar, select Save.

Guest invite setting - Level 2
Only administrators should be able to invite guest users. Restricting invitations to administrators ensures that only authorized accounts have access to Azure resources.
Sign in to the Azure portal. Search for and select Microsoft Entra ID.
In the left menu under Manage, select Users.
In the left menu, select User settings.
In the User settings pane, under External users, select Manage external collaboration settings.
In External collaboration settings, under Guest invite settings, select Only users assigned to specific admin roles can invite guest users.

If you change any settings, in the menu bar, select Save.
Users can create and manage security groups - Level 2
When this feature is enabled, all users in Microsoft Entra ID can create new security groups. Security group creation should be restricted to administrators.
Sign in to the Azure portal. Search for and select Microsoft Entra ID.
In the left menu under Manage, select Groups.
In the All groups pane, in the left menu under Settings, select General.
For Security Groups, ensure that Users can create security groups in Azure portals, API or PowerShell is set to No.

If you change any settings, in the menu bar, select Save.
Self-service group management enabled - Level 2
Unless your business requires delegating self-service group management to various users, a safety recommendation is to disable this feature.
Sign in to the Azure portal. Search for and select Microsoft Entra ID.
In the left menu under Manage, select Groups.
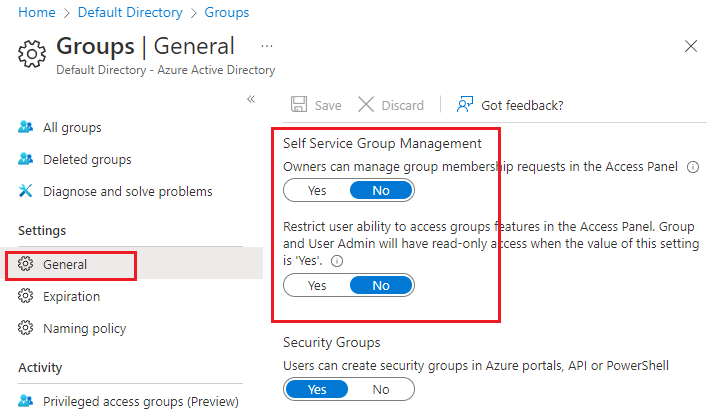
In the All groups pane, in the left menu under Settings, select General.
Under Self Service Group Management, ensure that all options are set to No.
If you change any settings, in the menu bar, select Save.
Application options - Allow users to register apps - Level 2
Require administrators to register custom applications.
Sign in to the Azure portal. Search for and select Microsoft Entra ID.
In the left menu under Manage, select Users.
In the left menu, select User settings.
In the User settings pane, ensure that App registrations is set to No.
If you change any settings, in the menu bar, select Save.
