Exercise: Create your first XAML page
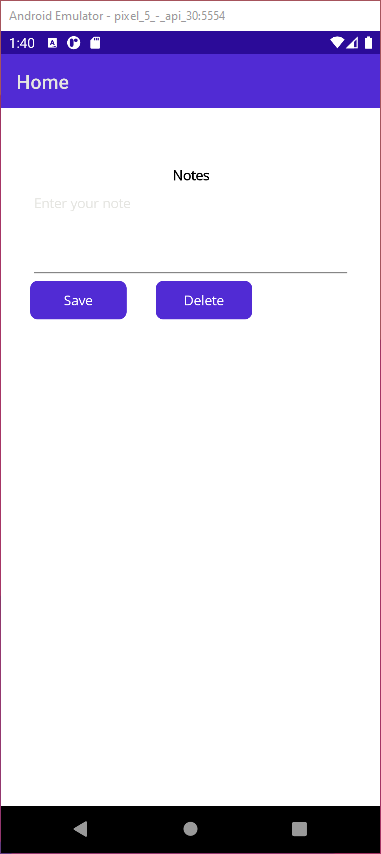
Engineers from your power utility company regularly make customer visits to repair appliances and perform other electrical maintenance tasks. Part of the app allows the engineer to make notes about the visit. It displays a simple editor where the engineer can enter the details and save them.
On Android, the app looks like this:
You've been asked to add some further features to this page. Before you start, you want to understand how the page was created, so you look at the source code. You notice that the UI was created entirely using C# code. While this approach works, it intermingles the code that handles the layout with the code that controls the way in which the UI works. You realize that before long, there's a danger of the two aspects of the app becoming locked together, making future maintenance difficult and possibly making the app more fragile as more features are added. You decide to separate the UI design from the UI logic by extracting the C# code that defines the layout from the app and replacing it with a XAML page.
This module uses the .NET 8.0 SDK. Ensure that you have .NET 8.0 installed by running the following command in your preferred command terminal:
dotnet --list-sdks
Output similar to the following example appears:
6.0.317 [C:\Program Files\dotnet\sdk]
7.0.401 [C:\Program Files\dotnet\sdk]
8.0.100 [C:\Program Files\dotnet\sdk]
Ensure that a version that starts with 8 is listed. If none is listed or the command isn't found, install the most recent .NET 8.0 SDK.
Review the existing app
Clone the GitHub repository for this exercise locally on your computer.
Note
It is best to clone or download the exercise content to a short folder path, such as C:\dev, to avoid build-generated files exceeding the maximum path length.
Move to the exercise1 folder in your local copy of the repository.
Open the Notes.sln Visual Studio solution file in this folder or the folder in Visual Studio Code.
In the Solution Explorer window, expand the Notes project and open the MainPage.xaml.cs file.
Review the MainPage class defined in this file. The constructor contains the following code that creates the UI:
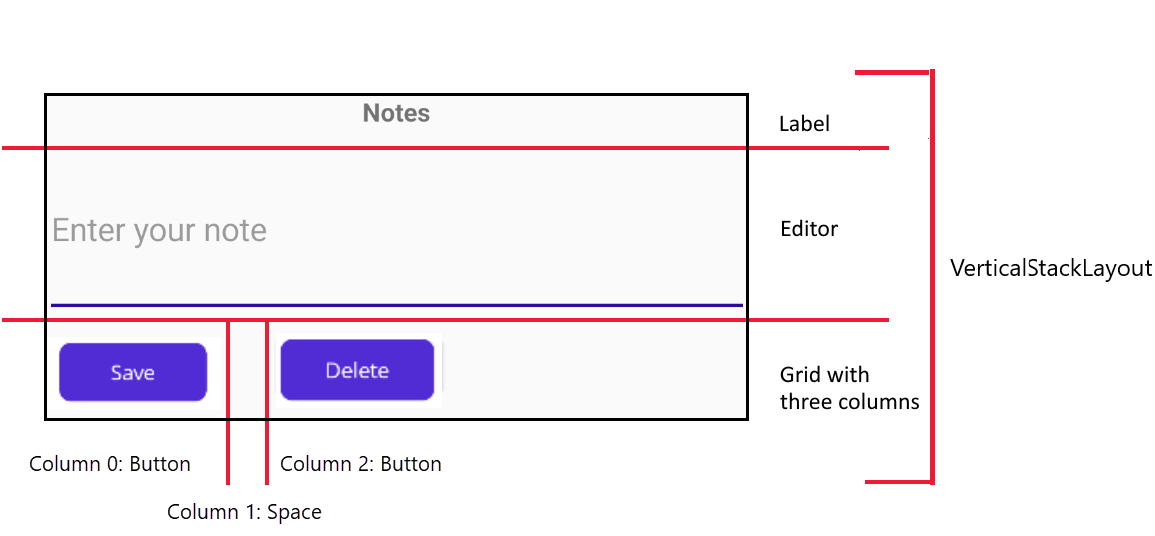
public MainPage()
{
    var notesHeading = new Label() { Text = "Notes", HorizontalOptions = LayoutOptions.Center, FontAttributes = FontAttributes.Bold };

    editor = new Editor() { Placeholder = "Enter your note", HeightRequest = 100 };
    editor.Text = File.Exists(_fileName) ? File.ReadAllText(_fileName) : string.Empty;

    var buttonsGrid = new Grid() { HeightRequest = 40.0 };
    buttonsGrid.ColumnDefinitions.Add(new ColumnDefinition() { Width = new GridLength(1.0, GridUnitType.Auto) });
    buttonsGrid.ColumnDefinitions.Add(new ColumnDefinition() { Width = new GridLength(30.0, GridUnitType.Absolute) });
    buttonsGrid.ColumnDefinitions.Add(new ColumnDefinition() { Width = new GridLength(1.0, GridUnitType.Auto) });

    var saveButton = new Button() { WidthRequest = 100, Text = "Save" };
    saveButton.Clicked += OnSaveButtonClicked;
    Grid.SetColumn(saveButton, 0);
    buttonsGrid.Children.Add(saveButton);

    var deleteButton = new Button() { WidthRequest = 100, Text = "Delete" };
    deleteButton.Clicked += OnDeleteButtonClicked;
    Grid.SetColumn(deleteButton, 2);
    buttonsGrid.Children.Add(deleteButton);

    var stackLayout = new VerticalStackLayout
    {
        Padding = new Thickness(30, 60, 30, 30),
        Children = { notesHeading, editor, buttonsGrid }
    };

    this.Content = stackLayout;
}
The UI comprises a
VerticalStackLayoutcontaining aLabel,Editor, and aGridwith three columns. The first column holds the saveButton control, the second is a spacer, and the third column has the deleteButton control.The following diagram illustrates the UI structure:
Note that the MainPage class also contains event-handling methods for the buttons and some code that initializes the
Editorcontrol. This code isn't distinguished from the UI definition.Build and run the app on Windows, just to see what it looks like. Select F5 to build and run the app.
Close the app and return to Visual Studio or Visual Studio Code when you've finished.
Create a XAML version of the UI
Open the MainPage.xaml file. The markup in this page represents an empty MAUI content page:
<ContentPage xmlns="http://schemas.microsoft.com/dotnet/2021/maui"
             xmlns:x="http://schemas.microsoft.com/winfx/2009/xaml"
             x:Class="Notes.MainPage">

</ContentPage>
Add a
VerticalStackLayoutcontrol to the content page:<ContentPage ...> <VerticalStackLayout Margin="30,60,30,30"> </VerticalStackLayout> </ContentPage>Add a
Labelcontrol to theVerticalStackLayout. Set the Text, HorizontalTextAlignment, and FontAttributes properties of this control as shown below:<ContentPage ...> <VerticalStackLayout ...> <Label Text="Notes" HorizontalOptions="Center" FontAttributes="Bold" /> </VerticalStackLayout> </ContentPage>Add an
Editorcontrol to theVerticalStackLayout:<ContentPage ...> <VerticalStackLayout ...> <Label .../> <Editor x:Name="editor" Placeholder="Enter your note" HeightRequest="100" /> </VerticalStackLayout> </ContentPage>Add a child
Gridto theVerticalStackLayout. ThisGridshould have three columns; the first and third are sized automatically, while the second has a width of 30:<ContentPage ...> <VerticalStackLayout ...> <Label .../> <Editor .../> <Grid ColumnDefinitions="Auto, 30, Auto"> </Grid> </VerticalStackLayout> </ContentPage>Add a
Buttonto the first column of the childGrid. This is the Save button:<ContentPage ...> <VerticalStackLayout ...> <Label .../> <Editor .../> <Grid ...> <Button Grid.Column="0" Text="Save" WidthRequest="100" Clicked="OnSaveButtonClicked" /> </Grid> </VerticalStackLayout> </ContentPage>Add another
Buttonto the third column of the childGrid. This is the Delete button:<ContentPage ...> <VerticalStackLayout ...> <Label .../> <Editor .../> <Grid ...> <Button ... /> <Button Grid.Column="2" Text="Delete" WidthRequest="100" Clicked="OnDeleteButtonClicked" /> </Grid> </VerticalStackLayout> </ContentPage>
Remove the layout code from the code-behind file
In the Solution Explorer window, expand the MainPage.xaml node, and open the MainPage.xaml.cs file.
Remove the Editor field from the MainPage class.
In the MainPage.xaml.cs file, in the MainPage constructor, remove all the code that creates the user interface elements, and replace them with a call to the InitializeComponent method. Add code that checks whether the file used to store the notes exists, and if so, read the contents and populate the Text field of the Editor control. The constructor should look like this:
public partial class MainPage : ContentPage
{
    string _fileName = Path.Combine(FileSystem.AppDataDirectory, "notes.txt");

    public MainPage()
    {
        InitializeComponent();

        if (File.Exists(_fileName))
        {
            editor.Text = File.ReadAllText(_fileName);
        }
    }

    ...
}
On the Build menu, select Rebuild Solution. Verify that the app builds without any errors.
Run the application. It should function exactly as before.
If you have time, deploy and run the app using the Android emulator. The app UI should resemble that shown in the image at the start of this exercise.