Lab - Create a purchase requisition workflow
Read this first - before you start the lab!
Important
For this lab, you CANNOT sign in with your own credentials. Use the following steps to sign in to your lab environment with the correct credentials.
Ensure that you are signed in to Microsoft Learn.
Select Launch VM mode or Sign in to launch VM mode in this unit.
In the Resources tab on the lab side bar, select the T icon next to Password in the MININT box, to have the administrator password for the Virtual Machine entered for you.
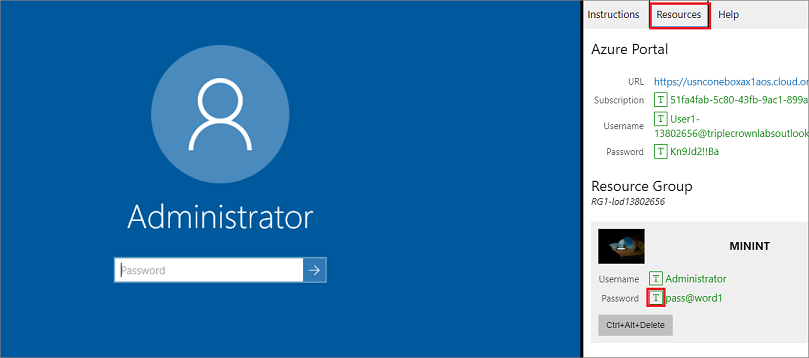
Select Enter.
Microsoft Edge will open. Wait for it to navigate to the Sign in page for finance and operations.
On the Microsoft Sign in page in finance and operations, place your mouse cursor into the Username field.
On the Resources tab of the lab side bar, below the Azure portal heading, select the T icon next to Username, then press Enter.

Your mouse cursor will now be in the Password page.
On the Resources tab of the lab side bar, below the Azure portal heading, select the T icon next to select Password, then press Enter.
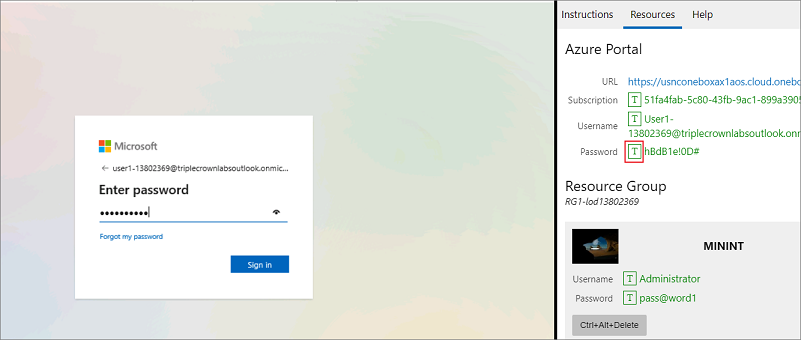
Don't stay signed in or store the password on the virtual machine.
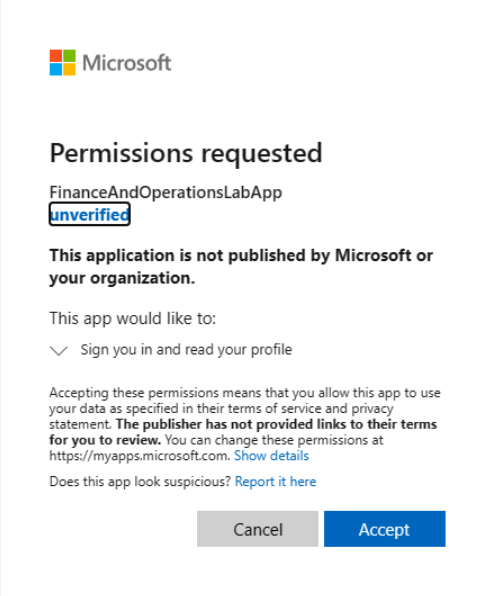
Select Accept in the Permissions requested page.
To see the lab instructions, select the Instructions tab on the lab side bar.
You can now begin your work on this lab.
Scenario
The finance and operations module that you're working in determines the types of workflow that you can create. In this lab, you will create a purchase requisition workflow. Before a purchase requisition can be submitted for review, you need to configure the workflow.
Create and set up workflows
- In the company USMF, go to Procurement and sourcing > Setup > Procurement and sourcing workflows.
- On the list page that appears, on the Action Pane, select New.
- On the Create workflow page, select the Purchase requisition line review.
- For the first time, the browser will show a dialog box to open the Microsoft.Dynamics.AX.Framework.WorkflowEditorHost page. Select Open.
- In the Do you want to run this application? dialog box, select Run. It takes a few minutes for the workflow editor to be downloaded. When it has finished the download, it automatically opens the Sign in dialog box.
- Enter your credentials and password (found in the Resources tab on the lab side bar, in the Azure portal section)
- The workflow editor appears (this can take a couple of minutes and may open behind the browser window).
Drag workflow elements onto the canvas
The Workflow elements area of the workflow editor contains the elements that you can add to your workflow.
- To add elements to the workflow, drag Review purchase requisition lines and Approve purchase requisition lines onto the canvas.
- Connect Start to Review purchase requisition lines. To connect one workflow element to another, hold the pointer over an element until connection points appear (small boxes around the edges of the elements). Select a connection point and drag it to another element. Be sure to connect all the elements.
- Connect Review purchase requisition lines to Approve purchase requisition lines.
- Connect Approve purchase requisition lines to End.
Configure workflow properties
In the workflow editor canvas, select Review purchase requisition lines and, from the Action Pane, select Properties to open the Properties page.
Enter a value in the Name field or accept the default.
Enter a value in the Work item subject field, for example Work item test. Alternatively, you can also include a place holder and concatenate the text with the place holder.
Enter a value in the Work item instructions field, for example "Review this purchase requisition".
Select Assignment on the left section.
In the Assignment type tab select User.
Select the User tab, and select a user, for example ALICIA, and add it to the Selected users section by using the arrow.
Select Close. The workflow editor may hide behind the browser window, if so – then just select it from the Windows task bar to open it.
On the pane at the bottom of the page, you will have four errors or warnings. Select each one.
The first will be a warning, noted by the icon on the left of an exclamation point. Double-click the warning icon to open the screen that needs to be changed. In this case, you do not have to enter anything, as you will see the warning is now gone from the bottom pane.
Select the next error, Selected assignment type “None” is not supported. On the screen that opens, select User. On the User tab, select Admin or any other user, and move it over to the Selected users. The error will then disappear and you can close the screen from the first step.
The next message is You must enter a message text for language en-us. Select the message and then enter a text (for example, Test message 1) in the Work item subject and Work item instructions fields. This will remove all error messages and your workflow is now complete.
Select Save and close in the workflow editor.
Specify version notes, for example New workflow.
Select OK.
Select Activate the new version.
Select OK. It might take a few minutes for the workflow editor to finish its activation process, and then it will close automatically.
Select Close.
Refresh the Procurement and sourcing workflows page in finance and operations if you don't see your new workflow.
Close the lab environment
- Select Done in the Instructions pane in the lab side bar.
- In the Lab is complete window, select Continue, and then select Leave to return to the next unit in the module.