Create a windows Virtual Machine using Azure Image Builder template
You decide to test Azure Image Builder to discover if it can meet the needs of the Contoso IT operations staff. You plan to create a Windows VM by using Azure Image Builder and a sample .json template that you have downloaded from the GitHub library. But first, you must register Azure Image Builder with your Azure subscription.
Note
In this preview, you can't use the Azure portal to work with Azure Image Builder.
Register Azure Image Builder
To use Azure Image Builder in public preview, you must register the features in your Azure subscription. The following steps provide guidance on this process.
To register Azure Image Builder, run the following Azure CLI command:
az feature register --namespace Microsoft.VirtualMachineImages --name VirtualMachineTemplatePreview`Check the status of the feature registration using the following command:
az feature show --namespace Microsoft.VirtualMachineImages --name VirtualMachineTemplatePreview | grep stateCheck your registration status using the following command:
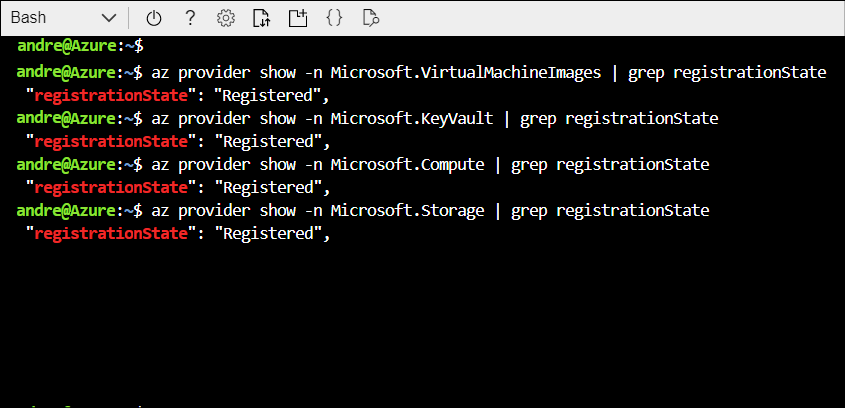
az provider show -n Microsoft.VirtualMachineImages | grep registrationState
az provider show -n Microsoft.KeyVault | grep registrationState
az provider show -n Microsoft.Compute | grep registrationState
az provider show -n Microsoft.Storage | grep registrationState
If any provider doesn't display
Registered, run the following command:az provider register -n Microsoft.VirtualMachineImages az provider register -n Microsoft.Compute az provider register -n Microsoft.KeyVault az provider register -n Microsoft.Storage
When all is ready, all providers should display as Registered.
Create an image
The next steps are to create an image, and then create the VM from the image. To create an image, perform the following procedure:
Set variables that you'll use during the build process:
# Resource group name
imageResourceGroup=ContosoWinImgBuilderRG
# Region location
location=WestUS2
# Name for the image
imageName=ContosoWinBuilderImage
# Run output name
runOutputName=ContosoWindows
# name of the image to be created
imageName=ContosoWinImage
# Create a variable for your subscription ID
subscriptionID=<Your subscription ID>
Tip
You can determine your subscription ID using the
az account show | grep idcommand.Create a resource group:
az group create -n $imageResourceGroup -l $location.Tip
You can, of course, use an existing resource group if you prefer. However, it's easier to manage (from a cleanup perspective) if you create one for this specific purpose.
Create a user-assigned identity and set permissions on the resource group:
 # create user assigned identity for image builder to access the storage account where the script is located
 identityName=aibBuiUserId$(date +'%s')
 az identity create -g $imageResourceGroup -n $identityName

 # get identity id
 imgBuilderCliId=$(az identity show -g $imageResourceGroup -n $identityName | grep "clientId" | cut -c16- | tr -d '",')

 # get the user identity URI, needed for the template
 imgBuilderId=/subscriptions/$subscriptionID/resourcegroups/$imageResourceGroup/providers/Microsoft.ManagedIdentity/userAssignedIdentities/$identityName

 # download preconfigured role definition example
 curl https://raw.githubusercontent.com/danielsollondon/azvmimagebuilder/master/solutions/12_Creating_AIB_Security_Roles/aibRoleImageCreation.json -o aibRoleImageCreation.json

 imageRoleDefName="Azure Image Builder Image Def"$(date +'%s')

 # update the definition
 sed -i -e "s/<subscriptionID>/$subscriptionID/g" aibRoleImageCreation.json
 sed -i -e "s/<rgName>/$imageResourceGroup/g" aibRoleImageCreation.json
 sed -i -e "s/Azure Image Builder Service Image Creation Role/$imageRoleDefName/g" aibRoleImageCreation.json

 # create role definitions
 az role definition create --role-definition ./aibRoleImageCreation.json

 # grant role definition to the user assigned identity
 az role assignment create \
 --assignee $imgBuilderCliId \
 --role $imageRoleDefName \
 --scope /subscriptions/$subscriptionID/resourceGroups/$imageResourceGroup
Download the image configuration template:
curl https://raw.githubusercontent.com/danielsollondon/azvmimagebuilder/master/quickquickstarts/0_Creating_a_Custom_Windows_Managed_Image/helloImageTemplateWin.json -o helloImageTemplateWin.json
sed -i -e "s/<subscriptionID>/$subscriptionID/g" helloImageTemplateWin.json
sed -i -e "s/<rgName>/$imageResourceGroup/g" helloImageTemplateWin.json
sed -i -e "s/<region>/$location/g" helloImageTemplateWin.json
sed -i -e "s/<imageName>/$imageName/g" helloImageTemplateWin.json
sed -i -e "s/<runOutputName>/$runOutputName/g" helloImageTemplateWin.json
sed -i -e "s%<imgBuilderId>%$imgBuilderId%g" helloImageTemplateWin.json
Create the image by submitting the image configuration to the VM Image Builder service:
az resource create \
 --resource-group $imageResourceGroup \
 --properties @helloImageTemplateWin.json \
 --is-full-object \
 --resource-type Microsoft.VirtualMachineImages/imageTemplates \
 -n helloImageTemplateWin01
Tip
You can edit the code using a text editor.
After the image creation completes, Azure Image Builder displays a success message in the console, and creates an Image Builder Configuration Template in the
$imageResourceGroup. You can review this resource in the resource group in the Azure portal if you enable Show hidden types. In the background, Azure Image Builder also creates a staging resource group in your subscription. This resource group is used for the image build. It will be in this format:IT_<DestinationResourceGroup>_<TemplateName>_<GUID>.Start the image build:
 az resource invoke-action \
  --resource-group $imageResourceGroup \
  --resource-type  Microsoft.VirtualMachineImages/imageTemplates \
  -n helloImageTemplateWin01 \
  --action Run
Note
The image build can take up to 15 minutes.
Build a VM
The final step is to create a VM from the newly built image. To build the VM, run the following command in Azure CLI:
az vm create \
  --resource-group $imageResourceGroup \
  --name aibImgWinVm00 \
  --admin-username azureuser \
  --admin-password <password> \
  --image $imageName \
  --location $location
Tip
Change the administrator name in the preceding code to suit your requirements.
After you have built your VM, you should verify the customization. You do this by opening a Remote Desktop Protocol (RDP) connection to the VM, signing in with the defined username and password, and verifying the presence of the following objects:
- buildActions
- buildArtifacts
Note
When you have finished, clean up all the resources that you created during the build process. For more details, refer to Clean up.
Additional reading
You can learn more by reviewing the following documents: