Exercise - Deploy your ARM templates
Note
The first time you activate a sandbox and accept the terms, your Microsoft account is associated with a new Azure directory named Microsoft Learn Sandbox. You're added to a special subscription named Concierge Subscription.
Here, you deploy an Azure Resource Manager (ARM) template from your computer and from a GitHub repository by specifying a URI.
Important
This exercise uses Azure Resource Manager Tools for Visual Studio Code. Be sure to install this extension in Visual Studio Code.
Set up your environment with the Microsoft Learn Sandbox subscription
To perform each deployment in this unit, you need to sign in to your Azure account from the Visual Studio Code terminal.
Be sure you're signing in to the same account that activated the sandbox.
Sign in to Azure
From the terminal in Visual Studio Code, run the following command to sign in to Azure. Running this command opens a browser that allows you to sign in to your account.
Connect-AzAccountAfter you're signed in, you see a list of the subscriptions associated with this account in the terminal. If you activated the sandbox, the Concierge Subscription should be in this list.
Verify the subscription name. The following command lists your subscriptions, names, and their IDs in an easy-to-read table format. Look for
Concierge Subscription.Get-AzSubscriptionChange your active subscription to the Concierge Subscription.
$context = Get-AzSubscription -SubscriptionName "Concierge Subscription" | Set-AzContext
Set the default resource group
You now need to set the resource group created for you in the sandbox as the default resource group. To perform that operation, you first need to get the resource group name by running the following command.
Get-AzResourceGroup | where-object ResourceGroupName -match "learn" | Set-AzDefault
In this command, use the resource name that you got from the previous command. (It looks like something like learn-a73131a1-b618-48b8-af70-21af7ca420c4.) This command allows you to omit that parameter from the rest of the Azure PowerShell commands in this exercise.
Note
Normally, when you run a PowerShell or Azure CLI command to deploy a template, you must specify the target resource group name. Running the previous command, we've set the context of our deployment. We've specified our sandbox resource group name by running the Set-AzDefault PowerShell command:
Set-AzDefault -ResourceGroupName {Resource Group Name}
Deploy a local template
In the following exercise, you deploy a template from your local machine. The name of the resource group that you normally use when deploying in your own environment isn't needed here, because we already defined the default resource group in the previous section.
To get started, copy and paste the content of the following template code into a file in a local directory. Use
C:\JSON\maintemplate.json, for example.{ "$schema": "https://schema.management.azure.com/schemas/2019-04-01/deploymentTemplate.json#", "contentVersion": "1.0.0.0", "parameters": { "VnetName": { "type": "string", "defaultValue": "VNet-001", "metadata": { "description": "Virtual Network Name" } }, "CostCenterIO": { "type": "string", "defaultValue": "12345", "metadata": { "description": "Cost Center IO number for cross billing" } }, "OwnerName": { "type": "string", "defaultValue": "John Smith", "metadata": { "description": "Name of the stakeholder responsible for this resource" } } }, "variables": {}, "resources": [ { "apiVersion": "2018-10-01", "type": "Microsoft.Network/virtualNetworks", "name": "[parameters('VnetName')]", "location": "[resourceGroup().location]", "tags": { "CostCenter": "[parameters('CostCenterIO')]", "Owner": "[parameters('OwnerName')]" }, "properties": { "addressSpace": { "addressPrefixes": [ "10.0.0.0/16" ] }, "enableVmProtection": false, "enableDdosProtection": false, "subnets": [ { "name": "subnet001", "properties": { "addressPrefix": "10.0.0.0/24" } }, { "name": "subnet002", "properties": { "addressPrefix": "10.0.1.0/24" } } ] } } ] }After you save the file locally, you can use the PowerShell command to deploy it at the resource group level that we talked about in the last unit. Namely, use the New-AzResourceGroupDeployment command.
$templateFile="C:\JSON\maintemplate.json"
$today=Get-Date -Format "MM-dd-yyyy"
$DeploymentName="DeployLocalTemplate-"+"$today"

New-AzResourceGroupDeployment `
-Name $DeploymentName `
-TemplateFile $templateFile
After it finishes, you should have results like this example.
DeploymentName          : DeployLocalTemplate-08-24-2020
ResourceGroupName       : learn-03f041a7-cd17-4f50-9c81-5f6678feb217
ProvisioningState       : Succeeded
Timestamp               : 2020-08-24 5:50:04 p.m.
Mode                    : Incremental
TemplateLink            :
Parameters              :
                          Name             Type                       Value
                          ===============  =========================  ==========
                          vnetName         String                     VNet-001
                          costCenterIO     String                     12345
                          ownerName        String                     John Smith

Outputs                 :
DeploymentDebugLogLevel :
Deploy the same local template with parameter values
In the last exercise, you deployed your template by using the parameter's default value. When you're deploying a local ARM template, you might need to pass parameter values. You can use either inline parameters or a parameter file.
To pass inline parameters to your deployment, you need to provide the names of the parameter with the New-AzResourceGroupDeployment cmdlet. In the next exercise, you'll pass the parameters as inline` parameters and as a parameter file.
By using the same template as the last exercise, construct a hash table that contains the values for the required template parameters.
$parameters = @{vnetName = "VNet-001"; costCenterIO = "12345"; ownerName = "John Smith"}
$templateFile="C:\JSON\maintemplate.json"
$today=Get-Date -Format "MM-dd-yyyy"
$DeploymentName="DeployLocalTemplate-2-"+"$today"

New-AzResourceGroupDeployment `
    -Name $DeploymentName `
    -TemplateFile $templateFile `
    -TemplateParameterObject $parameters
After it finishes, you should have results like this:
DeploymentName          : DeployLocalTemplate-2-08-24-2020
ResourceGroupName       : learn-03f041a7-cd17-4f50-9c81-5f6678feb217
ProvisioningState       : Succeeded
Timestamp               : 2020-08-24 5:51:55 p.m.
Mode                    : Incremental
TemplateLink            :
Parameters              :
                          Name             Type                       Value
                          ===============  =========================  ==========
                          vnetName         String                     VNet-001
                          costCenterIO     String                     12345
                          ownerName        String                     John Smith

Outputs                 :
DeploymentDebugLogLevel :
Rather than pass parameters as inline values in your script, you might find it easier to use a JSON file that contains the parameter values. The parameter file can be a local file or an external/remote file with an accessible URI. For more information about the parameter file, see Create Resource Manager parameter file.
To pass a local parameter file, we use the
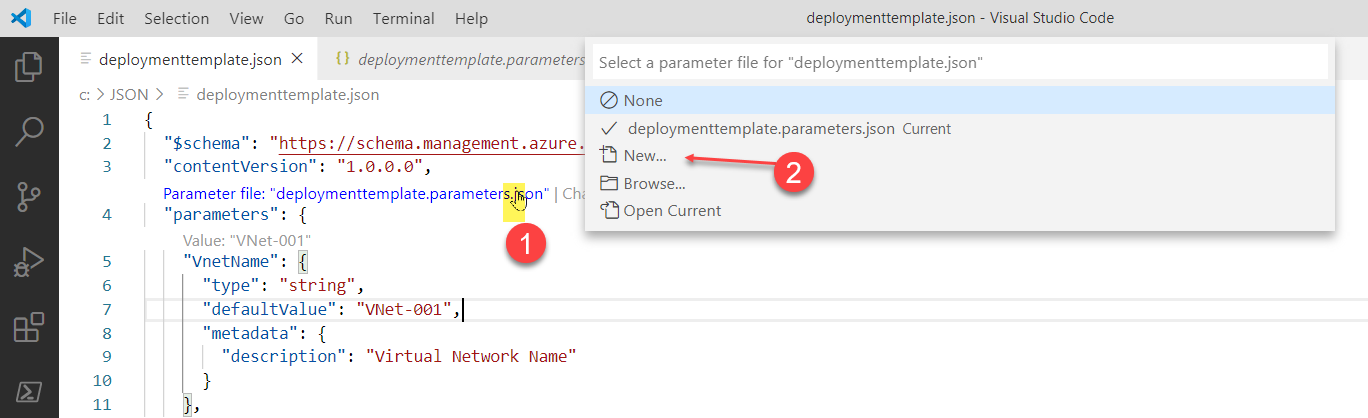
TemplateParameterFileparameter in the same command that we've been using. But first, you need to create and save your parameter file.Because we're using Visual Studio Code with the Azure Resource Manager Tools extension, you can open the ARM template that you saved locally and select the Select/create parameter file... link.
Select New on the menu, and then select Only required parameters. The extension creates a parameter file based on the currently opened template.
Use the following PowerShell command with the
TemplateParameterFileparameter.$parameters = @{vnetName = "VNet-001"; costCenterIO = "12345"; ownerName = "John Smith"} $templateFile="C:\JSON\maintemplate.json" $TemplateParameterFile= "C:\JSON\maintemplate.parameters.json" $today=Get-Date -Format "MM-dd-yyyy" $DeploymentName="DeployLocalTemplate-3-"+"$today" New-AzResourceGroupDeployment ` -Name $DeploymentName ` -TemplateFile $templateFile ` -TemplateParameterFile $TemplateParameterFileAfter the deployment, your results should look like the following example.
DeploymentName          : DeployLocalTemplate-3-08-24-2020
ResourceGroupName       : learn-03f041a7-cd17-4f50-9c81-5f6678feb217
ProvisioningState       : Succeeded
Timestamp               : 2020-08-24 5:54:40 p.m.
Mode                    : Incremental
TemplateLink            :
Parameters              :
                          Name             Type                       Value
                          ===============  =========================  ==========
                          vnetName         String                     VNet-001
                          costCenterIO     String                     12345
                          ownerName        String                     John Smith

Outputs                 :
DeploymentDebugLogLevel :
Deploy an external or remote template
In some instances, you need to deploy from an external or remote location instead of from a template on your local machine. You can store templates in a source control repository (such as GitHub). Or, you can store them in an Azure storage account for shared access in your organization.
To deploy an external template, use the
TemplateUriparameter.In the next exercise, you'll deploy an ARM template from a GitHub repo. The repo is public, so you don't need to worry about deploying a template that requires a shared access signature (SAS) token. For details about using a private or secured remote location, see Deploy a private template with SAS token.
The template URI for the exercise is https://raw.githubusercontent.com/Azure/azure-quickstart-templates/master/quickstarts/microsoft.storage/storage-account-create/azuredeploy.json. It's a short template that deploys a basic storage account in your sandbox environment.
The PowerShell command is exactly the same as for a local template. The only difference is that the
-TemplateUriparameter replaces the-TemplateFileparameter.Use the following code to deploy in the provided sandbox:
$parameters = @{vnetName = "VNet-001"; costCenterIO = "12345"; ownerName = "John Smith"}
$today=Get-Date -Format "MM-dd-yyyy"
$DeploymentName="DeployLocalTemplate-4-"+"$today"

New-AzResourceGroupDeployment `
    -Name $DeploymentName `
    -TemplateUri https://raw.githubusercontent.com/Azure/azure-quickstart-templates/master/quickstarts/microsoft.storage/storage-account-create/azuredeploy.json
The results are like the following screen capture. They outline the details of the template location.
DeploymentName          : DeployLocalTemplate-4-08-24-2020
ResourceGroupName       : learn-03f041a7-cd17-4f50-9c81-5f6678feb217
ProvisioningState       : Succeeded
Timestamp               : 2020-08-24 5:56:55 p.m.
Mode                    : Incremental
TemplateLink            :
                          Uri            :
                          https://raw.githubusercontent.com/Azure/azure-quickstart-templates/master/quickstarts/microsoft.storage/storage-account-create/azuredeploy.json
                          ContentVersion : 1.0.0.0

Parameters              :
                          Name                  Type                       Value
                          ====================  =========================  ==========
                          storageAccountType    String                     Standard_LRS
                          location              String                     westus

Outputs                 :
                          Name                  Type                       Value
                          ====================  =========================  ==========
                          storageAccountName    String                     storepgxosadmbq77e

DeploymentDebugLogLevel :
Note
This section was written using Azure CLI commands in Windows Linux Subsystem (WSL2) on Windows 10. The commands are the same whether you're using the Azure CLI in a PowerShell, CMD, or Bash shell. But the way the variables are addressed can differ.
Sign in to Azure
From the terminal in Visual Studio Code, run the following command to sign in to Azure. Running this command opens a browser that allows you to sign in to your account.
az loginAfter you're signed in, you see a JSON list of the subscriptions associated with this account in the terminal. If you activated the sandbox, the Concierge Subscription should be in this list.
Get the subscription ID. The following command lists your subscriptions and their IDs. The subscription ID is the third column. Look for
Concierge Subscriptionand copy the third column. It should look something likecf49fbbc-217c-4eb6-9eb5-a6a6c68295a0.az account list -o tableChange your active subscription to the Concierge Subscription. Be sure to substitute
{Your subscription ID}with the ID of the Concierge Subscription that you got in the previous command.az account set -s {Your subscription ID}
Set the default resource group
You now need to set the resource group created for you in the sandbox as the default resource group. To perform that operation, you first need to get the resource group name by using the following command:
az group list -o table
In this command, use the resource name that you got from the previous command. (It looks something like learn-a73131a1-b618-48b8-af70-21af7ca420c4.) This command allows you to omit that parameter from the rest of the Azure CLI commands in this exercise.
Note
Normally, when you use an Azure CLI command to deploy a template, you need to specify the target resource group name. In the exercise in this module, we're bypassing this requirement by setting the context of our deployment. We're specifying our sandbox resource group name in the next step by using the az configure Azure CLI command.
az configure --defaults group={Resource Group Name}
Deploy a local template
In the following exercise, you deploy a template from your local machine. The name of the resource group that you normally use when deploying in your own environment isn't needed here, because we already defined the default resource group in the previous section.
To get started, copy and paste the content of the following template code into a file in a local directory. Use
C:\JSON\maintemplate.jsonor/mnt/c/Users/you/json/maintemplate.json, for example.{ "$schema": "https://schema.management.azure.com/schemas/2019-04-01/deploymentTemplate.json#", "contentVersion": "1.0.0.0", "parameters": { "VnetName": { "type": "string", "defaultValue": "VNet-001", "metadata": { "description": "Virtual Network Name" } }, "CostCenterIO": { "type": "string", "defaultValue": "12345", "metadata": { "description": "Cost Center IO number for cross billing" } }, "OwnerName": { "type": "string", "defaultValue": "John Smith", "metadata": { "description": "Name of the stakeholder responsible for this resource" } } }, "variables": {}, "resources": [ { "apiVersion": "2018-10-01", "type": "Microsoft.Network/virtualNetworks", "name": "[parameters('VnetName')]", "location": "[resourceGroup().location]", "tags": { "CostCenter": "[parameters('CostCenterIO')]", "Owner": "[parameters('OwnerName')]" }, "properties": { "addressSpace": { "addressPrefixes": [ "10.0.0.0/16" ] }, "enableVmProtection": false, "enableDdosProtection": false, "subnets": [ { "name": "subnet001", "properties": { "addressPrefix": "10.0.0.0/24" } }, { "name": "subnet002", "properties": { "addressPrefix": "10.0.1.0/24" } } ] } } ] }After you save the file locally, you can use the Azure CLI command to deploy it at the resource group level that we talked about in the last unit. Namely, use az deployment group create.
Note
In the following example, the template file is in a json folder in the home drive in Windows Linux Subsystem (WSL2). Adjust your command based on your shell of choice.
templateFile=/mnt/c/Users/<UserName>/json/maintemplate.json
today=$(date +"%Y-%m-%d")
deploymentname="DeployLocalTemplate-"$today

az deployment group create \
  --name $deploymentname \
  --template-file $templateFile
After it finishes, the resulting output should look like the following example. To ensure that your deployment succeeded, look for the
"provisioningState": "Succeeded"line.{ "id": "/subscriptions/082d0d73-f197-45c5-9884-581c8f0ce102/resourceGroups/learn-e692001a-b605-48d4-97bd-7c05669db9dd/providers/Microsoft.Resources/deployments/DeployLocalTemplate-2020-08-19", "location": null, "name": "DeployLocalTemplate-2020-08-19", "properties": { "correlationId": "6ad759d5-cda5-4a71-a772-05a03d983c6f", "debugSetting": null, "dependencies": [], "duration": "PT8.9060761S", "error": null, "mode": "Incremental", "onErrorDeployment": null, "outputResources": [ { "id": "/subscriptions/082d0d73-f197-45c5-9884-581c8f0ce102/resourceGroups/ learn-e692001a-b605-48d4-97bd-7c05669db9dd/providers/Microsoft.Network/virtualNetworks/VNet-001", "resourceGroup": "learn-e692001a-b605-48d4-97bd-7c05669db9dd" } ], "outputs": null, "parameters": { "costCenterIO": { "type": "String", "value": "12345" }, "ownerName": { "type": "String", "value": "John Smith" }, "vnetName": { "type": "String", "value": "VNet-001" } }, "parametersLink": null, "providers": [ { "id": null, "namespace": "Microsoft.Network", "registrationPolicy": null, "registrationState": null, "resourceTypes": [ { "aliases": null, "apiVersions": null, "capabilities": null, "locations": [ "westus" ], "properties": null, "resourceType": "virtualNetworks" } ] } ], "provisioningState": "Succeeded", "templateHash": "11553431046699679955", "templateLink": null, "timestamp": "2020-08-19T14:47:06.403362+00:00", "validatedResources": null }, "resourceGroup": "learn-e692001a-b605-48d4-97bd-7c05669db9dd", "tags": null, "type": "Microsoft.Resources/deployments" }
Deploy the same local template with parameter values
In the last exercise, you deployed your template by using the parameter's default value. When you're deploying a local ARM template, you might need to pass parameter values. You can use either inline parameters or a parameter file.
In the next exercise, you pass inline parameters to your deployment. You need to provide the names of the parameters whether you're using inline parameters or a parameter file, by using the az deployment group create command.
By using the same template as the last exercise, construct a variable that contains the parameters in a JSON string format for the required template parameters.
Note
In the following example, the template file is in a json folder in Windows Linux Subsystem (WSL2). Adjust your command based on your shell and OS of choice.
parameters="{\"vnetName\":{\"value\":\"VNet-001\"},\"costCenterIO\":{\"value\":\"12345\"},\"ownerName\":{\"value\":\"John Smith\"}}"
templateFile=/mnt/c/Users/<UserName>/json/maintemplate.json
today=$(date +"%Y-%m-%d")
deploymentname="DeployLocalTemplate-2-"$today

az deployment group create \
--name $deploymentname \
--template-file $templateFile \
--parameters "$parameters"
After it finishes, you should have results like the following example. To ensure that the command was successful, see the
"parameters"section and the"provisioningState"value.{- Finished .. "id": "/subscriptions/082d0d73-f197-45c5-9884-581c8f0ce102/resourceGroups/learn-e692001a-b605-48d4-97bd-7c05669db9dd/providers/Microsoft.Resources/deployments/DeployLocalTemplate-2-2020-08-19", "location": null, "name": "DeployLocalTemplate-2-2020-08-19", "properties": { "correlationId": "edb2992e-08be-4ec2-940e-df23b1c09453", "debugSetting": null, "dependencies": [], "duration": "PT4.6990388S", "error": null, "mode": "Incremental", "onErrorDeployment": null, "outputResources": [ { "id": "/subscriptions/082d0d73-f197-45c5-9884-581c8f0ce102/resourceGroups/learn-e692001a-b605-48d4-97bd-7c05669db9dd/providers/Microsoft.Network/virtualNetworks/VNet-001", "resourceGroup": "learn-e692001a-b605-48d4-97bd-7c05669db9dd" } ], "outputs": null, "parameters": { "costCenterIO": { "type": "String", "value": "12345" }, "ownerName": { "type": "String", "value": "John Smith" }, "vnetName": { "type": "String", "value": "VNet-001" } }, "parametersLink": null, "providers": [ { "id": null, "namespace": "Microsoft.Network", "registrationPolicy": null, "registrationState": null, "resourceTypes": [ { "aliases": null, "apiVersions": null, "capabilities": null, "locations": [ "westus" ], "properties": null, "resourceType": "virtualNetworks" } ] } ], "provisioningState": "Succeeded", "templateHash": "11553431046699679955", "templateLink": null, "timestamp": "2020-08-19T16:40:20.249786+00:00", "validatedResources": null }, "resourceGroup": "learn-e692001a-b605-48d4-97bd-7c05669db9dd", "tags": null, "type": "Microsoft.Resources/deployments" }Rather than pass parameters as inline values in your script, you might find it easier to use a JSON file that contains the parameter values. The parameter file can be a local file or an external/remote file with an accessible URI. For more information about the parameter file, see Create Resource Manager parameter file.
To pass a local parameter file, we use the
--parametersparameter in the same command that we've been using. But first, you need to create and save your parameter file.Because we're using Visual Studio Code with the Azure Resource Manager Tools extension, you can open the ARM template that you saved locally and select the Select or create a parameter file to enable full validation link.
Select New on the menu. The extension creates a parameter file based on the currently opened template.
Use the following Azure CLI command with the
--parametersparameter.Note
In the following example, the template file is in a json folder in Windows Linux Subsystem (WSL2). Adjust the command based on your shell and OS of choice.
templateFile=/mnt/c/Users/<UserName>/json/maintemplate.json
templateparameterfile=/mnt/c/Users/<UserName>/json/maintemplate.parameters.json
today=$(date +"%Y-%m-%d")
deploymentname="DeployLocalTemplate-3-"$today

az deployment group create \
--name $deploymentname \
--template-file $templateFile \
--parameters $templateparameterfile
After the deployment, your results houdl look like the following example.
  {- Finished ..
    "id": "/subscriptions/00000000-0000-0000-0000-000000000000/resourceGroups/learn-159e2742-d3a1-4e71-84a3-16e19830242b/providers/Microsoft.Resources/deployments/DeployLocalTemplate-3-2020-08-19",
    "location": null,
    "name": "DeployLocalTemplate-3-2020-08-19",
    "properties": {
      "correlationId": "2a668f55-d8d0-48ac-862f-7170b48c02b6",
      "debugSetting": null,
      "dependencies": [],
      "duration": "PT4.2058912S",
      "error": null,
      "mode": "Incremental",
      "onErrorDeployment": null,
      "outputResources": [
        {
          "id": "/subscriptions/00000000-0000-0000-0000-000000000000/resourceGroups/learn-159e2742-d3a1-4e71-84a3-16e19830242b/providers/Microsoft.Network/virtualNetworks/VNet-001",
          "resourceGroup": "learn-159e2742-d3a1-4e71-84a3-16e19830242b"
        }
      ],
      "outputs": null,
      "parameters": {
        "costCenterIO": {
          "type": "String",
          "value": "12345"
        },
        "ownerName": {
          "type": "String",
          "value": "John Smith"
        },
        "vnetName": {
          "type": "String",
          "value": "VNet-001"
        }
      },
      "parametersLink": null,
      "providers": [
        {
          "id": null,
          "namespace": "Microsoft.Network",
          "registrationPolicy": null,
          "registrationState": null,
          "resourceTypes": [
            {
              "aliases": null,
              "apiVersions": null,
              "capabilities": null,
              "locations": [
                "westus"
              ],
              "properties": null,
              "resourceType": "virtualNetworks"
            }
          ]
        }
      ],
      "provisioningState": "Succeeded",
      "templateHash": "11553431046699679955",
      "templateLink": null,
      "timestamp": "2020-08-19T20:42:44.069215+00:00",
      "validatedResources": null
    },
    "resourceGroup": "learn-159e2742-d3a1-4e71-84a3-16e19830242b",
    "tags": null,
    "type": "Microsoft.Resources/deployments"
  }
Deploy an external or remote template
In some instances, you need to deploy from an external or remote location instead of from a template on your local machine. You can store templates in a source control repository (such as GitHub). Or, you can store them in an Azure storage account for shared access in your organization.
- To deploy an external template, use the
--template-uriparameter.
In this exercise, you deploy an ARM template from a GitHub repo. The repo is public, so you don't need to worry about deploying a template that requires a shared access signature (SAS) token. For details about using a private or secured remote location, see Deploy a private template with SAS token.
The template URI for the exercise is https://raw.githubusercontent.com/Azure/azure-quickstart-templates/master/quickstarts/microsoft.storage/storage-account-create/azuredeploy.json. It's a short template that deploys a basic storage account in your sandbox environment.
The Azure CLI command is exactly the same as for a local template. The only difference is that the
--template-uriparameter replaces the--template-fileparameter.Use the following code to deploy in the provided sandbox:
parameters="{\"vnetName\":{\"value\":\"VNet-001\"},\"costCenterIO\":{\"value\":\"12345\"},\"ownerName\":{\"value\":\"John Smith\"}}"
today=$(date +"%Y-%m-%d")
deploymentname="DeployLocalTemplate-4-"$today

az deployment group create \
--name $deploymentname \
--template-uri https://raw.githubusercontent.com/Azure/azure-quickstart-templates/master/quickstarts/microsoft.storage/storage-account-create/azuredeploy.json
The results are like the following code block. They outline the details of the template location in the
"templateLink"section. They also show if the deployment is successful in the"provisioningState"section.{- Finished .. "id": "/subscriptions/00000000-0000-0000-0000-000000000000/resourceGroups/learn-159e2742-d3a1-4e71-84a3-16e19830242b/providers/Microsoft.Resources/deployments/DeployLocalTemplate-4-2020-08-19", "location": null, "name": "DeployLocalTemplate-4-2020-08-19", "properties": { "correlationId": "2ccc49de-9d46-4375-a25d-19ec10daf88b", "debugSetting": null, "dependencies": [], "duration": "PT24.3286124S", "error": null, "mode": "Incremental", "onErrorDeployment": null, "outputResources": [ { "id": "/subscriptions/00000000-0000-0000-0000-000000000000/resourceGroups/learn-159e2742-d3a1-4e71-84a3-16e19830242b/providers/Microsoft.Storage/storageAccounts/store7zk7eyqew54l4", "resourceGroup": "learn-159e2742-d3a1-4e71-84a3-16e19830242b" } ], "outputs": { "storageAccountName": { "type": "String", "value": "store7zk7eyqew54l4" } }, "parameters": { "location": { "type": "String", "value": "westus" }, "storageAccountType": { "type": "String", "value": "Standard_LRS" } }, "parametersLink": null, "providers": [ { "id": null, "namespace": "Microsoft.Storage", "registrationPolicy": null, "registrationState": null, "resourceTypes": [ { "aliases": null, "apiVersions": null, "capabilities": null, "locations": [ "westus" ], "properties": null, "resourceType": "storageAccounts" } ] } ], "provisioningState": "Succeeded", "templateHash": "12600309984865991765", "templateLink": { "contentVersion": "1.0.0.0", "id": null, "relativePath": null, "uri": "https://raw.githubusercontent.com/Azure/azure-quickstart-templates/master/quickstarts/microsoft.storage/storage-account-create/azuredeploy.json" }, "timestamp": "2020-08-19T20:53:36.759312+00:00", "validatedResources": null }, "resourceGroup": "learn-159e2742-d3a1-4e71-84a3-16e19830242b", "tags": null, "type": "Microsoft.Resources/deployments" }