Exercise - Deploy linked and nested ARM templates
Note
The first time you activate a sandbox and accept the terms, your Microsoft account is associated with a new Azure directory named Microsoft Learn Sandbox. You're added to a special subscription named Concierge Subscription.
Here, you deploy a template that includes two linked templates in the supplied sandbox environment.
This exercise uses Azure Resource Manager Tools for Visual Studio Code. Be sure to install this extension in Visual Studio Code.
Set up your test environment with the provided Azure sandbox subscription
To perform each deployment in this unit, you need to sign in to your Azure account from the Visual Studio Code terminal.
Be sure you're signing in to the same account that activated the sandbox.
Sign in to Azure
From the terminal in Visual Studio Code, run the following command to sign in to Azure. Running this command opens a browser that allows you to sign in to your account.
Connect-AzAccountAfter you're signed in, you see a list of the subscriptions associated with this account in the terminal. If you activated the sandbox, the Concierge Subscription should be in this list.
Get the subscription ID. The following command lists your subscriptions and their IDs in an easy-to-read table format. The subscription ID is the second column. Look for
Concierge Subscriptionand copy the second column. It looks something likecf49fbbc-217c-4eb6-9eb5-a6a6c68295a0.Get-AzSubscriptionChange your active subscription to the Concierge Subscription. Be sure to substitute
{Your subscription ID}with the ID of the Concierge Subscription that you got in the previous command.$context = Get-AzSubscription -SubscriptionId {Your subscription ID} Set-AzContext $context
Set the default resource group
You now need to set the resource group created for you in the sandbox as the default resource group. To perform that operation, you first need to get the resource group name by using the following command:
Get-AzResourceGroup
In this command, use the resource name that you got from the previous command. It looks something like learn-a73131a1-b618-48b8-af70-21af7ca420c4. This command allows you to omit that parameter from the rest of the Azure PowerShell commands in this exercise.
Note
Normally, when you use a PowerShell or Azure CLI command to deploy a template, you need to specify the target resource group name. In the exercise in this module, we're bypassing this requirement by setting the context of our deployment. We're specifying our sandbox resource group name in the next step by using the Set-AzDefault PowerShell command.
Set-AzDefault -ResourceGroupName {Resource Group Name}
Deploy a linked template
In this exercise, we review and deploy a template that includes two linked templates.
To add a linked template to your ARM template, add a
Microsoft.Resources/deploymentsresource and thetemplateLinkproperty configured with the location of the template.In the following sample template, notice that two variables define remote or external templates located in a GitHub repo.
Review the template and note the
"type": "Microsoft.Resources/deployments"sections that define where and how the linked templates are deployed.The first linked template deploys a storage account. It consumes the parent parameters and deploys the storage template.
The second linked template is configured to depend on the storage deployment, and to deploy a virtual network template.
{
"$schema": "https://schema.management.azure.com/schemas/2019-04-01/deploymentTemplate.json#",
"contentVersion": "1.0.0.0",
"parameters": {
    "name": {
        "type": "string",
        "defaultValue": "linkeddemo001"
    }
},
"variables": {
    "linked-template": "https://raw.githubusercontent.com/Azure/azure-quickstart-templates/master/quickstarts/microsoft.storage/storage-account-create/azuredeploy.json",
    "linked-template-2": "https://raw.githubusercontent.com/Azure/azure-docs-json-samples/master/azure-resource-manager/what-if/what-if-before.json"
},
"resources": [
    {
        "name": "storage",
        "type": "Microsoft.Resources/deployments",
        "apiVersion": "2019-10-01",
        "properties": {
            "mode": "Incremental",
            "templateLink": {
                "uri": "[variables('linked-template')]",
                "contentVersion": "1.0.0.0"
            },
            "parameters": {
                "location": { "value": "[resourceGroup().location]" }
            }
        }
    },
    {
        "name": "identity",
        "type": "Microsoft.Resources/deployments",
        "apiVersion": "2019-10-01",
        "dependsOn": [
            "[resourceId('Microsoft.Resources/deployments','storage')]"
        ],
        "properties": {
            "mode": "Incremental",
            "templateLink": {
                "uri": "[variables('linked-template-2')]",
                "contentVersion": "1.0.0.0"
            }
        }
    }
],
"outputs": {}
}
Copy and paste the content of the preceding template into a file in a local directory. Use
C:\JSON\linkedtemplate.json, for example.After you save the file locally, use the following PowerShell command to deploy it at the resource group level that we talked about in the last unit. Namely, use New-AzResourceGroupDeployment.
    $templateFile="C:\JSON\linkedtemplate.json"
    $today=Get-Date -Format "MM-dd-yyyy"
    $DeploymentName="DeployLinkedTemplate-"+"$today"

    New-AzResourceGroupDeployment `
    -Name $DeploymentName `
    -TemplateFile $templateFile
After it finishes, you should have results like the following exmaple.
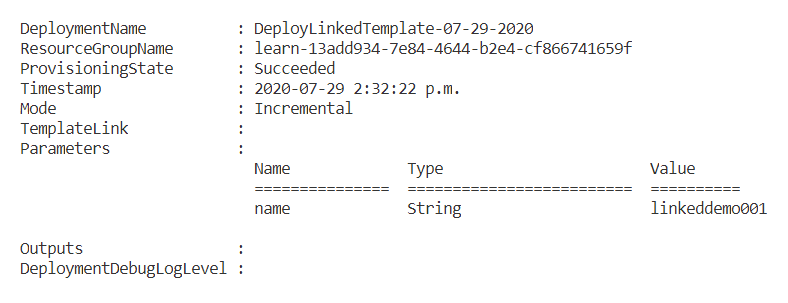
Validate the results.
Go to the Azure portal and make sure you're in the sandbox subscription. To do that, select your avatar in the upper-right corner of the page. Select Switch directory. In the list, choose the Microsoft Learn Sandbox directory.
On the left panel, select Resource groups.
Select
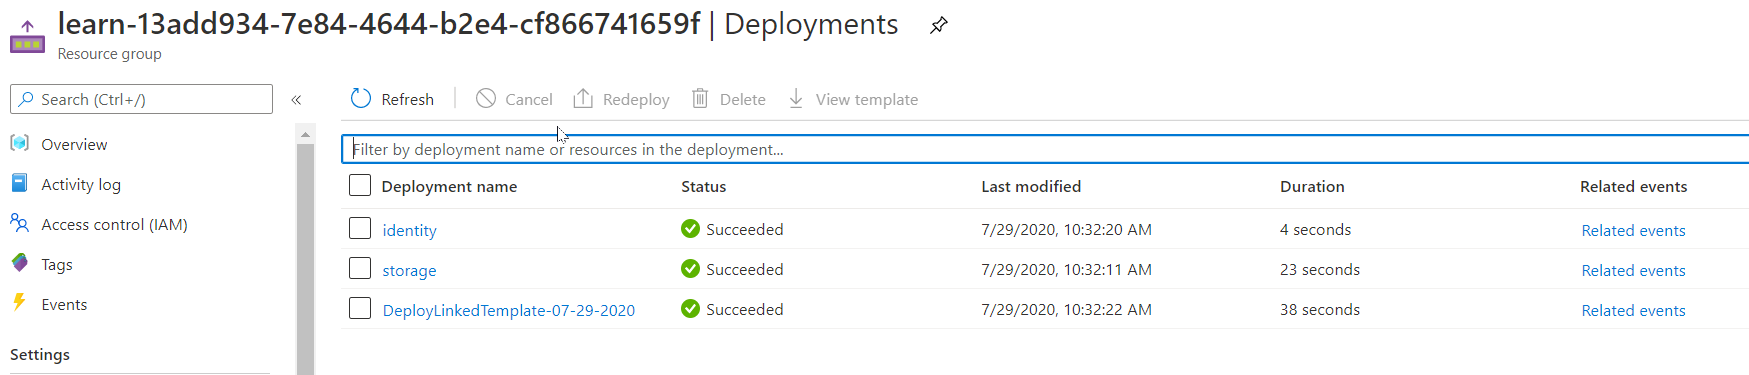
[sandbox resource group name] .In the Overview area, you see that the deployment succeeds. Select 3 Succeeded to see the details of the deployment. (There might be more completed deployments, depending on whether you performed the previous unit's exercises.)

Notice that you deployed one template, but three are listed on the deployment pane of the portal. Those three deployments correspond to the main template and the two linked templates.
Sign in to Azure
From the terminal in Visual Studio Code, run the following command to sign in to Azure. Running this command opens a browser that allows you to sign in to your account.
az loginAfter you're signed in, you see a JSON list of the subscriptions associated with this account in the terminal. If you activated the sandbox, the Concierge Subscription should be in this list.
Get the subscription ID. The following command lists your subscriptions and their IDs. The subscription ID is the third column. Look for
Concierge Subscriptionand copy the third column. It looks something likecf49fbbc-217c-4eb6-9eb5-a6a6c68295a0.az account list -o tableChange your active subscription to the Concierge Subscription. Be sure to substitute
{Your subscription ID}with the ID of the Concierge Subscription that you got in the previous command.az account set -s {Your subscription ID}
Set the default resource group
You now need to set the resource group created for you in the sandbox as the default resource group. To perform that operation, you first need to get the resource group name by using the following command:
az group list -o table
In this command, use the name of the resource group that you got from the previous command. (It looks something like learn-a73131a1-b618-48b8-af70-21af7ca420c4.) Setting this default allows you to omit that parameter from the rest of the Azure CLI commands in this exercise.
Note
Normally, when you use an Azure CLI command to deploy a template, you need to specify the target resource group name. In the exercise in this module, we're bypassing this requirement by setting the context of our deployment. We're specifying our sandbox resource group name in the next step by using the az configure Azure CLI command.
az configure --defaults group={Resource Group Name}
Deploy a linked template
In this exercise, we review and deploy a template that includes two linked templates.
To add a linked template to your ARM template, add a
Microsoft.Resources/deploymentsresource and thetemplateLinkproperty configured with the location of the template.In the following sample template, notice that two variables define remote or external templates located in a GitHub repo.
Review the template and note the
"type": "Microsoft.Resources/deployments"sections that define where and how the linked templates are deployed.The first linked template deploys a storage account. It consumes the parent parameters and deploys the storage template.
The second linked template is configured to depend on the storage deployment, and to deploy a virtual network template.
{
"$schema": "https://schema.management.azure.com/schemas/2019-04-01/deploymentTemplate.json#",
"contentVersion": "1.0.0.0",
"parameters": {
    "name": {
        "type": "string",
        "defaultValue": "linkeddemo001"
    }
},
"variables": {
    "linked-template": "https://raw.githubusercontent.com/Azure/azure-quickstart-templates/master/quickstarts/microsoft.storage/storage-account-create/azuredeploy.json",
    "linked-template-2": "https://raw.githubusercontent.com/Azure/azure-docs-json-samples/master/azure-resource-manager/what-if/what-if-before.json"
},
"resources": [
  {
      "name": "storage",
      "type": "Microsoft.Resources/deployments",
      "apiVersion": "2019-10-01",
      "properties": {
          "mode": "Incremental",
          "templateLink": {
              "uri": "[variables('linked-template')]",
              "contentVersion": "1.0.0.0"
          },
          "parameters": {
              "location": { "value": "[resourceGroup().location]" }
          }
      }
  },
  {
      "name": "identity",
      "type": "Microsoft.Resources/deployments",
      "apiVersion": "2019-10-01",
      "dependsOn": [
          "[resourceId('Microsoft.Resources/deployments','storage')]"
      ],
      "properties": {
          "mode": "Incremental",
          "templateLink": {
              "uri": "[variables('linked-template-2')]",
              "contentVersion": "1.0.0.0"
          }
      }
  }
],
"outputs": {}
}
Copy and paste the content of the preceding template into a file in a local directory. Use
C:\JSON\linkedtemplate.json or /mnt/c/Users/you/json/linkedtemplate.json, for example.After you save that file locally, deploy it at the resource group level by using the following Azure CLI command. Namely, use az deployment group create.
templateFile=/mnt/c/Users/<UserName>/json/linkedtemplate.json
today=$(date +"%Y-%m-%d")
deploymentname="DeployLocalTemplate-3-"$today

az deployment group create \
--name $deploymentname \
--template-file $templateFile
After it finishes, you should have results like the following example. Check the
"provisioningState"value to ensure that the deployment succeeded.{- Finished .. "id": "/subscriptions/00000000-0000-0000-0000-000000000000/resourceGroups/learn-159e2742-d3a1-4e71-84a3-16e19830242b/providers/Microsoft.Resources/deployments/DeployLocalTemplate-3-2020-08-19", "location": null, "name": "DeployLocalTemplate-3-2020-08-19", "properties": { "correlationId": "f127f689-badf-4063-ad55-dff549e63e48", "debugSetting": null, "dependencies": [ { "dependsOn": [ { "id": "/subscriptions/00000000-0000-0000-0000-000000000000/resourceGroups/learn-159e2742-d3a1-4e71-84a3-16e19830242b/providers/Microsoft.Resources/deployments/storage", "resourceGroup": "learn-159e2742-d3a1-4e71-84a3-16e19830242b", "resourceName": "storage", "resourceType": "Microsoft.Resources/deployments" } ], "id": "/subscriptions/00000000-0000-0000-0000-000000000000/resourceGroups/learn-159e2742-d3a1-4e71-84a3-16e19830242b/providers/Microsoft.Resources/deployments/identity", "resourceGroup": "learn-159e2742-d3a1-4e71-84a3-16e19830242b", "resourceName": "identity", "resourceType": "Microsoft.Resources/deployments" } ], "duration": "PT16.4639167S", "error": null, "mode": "Incremental", "onErrorDeployment": null, "outputResources": [ { "id": "/subscriptions/00000000-0000-0000-0000-000000000000/resourceGroups/learn-159e2742-d3a1-4e71-84a3-16e19830242b/providers/Microsoft.Network/virtualNetworks/vnet-001", "resourceGroup": "learn-159e2742-d3a1-4e71-84a3-16e19830242b" }, { "id": "/subscriptions/00000000-0000-0000-0000-000000000000/resourceGroups/learn-159e2742-d3a1-4e71-84a3-16e19830242b/providers/Microsoft.Storage/storageAccounts/store7zk7eyqew54l4", "resourceGroup": "learn-159e2742-d3a1-4e71-84a3-16e19830242b" } ], "outputs": {}, "parameters": { "name": { "type": "String", "value": "linkeddemo001" } }, "parametersLink": null, "providers": [ { "id": null, "namespace": "Microsoft.Resources", "registrationPolicy": null, "registrationState": null, "resourceTypes": [ { "aliases": null, "apiVersions": null, "capabilities": null, "locations": [ null ], "properties": null, "resourceType": "deployments" } ] } ], "provisioningState": "Succeeded", "templateHash": "12700491000282730217", "templateLink": null, "timestamp": "2020-08-19T21:07:18.729310+00:00", "validatedResources": null }, "resourceGroup": "learn-159e2742-d3a1-4e71-84a3-16e19830242b", "tags": null, "type": "Microsoft.Resources/deployments" }Validate the results.
Go to the Azure portal and make sure you're in the sandbox subscription. To do that, select your avatar in the upper-right corner of the page. Select Switch directory. In the list, choose the Microsoft Learn Sandbox directory.
On the left panel, select Resource groups.
Select
[sandbox resource group name] .In the Overview area, you see that the deployment succeeded. Select 3 Succeeded to see the details of the deployment. (There might be more completed deployments, depending on whether you performed the previous unit's exercises.)
Notice that you deployed one template, but three are listed on the deployment pane of the portal. Those three deployments correspond to the main template and the two linked templates.