Exercise - Connect an ASP.NET application to Azure SQL Database
Your database is created. Now you can configure and deploy a web application that academic advisors can use to discuss courses and plans of study with students. The app uses the System.Data.SqlClient library to retrieve and display the details of courses and modules that a student must pass to complete a course.
To save time, we use a pre-existing web application and show you how to add the code that connects this app to your database. The following diagram shows the primary components of this app:

To configure the web application, do the following things:
- Create a class that holds the course name, module title, and sequence for each module in the database.
- Create a data access controller class that retrieves the information from the database.
- Edit the code that's behind the index page in the web app to create a data access controller object and fetch the data.
- Edit the index page to display the data.
Deploy and run the pre-existing web app
Change your working directory to the
educationfolder.cd ~/educationRun the following commands to build and deploy the initial web app.
WEBAPPNAME=educationapp-$RANDOM
az webapp up \
    --resource-group <rgn>[Sandbox resource group]</rgn> \
    --location centralus \
    --sku F1 \
    --name $WEBAPPNAME
When the web application has been deployed, the output shows an App_url with the URL of the web site. Open this site in a new tab.
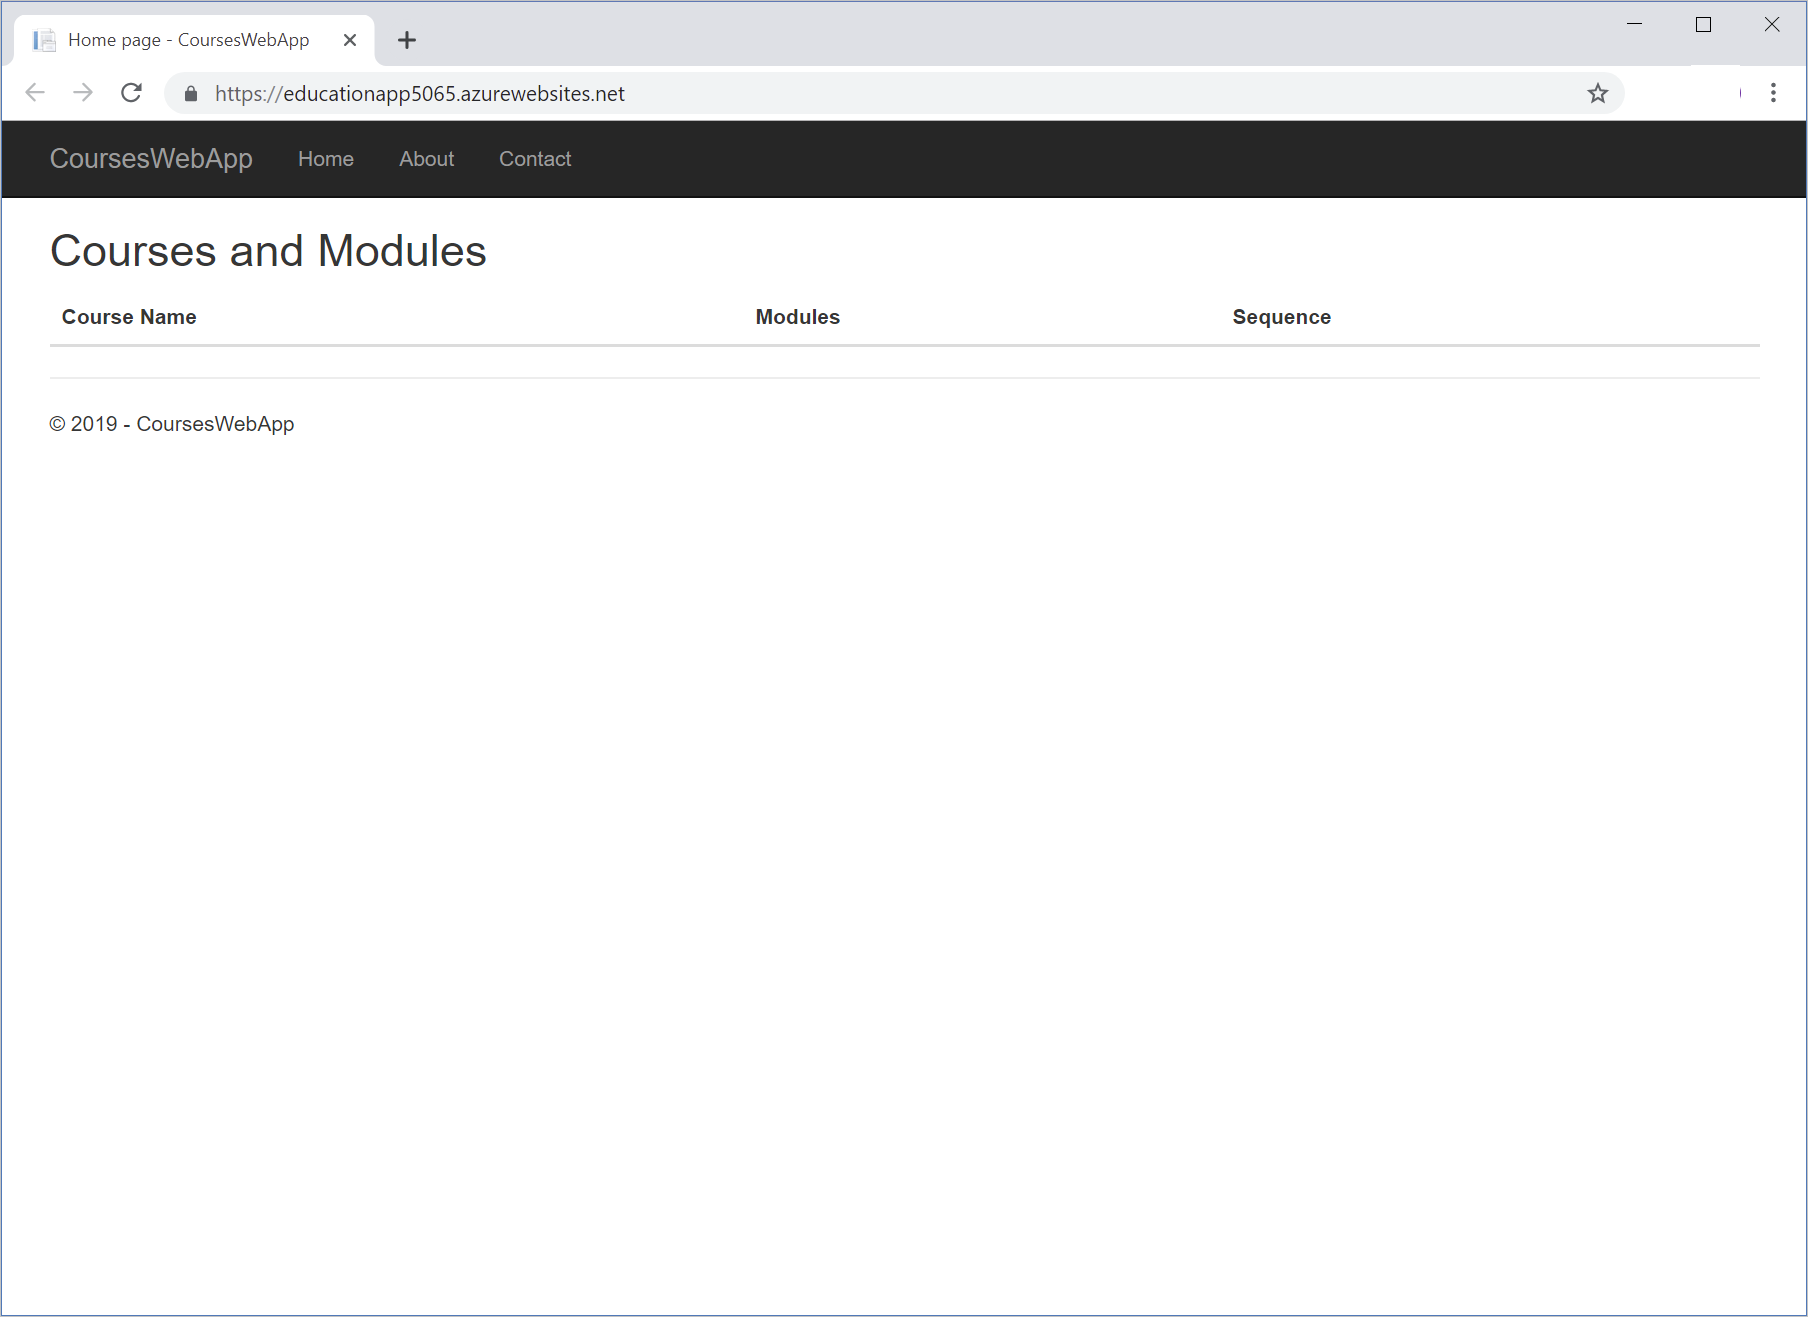
You want the web app to display a list of courses and the modules that make up each course. Currently, the app doesn't retrieve or display this data. So, you need to update the code to get the data from the database and display it.
Add code to the web app to retrieve data
Now let's add to the application the code to retrieve course data from the database.
In Cloud Shell, go to the
education/Modelsfolder.cd ~/education/ModelsThis folder contains two files,
CoursesAndModules.csandDataAccessController.cs.Use the code editor to open the
CoursesAndModules.csfile.code CoursesAndModules.csThis file contains an empty class that's named
CoursesAndModules.namespace CoursesWebApp.Models { public class CoursesAndModules { // TODO: Define the CourseName, ModuleTitle, and Sequence read-only properties // TODO: Create a constructor that initializes the fields behind the properties } }Replace the comment
// TODO: Define the CourseName, ModuleTitle, and Sequence read-only propertieswith the following code.public string CourseName { get; } public string ModuleTitle { get; } public int Sequence { get; }This code defines a set of read-only fields that contain the data for each row displayed by the web app.
Replace the comment
// TODO: Create a constructor that initializes the fields behind the propertieswith the following constructor.public CoursesAndModules(string courseName, string moduleTitle, int sequence) { this.CourseName = courseName; this.ModuleTitle = moduleTitle; this.Sequence = sequence; }This constructor populates the fields with the data to display. The complete file should contain the following code.
namespace CoursesWebApp.Models
{
    public class CoursesAndModules
    {
        public string CourseName { get; }
        public string ModuleTitle { get; }
        public int Sequence { get; }

        public CoursesAndModules(string courseName, string moduleTitle, int sequence)
        {
            this.CourseName = courseName;
            this.ModuleTitle = moduleTitle;
            this.Sequence = sequence;
        }
    }
}
Save the file by pressing Ctrl+S, and close the code editor by pressing Ctrl+Q.
Use the code editor to open the
DataAccessController.csfile.code DataAccessController.csThis file contains a class that's named
DataAccessController. This class contains the data access logic to connect to the database and retrieve the course and module data. It populates a list ofCoursesAndModulesobjects with this data.using Microsoft.Extensions.Options; using System; using System.Collections.Generic; using System.Data; using System.Data.SqlClient; using System.Linq; using System.Threading.Tasks; namespace CoursesWebApp.Models { public class DataAccessController { // TODO: Add your connection string in the following statements private string connectionString = "<Azure SQL Database Connection String>"; // Retrieve all details of courses and their modules public IEnumerable<CoursesAndModules> GetAllCoursesAndModules() { List<CoursesAndModules> courseList = new List<CoursesAndModules>(); // TODO: Connect to the database //using () { // TODO: Specify the Transact-SQL query to run // TODO: Execute the query // TODO: Read the data a row at a time // TODO: Close the database connection } return courseList; } } }Leave the code editor open, and switch to the Azure portal.
On the Azure portal menu, select SQL databases, and then select your database. The SQL database for coursedatabaseNNN appears.
In the left menu pane, under Settings, select Connection strings. Copy the ADO.NET connection string to the clipboard.
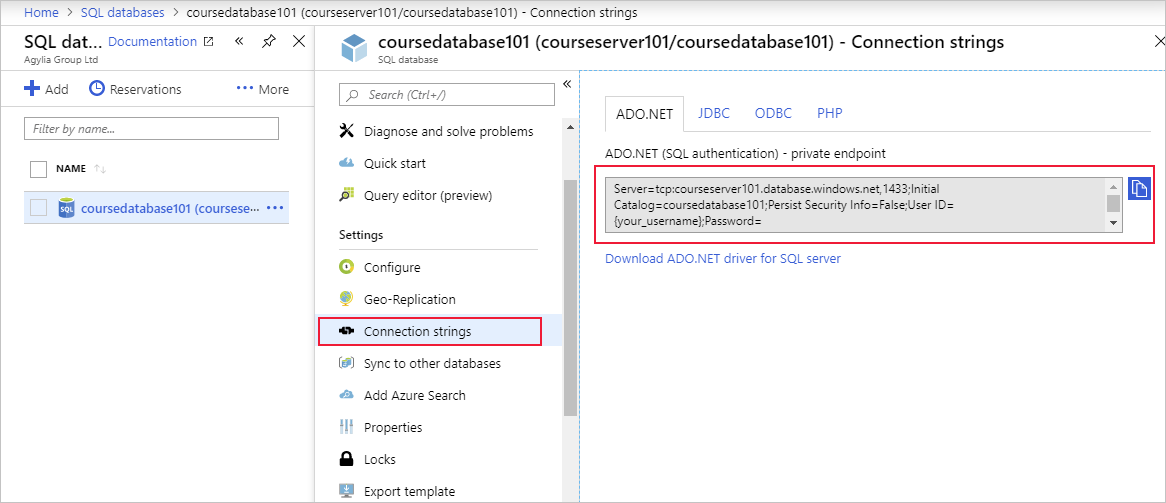
Return to the code editor. Replace the value of the connectionString variable with the value from the clipboard. In the connection string, see the text
User IDwith the valueazuresql. Replace the text{your_password}with the password for this account.private string connectionString = "Server=tcp:courseservernnn.database.windows.net,1433;Initial Catalog=coursedatabasennn;Persist Security Info=False;User ID=azuresql;Password=<password>;MultipleActiveResultSets=False;Encrypt=True;TrustServerCertificate=False;Connection Timeout=30;";After the comment
//TODO: Connect to the database, replace the commented-outusingstatement with the following code.using (SqlConnection con = new SqlConnection(connectionString))This code creates a new
SqlConnectionobject that uses your connection string to connect to the database.Replace the comment
// TODO: Specify the Transact-SQL query to runwith the following statements.SqlCommand cmd = new SqlCommand( @"SELECT c.CourseName, m.ModuleTitle, s.ModuleSequence FROM dbo.Courses c JOIN dbo.StudyPlans s ON c.CourseID = s.CourseID JOIN dbo.Modules m ON m.ModuleCode = s.ModuleCode ORDER BY c.CourseName, s.ModuleSequence", con); cmd.CommandType = CommandType.Text;The
SqlCommandobject contains a Transact-SQL (T-SQL) statement that retrieves the data for all courses and modules. It joins them by using the information in thedbo.StudyPlantable.Replace the comment
// TODO: Execute the querywith the following code.con.Open(); SqlDataReader rdr = cmd.ExecuteReader();These statements open the connection to the database and run the T-SQL statement. You can use the
SqlDataReaderobject to fetch the results one row at a time.Replace the comment
// TODO: Read the data a row at a timewith the following block of code.while (rdr.Read()) { string courseName = rdr["CourseName"].ToString(); string moduleTitle = rdr["ModuleTitle"].ToString(); int moduleSequence = Convert.ToInt32(rdr["ModuleSequence"]); CoursesAndModules course = new CoursesAndModules(courseName, moduleTitle, moduleSequence); courseList.Add(course); }This block iterates through the rows that are returned in the
SqlDataReaderobject. The code extracts the data in the fields in each row and uses them to populate a newCoursesAndModulesobject. This object is then added to a list.Replace the comment
// TODO: Close the database connectionwith the following statement.con.Close();This statement closes the connection to the database and releases any resources that were held.
The completed class should contain the following code, which includes the connection string for your database.
using Microsoft.Extensions.Options;
using System;
using System.Collections.Generic;
using System.Data;
using System.Data.SqlClient;
using System.Linq;
using System.Threading.Tasks;

namespace CoursesWebApp.Models
{
    public class DataAccessController
    {
        // Add your connection string in the following statements
        private string connectionString = "Server=tcp:courseserver101.database.windows.net,1433;Initial Catalog=coursedatabase101;Persist Security Info=False;User ID=azuresql;Password=<password>;MultipleActiveResultSets=False;Encrypt=True;TrustServerCertificate=False;Connection Timeout=30;";

        // Retrieve all details of courses and their modules
        public IEnumerable<CoursesAndModules> GetAllCoursesAndModules()
        {
            List<CoursesAndModules> courseList = new List<CoursesAndModules>();

            // Connect to the database
            using (SqlConnection con = new SqlConnection(connectionString))
            {
                // Specify the Transact-SQL query to run
                SqlCommand cmd = new SqlCommand(
                    @"SELECT c.CourseName, m.ModuleTitle, s.ModuleSequence
                    FROM dbo.Courses c JOIN dbo.StudyPlans s
                    ON c.CourseID = s.CourseID
                    JOIN dbo.Modules m
                    ON m.ModuleCode = s.ModuleCode
                    ORDER BY c.CourseName, s.ModuleSequence", con);
                cmd.CommandType = CommandType.Text;

                // Execute the query
                con.Open();
                SqlDataReader rdr = cmd.ExecuteReader();

                // Read the data a row at a time
                while (rdr.Read())
                {
                    string courseName = rdr["CourseName"].ToString();
                    string moduleTitle = rdr["ModuleTitle"].ToString();
                    int moduleSequence = Convert.ToInt32(rdr["ModuleSequence"]);
                    CoursesAndModules course = new CoursesAndModules(courseName, moduleTitle, moduleSequence);
                    courseList.Add(course);
                }

                // Close the database connection
                con.Close();
            }
            return courseList;
        }
    }
}
Save the file, and close the Code editor.
Add code to the web app to display the data
The application can now retrieve the course data. Now, update the app to display the data to the user.
In Cloud Shell, move to the
education/Pagesfolder.cd ~/education/PagesThis folder contains the .cshtml pages and code files that the web app uses to display information.
Use the code editor to open the
Index.cshtml.csfile.code Index.cshtml.csThis file contains code that the index page runs when it's displayed. The code defines a class
CoursesAndModulesModel. The index page uses this model to display the details of courses and modules. In this file, you need to add the code that uses aDataAccessControllerobject to fetch that data.using System; using System.Collections.Generic; using System.Linq; using System.Threading.Tasks; using CoursesWebApp.Models; using Microsoft.AspNetCore.Mvc; using Microsoft.AspNetCore.Mvc.RazorPages; namespace CoursesWebApp.Pages { public class CoursesAndModulesModel : PageModel { // TODO: Create a DataAccessController object // TODO: Create a collection for holding CoursesAndModules object public void OnGet() { // TODO: Retrieve the data using the DataAccessController object and populate the CoursesAndModules object } } }In
Index.cshtml.cs, replace the comment// TODO: Create a DataAccessController objectwith the following code to create a newDataAccessControllerobject.DataAccessController dac = new DataAccessController();Replace the comment
// TODO: Create a collection for holding CoursesAndModules objectwith the following code.public List<CoursesAndModules> CoursesAndModules;In the
OnGetmethod, replace the comment// TODO: Retrieve the data using the DataAccessController object and populate the CoursesAndModules objectwith the following code. This code uses theDataAccessControllerobject to populate the list with the data from the database.CoursesAndModules = dac.GetAllCoursesAndModules().ToList();The completed file should contain the following code.
using System;
using System.Collections.Generic;
using System.Linq;
using System.Threading.Tasks;
using CoursesWebApp.Models;
using Microsoft.AspNetCore.Mvc;
using Microsoft.AspNetCore.Mvc.RazorPages;

namespace CoursesWebApp.Pages
{
    public class CoursesAndModulesModel : PageModel
    {
        // Create a DataAccessController object
        DataAccessController dac = new DataAccessController();

        // Create a collection for holding CoursesAndModules object
        public List<CoursesAndModules> CoursesAndModules;

        public void OnGet()
        {
            // Retrieve the data using the DataAccessController object and populate the CoursesAndModules object
            CoursesAndModules = dac.GetAllCoursesAndModules().ToList();
        }
    }
}
Save the file, and close the code editor.
Use the code editor to open the file
Index.cshtml.code Index.cshtmlThis file contains the display logic for the index page. It specifies
CoursesAndModulesModelas the data source. The code that we've added creates and populates this model.The page uses HTML data to display the data from the model. Currently, the page just displays the table headings. The table body (
<tbody>) is empty.<h2>Courses and Modules</h2> <div> <table class="table"> <thead> <tr> <th> Course Name </th> <th> Modules </th> <th> Sequence </th> </tr> </thead> <tbody> <!-- TODO: Display the data from the CoursesAndModules collection --> </tbody> </table> </div>Replace the comment
<!-- TODO: Display the data from the CoursesAndModules collection --\>with the following markup.@foreach(var courseAndModule in Model.CoursesAndModules) { <tr> <td> @Html.DisplayFor(courseName => courseAndModule.CourseName) </td> <td> @Html.DisplayFor(moduleTitle => courseAndModule.ModuleTitle) </td> <td> @Html.DisplayFor(sequence => courseAndModule.Sequence) </td> </tr> }This code iterates through the rows in the model and outputs the data in each field.
The completed
Index.cshtmlfile should contain the following code.@page @model CoursesAndModulesModel @{ ViewData["Title"] = "Home page"; } <h2>Courses and Modules</h2> <div> <table class="table"> <thead> <tr> <th> Course Name </th> <th> Modules </th> <th> Sequence </th> </tr> </thead> <tbody> @foreach(var courseAndModule in Model.CoursesAndModules) { <tr> <td> @Html.DisplayFor(courseName => courseAndModule.CourseName) </td> <td> @Html.DisplayFor(moduleTitle => courseAndModule.ModuleTitle) </td> <td> @Html.DisplayFor(sequence => courseAndModule.Sequence) </td> </tr> } </tbody> </table> </div>Save the file, and close the code editor.
Deploy and test the updated web app
With the application fully configured to retrieve and display the course data to the user, you can deploy the updated version.
In Cloud Shell, return to the
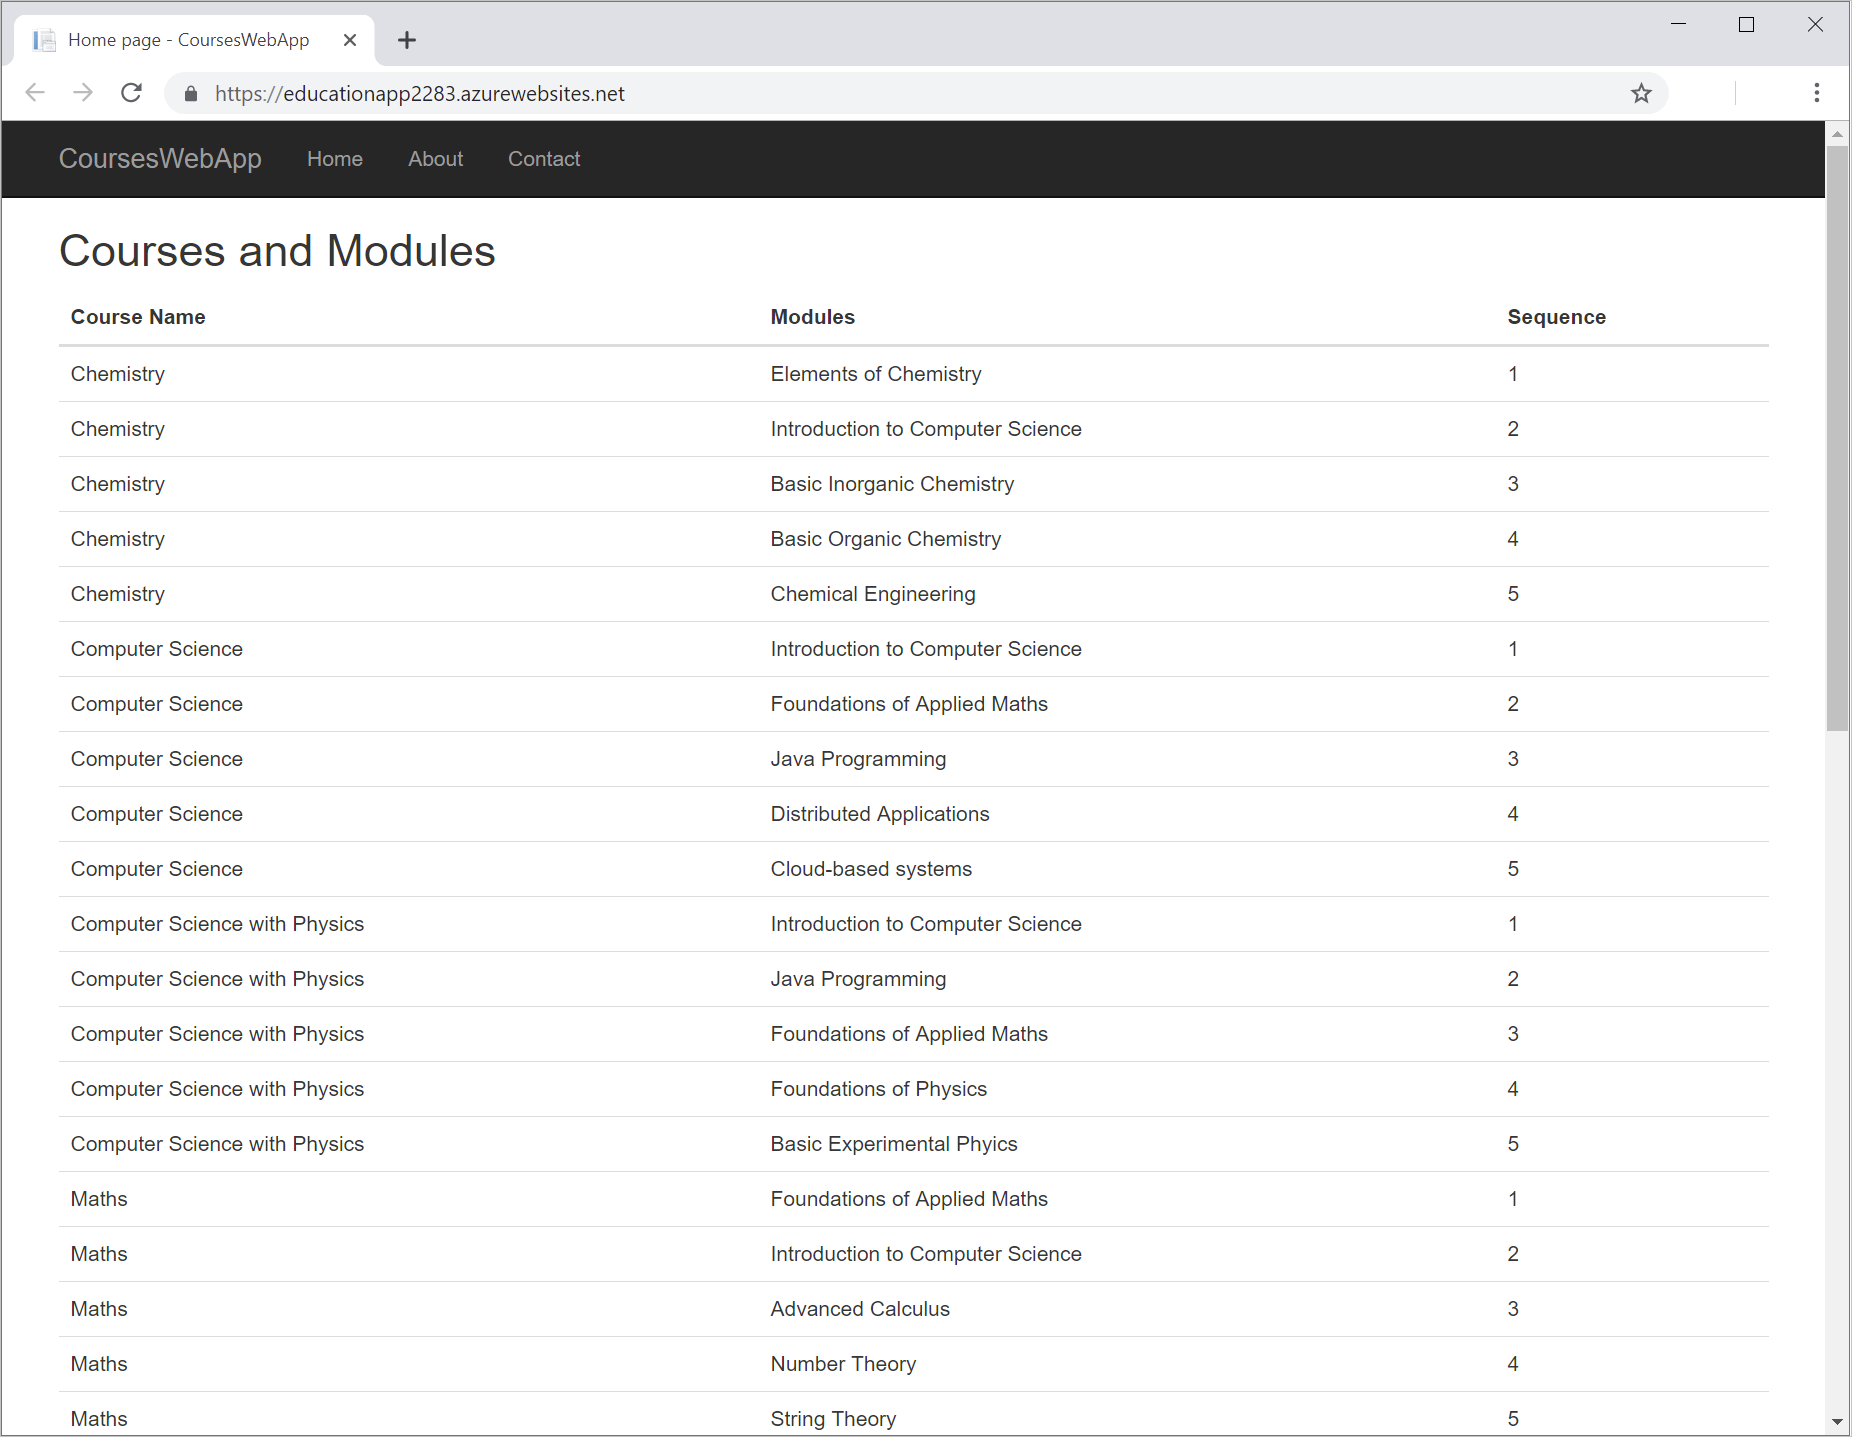
educationfolder.cd ~/educationRun the following commands to build and deploy the updated web app.
az webapp up \
    --resource-group <rgn>[Sandbox resource group]</rgn> \
    --name $WEBAPPNAME
After the new web app is deployed, select the link for the app. It should now display a list of courses and modules with the data that's stored in the database.