Connect to and query MySQL - Flexible Server from your application
Azure Database for MySQL - Flexible Server provides you with the flexibility to develop applications using your favorite tools, languages, and frameworks. You can continue to use powerful development tools like Visual Studio Code and GitHub and develop using any programming language like PHP, Java, Python, Node.js, C#, Ruby, etc. You can also integrate MySQL - Flexible Server with popular Content Management Systems (CMS) like WordPress or Drupal, Learning Management Systems (LMS) like Moodle, e-commerce platforms like Magento, and so on.
Let's begin by taking a look at the various steps involved in connecting to and querying MySQL - Flexible Server from your application, developed in the language of your choice.
Step 1 - Obtain connection information
The first step is to obtain the connection information you need to connect to Azure Database for MySQL - Flexible Server. You'll need the server name, database name, and sign in credentials.
In the Azure portal, navigate to your flexible server resource and note the Server name and Server admin login name. If you forget your password, you can also reset the password from this page.
Step 2 - Obtain SSL certificate
It's recommended to secure data in transit by ensuring that your application connects to a MySQL flexible server using Secure Sockets Layer (SSL). You can download the public SSL certificate from the Networking blade in the Azure portal as shown in the following screenshot.
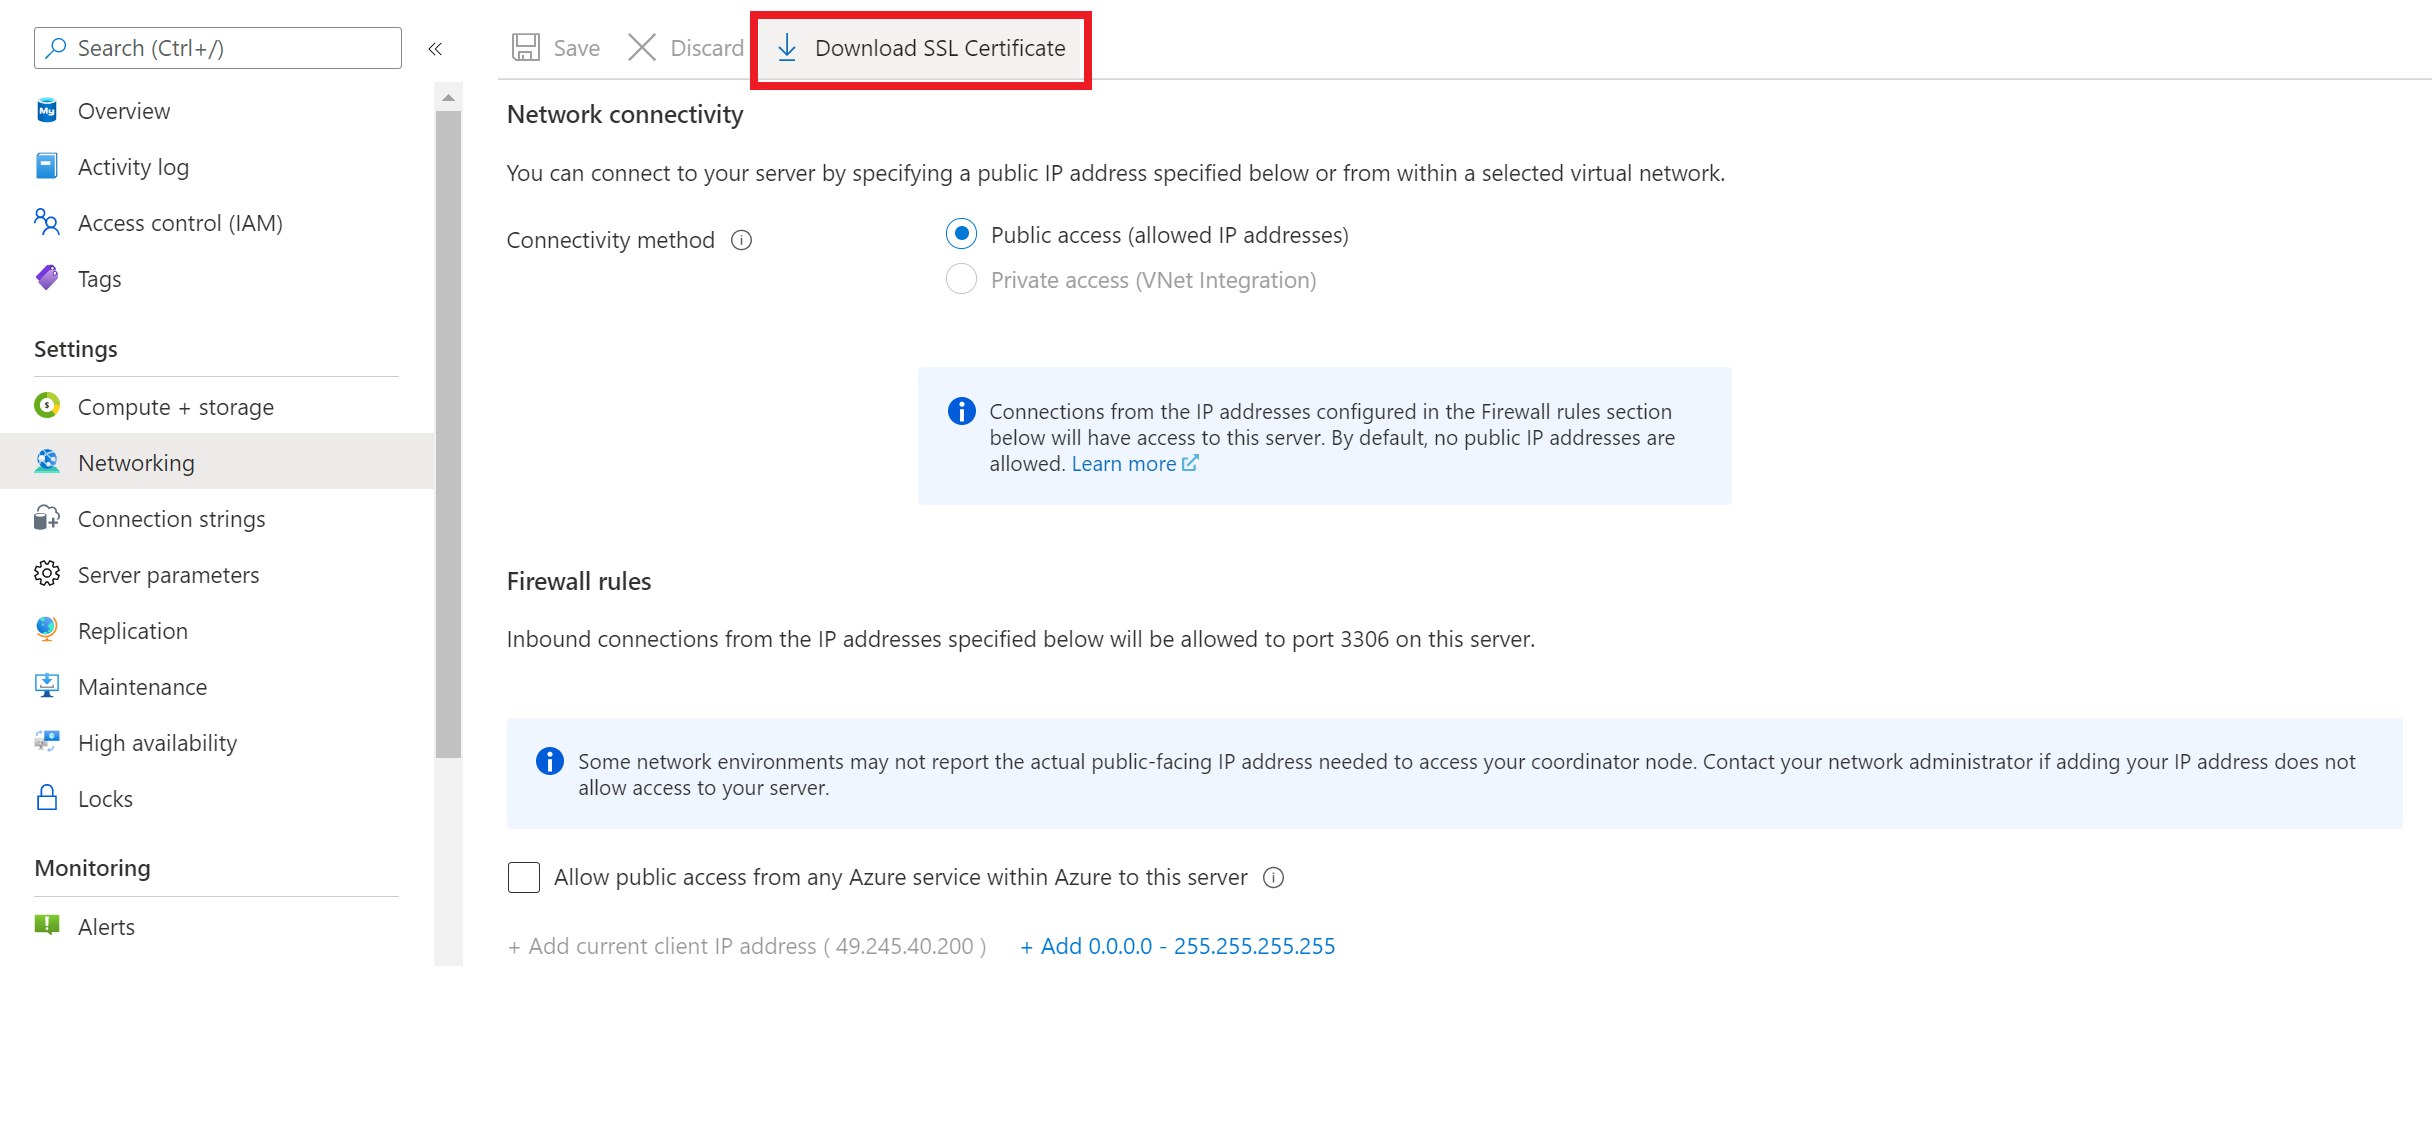
Save the certificate file to your preferred location.
MySQL connectors for PHP
To connect to MySQL from your PHP application, you can use one of the following connectors:
- MySQLi (MySQL Improved) extension
- PDO_MYSQL. PDO or PHP Data Objects extension defines an interface for accessing databases in PHP. PDO_MYSQL is a MySQL specific driver that implements the PDO interface to enable access from PHP to MySQL databases.
To use an extension, you'll need to enable it in the php.ini configuration file by uncommenting the associated line. For example, if you wanted to use MySQLi, uncomment the extension=mysqli line in the file.
Step 3 - Connect to and query MySQL - Flexible Server using PHP
For the purposes of this unit, we will showcase how to use the MySQLi extension to connect to MySQL - Flexible Server from your PHP application.
You'll also need to use the OpenSSL extension to establish an encrypted connection over SSL. As you did for MySQLi, enable the OpenSSL extension by uncommenting the extension=openssl line in the php.ini file.
Establish a connection
Below is a code snippet you can use in your PHP application to establish a connection to flexible server using MySQLi. You'll need to replace the host, username, password, and db_name parameters with your values, and then provide the path to your downloaded SSL certificate path in the mysqli_ssl_set() method.
$host = '<your_server_name>.mysql.database.azure.com';
$username = '<your_admin_username';
$password = '<your_password>';
$db_name = '<your_database_name>';

$conn = mysqli_init();
mysqli_ssl_set($conn,NULL,NULL, "<your_path_to_SSL_cert>", NULL, NULL);
mysqli_real_connect($conn, $host, $username, $password, $db_name, 3306, MYSQLI_CLIENT_SSL);
if (mysqli_connect_errno($conn)) {
    die('Failed to connect to MySQL: '.mysqli_connect_error());
}
printf("Connection Established.\n");
mysqli_init()method initializes MySQLi and returns an object for use withmysqli_real_connect()mysqli_ssl_set()is used to establish secure connections using SSL. This method takes in the path to your downloaded SSL certificate. This function does nothing unless OpenSSL extension is enabled.mysqli_real_connect()method opens a connection to a MySQL database engine. Pass the flexible server connection information as arguments to establish a connection to it.
Perform database operations
After you establish a connection to your flexible server database, use methods like mysqli_query() to perform a query. For example:
mysqli_query($conn, '
CREATE TABLE Products (
`Id` INT NOT NULL AUTO_INCREMENT ,
`ProductName` VARCHAR(200) NOT NULL ,
`Price` DOUBLE NOT NULL ,
PRIMARY KEY (`Id`)
);
')
If the query contains any variable input then use parameterized prepared statements instead. This protects against SQL injection attacks which is one of the most common techniques used by web hackers.
Below is a code snippet that inserts data into a table by using prepared statements with MySQLi.
$product_name = 'BrandNewProduct';
$product_price = 15;

//Create a prepared statement
if ($stmt = mysqli_prepare($conn, "INSERT INTO Products (ProductName, Price) VALUES (?, ?)")) {
    //Binds the parameters for each column value
    mysqli_stmt_bind_param($stmt, 'ssd', $product_name, $product_price);
    //Run the prepared statement
    mysqli_stmt_execute($stmt);
    printf("Insert: Affected %d rows\n", mysqli_stmt_affected_rows($stmt));
    //Close the prepared statement
    mysqli_stmt_close($stmt);
}
Close the connection
After you complete your database operations, it's a good practice to close the database connection using mysqli_close() method.
mysqli_close($conn);
MySQL connectors for Python
To connect to MySQL from your Python application, you can either use MySQL Connector/Python, a self-contained Python driver for communicating with MySQL servers or PyMySQL.
You can easily install these connectors using the Python package installer pip. For example, pip install mysql-connector-python
Step 3 - Connect to and query MySQL - Flexible Server using Python
In this section, we will showcase how to use MySQL Connector/Python to connect to MySQL - Flexible Server from your Python application.
Establish a connection
Below is a code snippet you can use in your Python application to establish a connection to flexible server. You will need to replace the host, user, password, and database parameters with your values, and provide the path to downloaded SSL certificate under ssl_ca option.
import mysql.connector
from mysql.connector import errorcode

# Flexible server connection information
config = {
  'host':'<your_server_name>.mysql.database.azure.com',
  'user':'<your_admin_username>',
  'password':'<your_password>',
  'database':'<your_database_name>',
  'client_flags': [mysql.connector.ClientFlag.SSL],
  'ssl_ca': '<your_path_to_SSL_cert>'
}

# Establish connection and obtain cursor object
try:
    conn = mysql.connector.connect(**config)
    print("Connection established")
except mysql.connector.Error as err:
    if err.errno == errorcode.ER_ACCESS_DENIED_ERROR:
        print("Something is wrong with the user name or password")
    elif err.errno == errorcode.ER_BAD_DB_ERROR:
        print("Database does not exist")
    else:
        print(err)
else:
    cursor = conn.cursor()
mysql.connector.connect()method sets up a connection with the MySQL server and returns a connection object. Pass the flexible server connection information object as argument to establish a connection to it.cursor()method of the connection object creates a cursor that can be used to interact with the MySQL server.
Perform database operations
After you establish a connection to your flexible server database, use the cursor object and invoke cursor.execute() method to perform any database operations. For example:
# Create table
cursor.execute("CREATE TABLE inventory (id serial PRIMARY KEY, name VARCHAR(50), quantity INTEGER);")

# Insert some data into table
cursor.execute("INSERT INTO inventory (name, quantity) VALUES (%s, %s);", ("banana", 150))
Close the connection
MySQL Connector/Python does not auto-commit transactions. So it is important to call the commit() method of the connection object, like conn.commit(), after every transaction that modifies data.
After performing all the operations, it's a good practice to close the cursor and the connection object.
cursor.close()
conn.close()
MySQL Connectors for Java
To connect to MySQL from your Java application, you can use MySQL Connector/J, a JDBC-compatible API that natively implements the MySQL protocol in Java, rather than utilizing client libraries. You can install MySQL Connector/J from a Binary Distribution or using Apache Maven dependencies manager.
Alternatively, you can also use frameworks like Spring Data JPA to connect to MySQL from Java.
Step 3 - Connect to and query MySQL - Flexible Server using Java
In this section, we will showcase how to use MySQL Connector/J to connect to MySQL - Flexible Server from your Java application.
Store connection information
It is a good practice to create an application.properties file in the resources section of your source code to store the flexible server connection information.
url=jdbc:mysql://<your_server_name>.mysql.database.azure.com:3306/<your_database_name>?serverTimezone=UTC
user=<your_admin_username>
password=<your_password>
Establish a connection
When you are using JDBC outside of an application server, the DriverManager class in java.sql package manages the establishment of connections. To connect to your MySQL flexible server, first load the connection properties from application.properties file, and invoke DriverManager's getConnection() method by passing these connection properties to it.
import java.sql.*;

public class DemoApplication {

    public static void main(String[] args) throws Exception {

        //Load application properties
        Properties properties = new Properties();
        properties.load(DemoApplication.class.getClassLoader().getResourceAsStream("application.properties"));

        //Establish Connection to database
        Connection connection = DriverManager.getConnection(properties.getProperty("url"), properties);

        .
        .

    }
}
Perform database operations
After you've established a connection and obtained the Connection object, you can call the createStatement() method on the object to create a Statement object.
After you have a Statement instance, you can execute a SELECT query by calling the executeQuery(String) method with the SQL you want to use. To update data in the database, use the executeUpdate(String SQL) method.
For example:
Statement statement = connection.createStatement();
statement.execute("CREATE TABLE inventory (id serial PRIMARY KEY, name VARCHAR(50), quantity INTEGER)");
statement.executeUpdate("INSERT INTO inventory (name, quantity) VALUES (\"banana\", 150)");
ResultSet resultSet = statement.executeQuery("SELECT * FROM inventory");
If the query contains any variable input, then parameterized prepared statements should be used instead. This protects against SQL injection attacks which is one of the most common techniques used by web hackers. To use prepared statements, you can call the prepareStatement() method on the Connection object to create a PreparedStatement object, bind the parameters and run the prepared statement using executeUpdate() method.
Close the connection
After you complete your database operations, it's a good practice to close the database connection using the close() method of the connection object. For example, connection.close();