Exercise: Create a production order
Read this first - before you start the lab!
Important
For this lab, you CANNOT sign in with your own credentials. Use the following steps to sign in to your lab environment with the correct credentials.
Select Launch VM mode or Sign in to launch VM mode in this unit.
In the Resources tab on the lab side bar, select the T icon next to Password in the MININT box, to have the administrator password for the Virtual Machine entered for you.
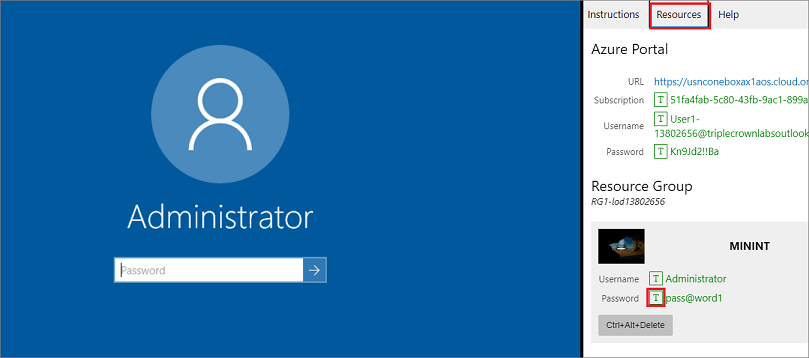
Press Enter.
In the Networks window that opens, select No to not allow your PC to be discoverable.
You'll see a PowerShell window and a Windows Command window appear. After about two to three minutes, they'll close and Microsoft Edge will open automatically. Wait for it to navigate to the Sign in page for finance and operations.
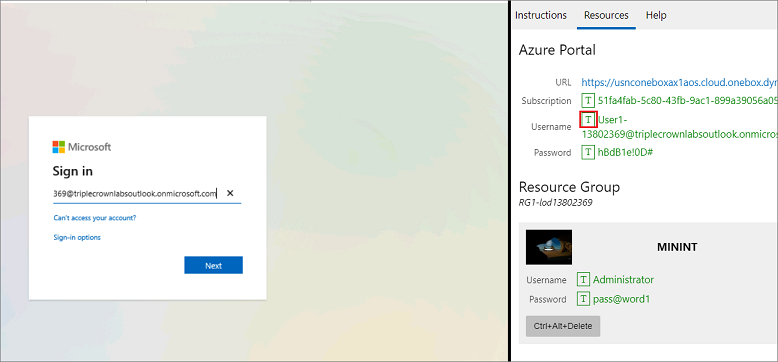
On the Microsoft Sign in page in finance and operations, insert your mouse cursor into the Username field.
On the Resources tab of the lab side bar, below the Azure portal heading, select the T icon next to Username, then press Enter.
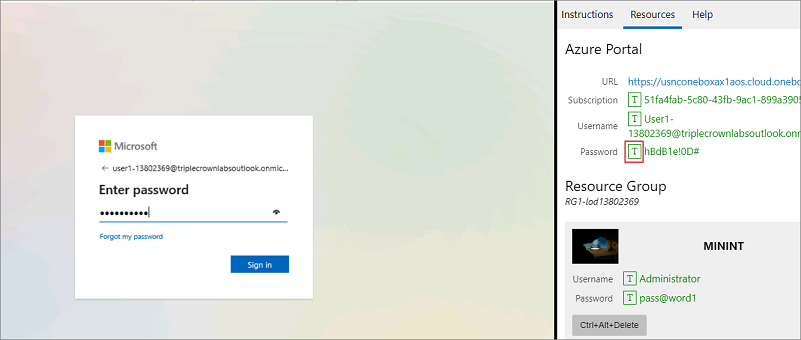
Your mouse cursor will now be in the Password page.
On the Resources tab of the lab side bar, below the Azure portal heading, select the T icon next to select Password, then press Enter.
Don't stay signed in, or store the password on the virtual machine.
To see the lab instructions, select the Instructions tab on the lab side bar.
You can now begin your work on this lab.
Objective
Production orders help to initiate the production process in Supply Chain Management. In this lab, you become familiar with the user interface and functionality of the Production order form. Also, you learn how to create a production order by the end of the exercise.
Lab steps
On the Finance and Operations home page, in the top right, verify you're working with the USMF company.
If necessary, select the company and from the menu, select USMF.
In the left navigation pane, select Modules > Production control > Production orders > All production orders.
On the top menu, select New production order.
Under IDENTIFICATION, in the Item number box, enter D0001.
In the Quantity box, enter 20.
Under PRODUCTION, in the Delivery box, select a date one month from today's date.
The delivery date indicates when the production order should end to deliver on time. This date can be used in the scheduling process. For example, you can schedule the order backward from the delivery date.
Under BOM/ROUTE, the BOM number field automatically displays the number of any active BOM for the current item, but you can change the BOM for the production order by selecting an active BOM from the list of approved BOM versions. The Route number field automatically displays the number of any active Route for the current item, but you can change the Route for the production order by selecting an active Route from the list of approved Route versions.
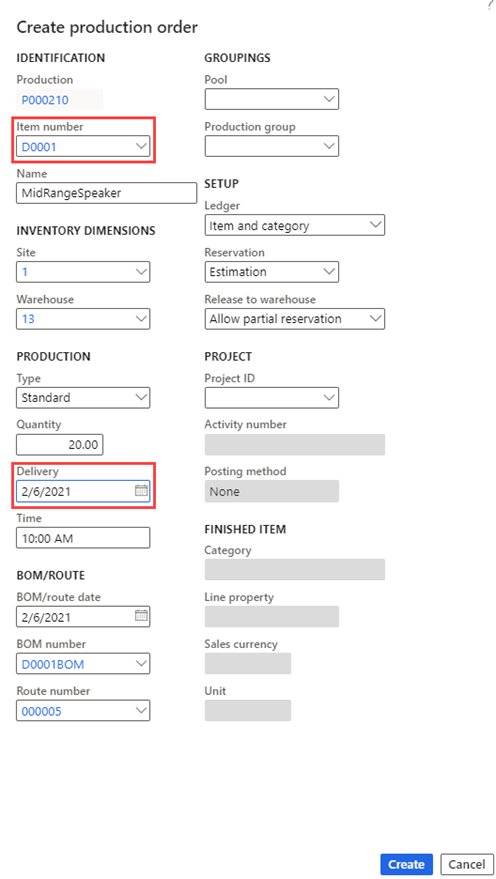
- Select Create.
Close the lab environment
- Select Done in the Instructions pane in the lab side bar.
- In the Lab is complete window, select Continue, and then select Leave to return to the next unit in the module.